

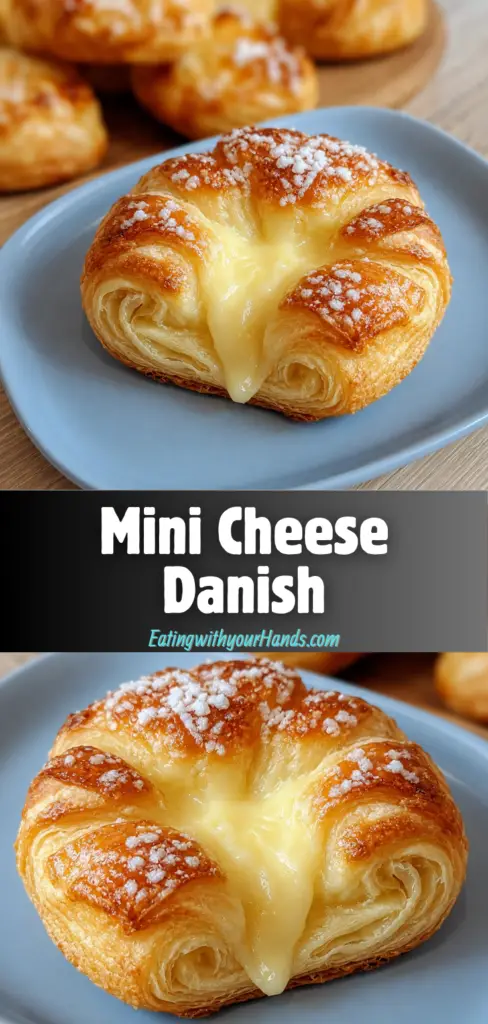
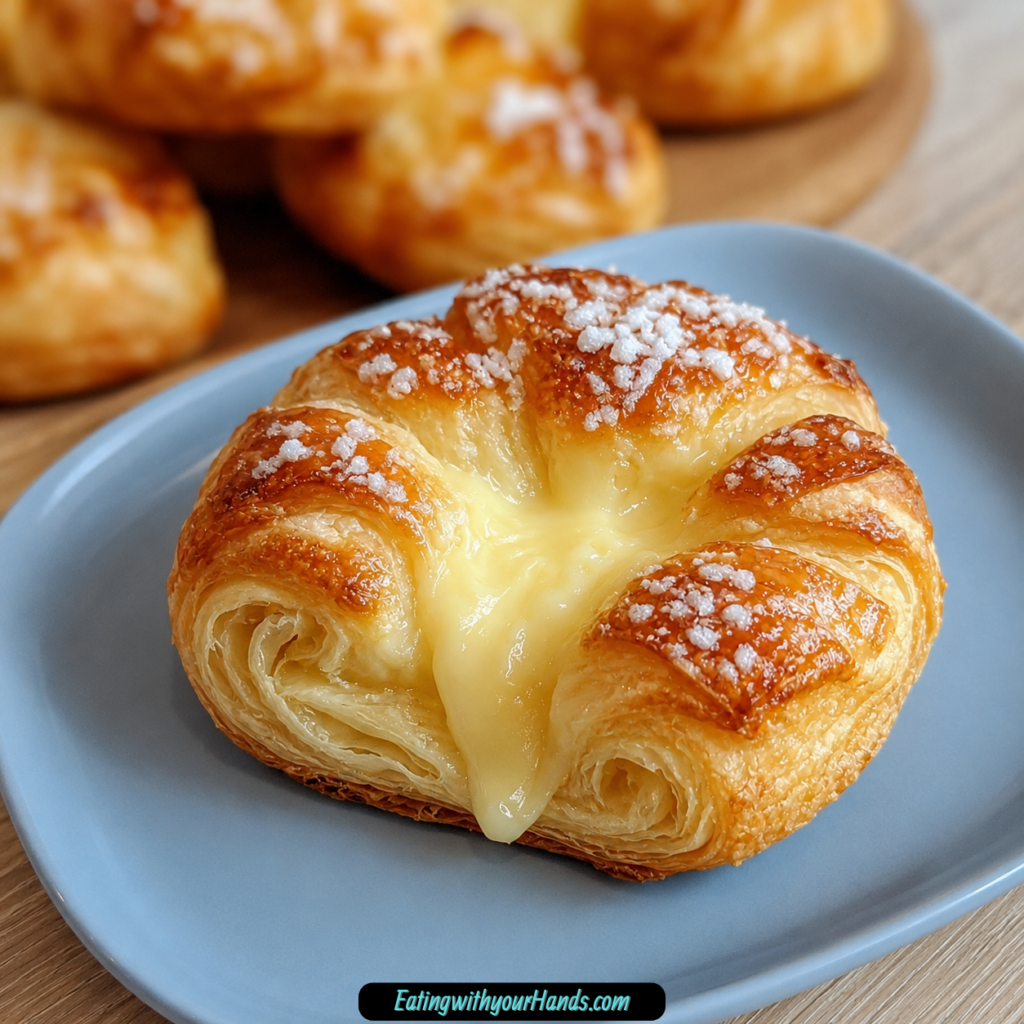
Some pastries have a way of making an ordinary morning feel like a small celebration. Mini Cheese Danish is one of those sweet, flaky treats that brings warmth to the kitchen before the first bite is even taken.
I always think of these little pastries as the kind of recipe that belongs to slow mornings, family brunches, and tables where people naturally reach for just one more. They are simple enough to make with store-bought puff pastry, but they still feel special because of the creamy filling, golden layers, and sweet glaze drizzled over the top.
There is something nostalgic about the smell of puff pastry baking in the oven. It fills the kitchen with that buttery, bakery-style aroma that can make even the sleepiest morning feel inviting.
The filling is smooth, sweet, and lightly bright from vanilla and optional lemon juice. It sits in the center of each pastry, wrapped in flaky layers that puff beautifully as they bake.
These Mini Cheese Danish are perfect for brunch, weekend breakfasts, spring or summer gatherings, or any time you want a treat that feels homemade without being overly complicated. They are also easy to customize with fruit preserves, flavored extracts, spices, chocolate chips, or nuts.
What makes this recipe especially lovable is its balance of ease and charm. With just a few simple ingredients, you can make a tray of pastries that feel cozy, pretty, and full of that homemade sweetness people remember.
Table of Contents
- Why You’ll Love This Mini Cheese Danish Recipe
- Recipe Details
- Ingredients You’ll Need
- A Closer Look at the Ingredients
- The Sweet Memory Behind These Pastries
- Directions
- Step 1: Preheat the Oven
- Step 2: Prepare the Baking Sheet
- Step 3: Keep the Puff Pastry Cold
- Step 4: Roll Out the Puff Pastry
- Step 5: Cut the Pastry into Squares
- Step 6: Soften the Cream Cheese
- Step 7: Add the Sugar
- Step 8: Add the Vanilla Extract
- Step 9: Add the Optional Lemon Juice
- Step 10: Mix the Filling Until Smooth
- Step 11: Place Filling in the Center of Each Square
- Step 12: Fold the Corners Toward the Center
- Step 13: Pinch the Edges to Seal
- Step 14: Arrange the Pastries on the Baking Sheet
- Step 15: Brush with Beaten Egg
- Step 16: Bake the Mini Cheese Danish
- Step 17: Let the Pastries Cool Slightly
- Step 18: Make the Glaze
- Step 19: Drizzle the Glaze
- Step 20: Serve Warm
- Helpful Tips for the Best Mini Cheese Danish
- Variations
- Serving Suggestions
- Storage Tips
- Freezing Instructions
- Make-Ahead Notes
- Frequently Asked Questions
- Final Thoughts
- Mini Cheese Danish
Why You’ll Love This Mini Cheese Danish Recipe
Mini Cheese Danish is quick and easy to prepare, taking about 35 minutes from start to finish. That makes it a wonderful option when you want something sweet but do not want to spend all morning baking.
The recipe uses minimal ingredients. Puff pastry, cream cheese, sugar, vanilla, lemon juice, egg, powdered sugar, and milk come together into something that tastes much more special than the ingredient list suggests.
These pastries are perfect for family gatherings, brunches, holidays, cozy weekends, or casual mornings when you want to make the table feel a little sweeter. They look beautiful on a platter and are easy for guests to pick up and enjoy.
They are freezer-friendly, too. You can assemble them ahead of time, freeze them, and bake them fresh when you need them.
They are also easy to customize. A spoonful of raspberry or apricot preserves, a different extract, a little cinnamon, or a dusting of powdered sugar can change the mood of the whole batch.
Most of all, they are kid-friendly and crowd-pleasing. Flaky pastry and creamy sweet cheese filling are hard to resist.
Recipe Details
- Recipe name: Mini Cheese Danish
- Main pastry: Store-bought puff pastry
- Filling: Cream cheese, sugar, vanilla extract, and optional lemon juice
- Glaze: Powdered sugar and milk
- Texture: Flaky, creamy, golden, soft in the center, and lightly crisp around the edges
- Prep and bake time: About 35 minutes total
- Oven temperature: 400°F (200°C)
- Pastry size: About 3-inch by 3-inch squares
- Approximate yield: Around 12 squares from one package of puff pastry
- Best served: Warm, straight from the oven, or slightly cooled
- Storage: Refrigerate leftovers for up to 3 days
- Freezer-friendly: Yes, up to 1 month
- Serving ideas: Fresh fruit, jam, powdered sugar, coffee, tea, or a brunch spread
Ingredients You’ll Need
For the Pastries
- 1 package of puff pastry
- 8 oz cream cheese
- ¼ cup granulated sugar
- 1 teaspoon vanilla extract
- 1 tablespoon lemon juice, optional
- 1 beaten egg
For the Glaze
- 1 cup powdered sugar
- 1 tablespoon milk
A Closer Look at the Ingredients
Puff pastry is the base of this recipe, and store-bought puff pastry keeps the process easy. Keep it cold until you are ready to use it, because chilled puff pastry is easier to handle and bakes up better.
Cream cheese creates the smooth, rich filling. It should be softened before mixing so it blends easily with the sugar and vanilla.
Ricotta can be used as a lighter option if you want to change the filling texture. It will not be exactly the same as cream cheese, but it can still make a delicious pastry.
Granulated sugar sweetens the filling without making it overly heavy. You can also substitute a sugar alternative like erythritol if desired.
Vanilla extract gives the filling a warm, familiar sweetness. Pure vanilla extract gives the best flavor, while imitation vanilla will not taste as rich.
Lemon juice is optional, but it adds brightness. It keeps the filling from tasting too flat and pairs beautifully with the sweet glaze.
A beaten egg is brushed over the pastry before baking. This helps create that lovely golden color on top.
Milk can be used instead of the beaten egg if needed. It is also used in the glaze to turn powdered sugar into a smooth drizzle.
Powdered sugar creates the glaze. It dissolves easily and gives the pastries that sweet, pretty finish.
The Sweet Memory Behind These Pastries
Mini Cheese Danish feels like a recipe made for sharing. There is something about small pastries that makes people gather around the plate, choosing the prettiest one, taking a bite, and smiling before they even say anything.
These pastries carry that grandmother’s-kitchen feeling from the original story. They remind you of lazy Sunday mornings, when the smell of baking pastry could pull everyone toward the kitchen without anyone needing to call.
The filling is simple, but it tastes comforting. Cream cheese, sugar, vanilla, and lemon create a soft center that feels sweet, creamy, and familiar.
The puff pastry gives the recipe its charm. It bakes into delicate layers that feel crisp at the edges and tender near the filling.
The glaze is the final touch. It adds sweetness, shine, and that little bakery-style finish that makes the pastries feel complete.
Directions
Step 1: Preheat the Oven
Preheat your oven to 400°F (200°C). A hot oven is important for puff pastry because it helps the layers rise and turn golden.
If the oven is not hot enough, the pastry may not puff as nicely. Starting at the correct temperature gives the Mini Cheese Danish the best texture.
While the oven preheats, prepare your baking sheet and ingredients. This keeps the process smooth once the puff pastry is out of the refrigerator.
Step 2: Prepare the Baking Sheet
Line a baking sheet with parchment paper. This helps prevent sticking and makes cleanup easier.
Puff pastry can release a little butter as it bakes, so parchment is helpful. It also makes it easier to remove the pastries once they are done.
Set the prepared baking sheet aside. You will transfer the assembled Danish onto it before baking.
Step 3: Keep the Puff Pastry Cold
Take the puff pastry out of the refrigerator only when you are ready to work with it. Puff pastry performs best when it stays cold.
If it becomes too warm, it can get sticky and harder to shape. Warm pastry may also lose some of its lift in the oven.
Work gently and quickly. You do not need to rush, but try not to leave the pastry sitting out too long.
Step 4: Roll Out the Puff Pastry
Unroll the puff pastry on a clean, lightly floured surface. Sprinkle just enough flour to prevent sticking.
Use a rolling pin to gently roll the pastry until it is about ⅛ inch thick. Do not press too hard, because you do not want to crush the layers.
The pastry does not need to look perfect. A little rustic shape gives the pastries homemade character.
Step 5: Cut the Pastry into Squares
Cut the rolled pastry into squares that are about 3 inches by 3 inches. You should get around 12 squares from one package.
Try to keep the squares close in size so they bake evenly. If some are slightly uneven, that is fine.
Use a sharp knife or pastry cutter for clean edges. Clean cuts help the pastry puff better as it bakes.
Step 6: Soften the Cream Cheese
Make sure the cream cheese is softened before making the filling. Soft cream cheese blends much more easily.
If the cream cheese is too cold, the filling may turn lumpy. A smooth filling gives the Danish a better texture.
Place the softened cream cheese in a mixing bowl. It will become the creamy base of the filling.
Step 7: Add the Sugar
Add ¼ cup granulated sugar to the cream cheese. Stir or beat until the sugar begins to blend into the cheese.
The sugar sweetens the filling and helps make it taste like a classic cheese Danish. It should be fully incorporated.
If using a sugar alternative like erythritol, mix it in the same way. The goal is a smooth, sweet filling.
Step 8: Add the Vanilla Extract
Add 1 teaspoon vanilla extract to the cream cheese mixture. Use pure vanilla extract if possible for the best flavor.
Vanilla gives the filling warmth and depth. It makes the pastry smell even sweeter as it bakes.
Mix until the vanilla is evenly blended. The filling should begin to look creamy and smooth.
Step 9: Add the Optional Lemon Juice
Add 1 tablespoon lemon juice if you want a brighter filling. This step is optional, but it adds a fresh note.
The lemon juice helps balance the richness of the cream cheese. It gives the filling a little lift without making it taste sour.
Stir until the lemon juice is fully mixed in. The filling should remain smooth and spreadable.
Step 10: Mix the Filling Until Smooth
Use a hand mixer or a sturdy spatula to mix the filling until completely smooth. Take your time so there are no visible lumps.
The filling should be creamy, slightly thick, and easy to spoon. It should taste sweet with a soft vanilla flavor.
You can taste a tiny bit to check the sweetness. This filling is the center of the Danish, so it should be delicious before it ever goes into the pastry.
Step 11: Place Filling in the Center of Each Square
Spoon a small amount of the cream cheese filling into the center of each pastry square. Do not overfill.
Too much filling can ooze out while baking. A modest spoonful gives you the creamy center without making the pastries hard to seal.
Try to divide the filling evenly between the squares. This helps each Mini Cheese Danish bake and taste consistently.
Step 12: Fold the Corners Toward the Center
Fold the corners of each pastry square toward the center, covering part of the filling. Bring them in gently so the pastry keeps its shape.
The goal is to create a little pastry bundle with the cheese filling tucked inside. Some filling may still show, which is perfectly fine.
If you want a different look, you can twist the corners slightly. This gives the Danish a more decorative shape.
Step 13: Pinch the Edges to Seal
Pinch the edges of the folded pastry to seal them tightly. This helps keep the filling from leaking too much during baking.
Do not press the entire pastry flat. Just seal the edges and corners where needed.
A good seal makes the pastries neater. It also helps the center stay creamy instead of spilling onto the baking sheet.
Step 14: Arrange the Pastries on the Baking Sheet
Place the assembled pastries on the parchment-lined baking sheet. Leave a little space between each one.
Puff pastry expands as it bakes, so the pastries need room. If they are too close together, they may puff into each other.
Arrange them evenly on the pan. This helps them bake at the same pace.
Step 15: Brush with Beaten Egg
Brush the tops of the pastries with the beaten egg. This gives them a beautiful golden color as they bake.
Use a light hand so you do not press down the pastry. A thin coating is enough.
If you are replacing the egg with milk, brush the tops with milk instead. It will still help the pastry brown, though the finish may look slightly different.
Step 16: Bake the Mini Cheese Danish
Place the baking sheet in the preheated oven. Bake for about 15 minutes.
The pastries are ready when they are puffed and golden brown. Keep an eye on them near the end because puff pastry can go from perfect to overly browned quickly.
The filling should look set, and the pastry should feel crisp and flaky. Remove them from the oven once they are beautifully golden.
Step 17: Let the Pastries Cool Slightly
Allow the Mini Cheese Danish to cool for a few minutes after baking. The filling will be hot right out of the oven.
Cooling briefly also helps the pastries set. They will be easier to move and glaze.
They do not need to cool completely before glazing, but they should not be burning hot. Slightly warm pastries are perfect for a sweet drizzle.
Step 18: Make the Glaze
In a small bowl, combine 1 cup powdered sugar with 1 tablespoon milk. Stir until smooth.
The glaze should be drizzle-able but not too thin. If it feels too thick, add a tiny bit more milk very slowly.
Use regular milk or a dairy-free option such as almond milk or oat milk. Both can work well for the glaze.
Step 19: Drizzle the Glaze
Drizzle the glaze over the slightly cooled pastries. Let it fall naturally over the tops for a pretty finish.
You can use a spoon for a rustic drizzle. You can also transfer the glaze to a small bag and snip the corner if you want thinner lines.
The glaze adds sweetness and makes the Mini Cheese Danish look finished. It also gives each bite that bakery-style touch.
Step 20: Serve Warm
Serve the Mini Cheese Danish warm for the best experience. The pastry will be flaky, the filling will be creamy, and the glaze will be soft.
They are wonderful on a brunch table with fresh fruit or jam. They also pair beautifully with coffee or tea.
For a special touch, dust them with powdered sugar just before serving. This makes them look even more inviting.
Helpful Tips for the Best Mini Cheese Danish
Keep the puff pastry cold until you are ready to use it. Cold pastry is easier to shape and bakes into better layers.
Do not overfill the pastry squares. A small spoonful of filling is enough for each Danish.
Seal the edges well so the filling does not ooze out too much. A little leakage can happen, but careful sealing helps.
Use softened cream cheese for a smooth filling. Cold cream cheese can leave lumps.
Watch the pastries closely near the end of baking. Puff pastry browns quickly once it starts turning golden.
Add the glaze after the pastries cool slightly. If they are too hot, the glaze may melt and run off too fast.
Variations
Add a spoonful of fruit preserves, such as raspberry or apricot, for a fruity twist. Place it with the cream cheese filling before folding the pastry.
Try flavored extracts such as almond or orange. These can give the filling a unique taste.
Use gluten-free puff pastry for a gluten-free version if available at specialty stores. This keeps the recipe style similar while adjusting for gluten-free needs.
Make the filling lighter by swapping cream cheese for Greek yogurt. You can also use a dairy-free cream cheese alternative if needed.
Add cinnamon or nutmeg to the filling for warmth. This makes the pastries feel especially cozy.
If you do not have puff pastry, crescent roll dough can work in a pinch. The texture will be different, but the idea still works.
Add chocolate chips or chopped nuts to the filling for a surprise. This gives the pastries extra texture and flavor.
Try different fruit toppings after glazing for a seasonal twist. This is especially nice in spring and summer.
Serving Suggestions
Mini Cheese Danish are best served warm, straight from the oven or shortly after glazing. The pastry is flakiest when fresh.
They make a beautiful addition to a brunch spread. Serve them with fresh fruit, coffee, tea, or juice.
You can also serve them with a side of jam for extra sweetness. Raspberry or apricot flavors work especially well with cream cheese.
For a pretty finish, dust the pastries with powdered sugar just before serving. This is simple but makes the plate look special.
They are also lovely for a cozy weekend treat. A warm Danish with a cup of coffee can make an ordinary morning feel slower and sweeter.
Storage Tips
Store leftover Mini Cheese Danish in an airtight container in the refrigerator for up to 3 days. Let them cool before storing.
Because the filling contains cream cheese, refrigeration is best. This helps keep the pastries fresh.
The pastry will soften slightly after storage. Reheating helps bring back some warmth and texture.
To reheat, place them in the oven at 350°F (175°C) for about 5-7 minutes. This warms the filling and refreshes the pastry.
Avoid reheating too long, or the pastry can become overly dry. A short warm-up is enough.
Freezing Instructions
Mini Cheese Danish can be frozen for up to 1 month. They freeze especially well after assembly and before baking.
After assembling the pastries, place them on a baking sheet and freeze until solid. Once frozen, transfer them to an airtight container or freezer bag.
When ready to bake, place them in the oven directly from the freezer. Add a few extra minutes to the baking time.
You can also freeze leftovers, but the best texture comes from freezing before baking. Freshly baked pastry always has the best flakiness.
Make-Ahead Notes
This recipe is great for making ahead because the pastries can be assembled and frozen. That means you can have fresh Mini Cheese Danish without starting from scratch.
You can also mix the cream cheese filling ahead of time and store it covered in the refrigerator. Let it soften slightly before using so it spreads easily.
If preparing for brunch, cut the pastry and make the filling ahead, then assemble shortly before baking. This keeps the pastry as cold and flaky as possible.
Wait to make the glaze until the pastries are baking or cooling. Fresh glaze has the best texture for drizzling.
Frequently Asked Questions
Can I Freeze Mini Cheese Danish?
Yes, Mini Cheese Danish can be frozen. After assembling the pastries, place them on a baking sheet and freeze until solid.
Once frozen, transfer them to an airtight container or freezer bag. They can be stored in the freezer for up to 1 month.
Can I Bake Them from Frozen?
Yes, you can bake them directly from frozen. Place the frozen pastries on a prepared baking sheet and bake as directed.
Add a few extra minutes to the baking time. Watch for the pastry to become puffed and golden.
What Can I Substitute for Cream Cheese?
Ricotta cheese can be used for a lighter option. Greek yogurt can also be used for a tangier filling.
Dairy-free cream cheese is another good substitute if you are avoiding dairy. Choose one with a texture similar to cream cheese for the best result.
How Do I Make Mini Cheese Danish Dairy-Free?
Use a dairy-free cream cheese alternative for the filling. Cashew-based or almond-based cream alternatives can work well.
For the glaze, use plant-based milk such as almond milk or oat milk. You can also brush the pastry with milk instead of egg if needed.
Can I Use Crescent Roll Dough Instead of Puff Pastry?
Yes, crescent roll dough works in a pinch. The texture will not be as flaky as puff pastry, but it can still make a tasty sweet pastry.
Keep in mind that the shape and baking time may vary slightly. Watch closely while baking.
Can I Add Fruit Preserves?
Yes, fruit preserves are a wonderful addition. Raspberry and apricot are both suggested options.
Add a small spoonful with the cream cheese filling before folding the pastry. Do not add too much, or it may leak during baking.
Can I Make These Gluten-Free?
Yes, use gluten-free puff pastry if you can find it at a specialty store. This is the easiest way to keep the recipe close to the original.
Make sure the other ingredients are also gluten-free if needed. Always check labels when baking for dietary needs.
How Do I Keep the Filling from Leaking?
Do not overfill the pastry squares, and pinch the edges tightly to seal. A small amount of filling in the center is enough.
Make sure the pastry stays cold while assembling. Warm pastry can be harder to seal and may spread more during baking.
Final Thoughts
Mini Cheese Danish is the kind of recipe that makes homemade baking feel joyful and approachable. It starts with store-bought puff pastry, but the creamy filling and sweet glaze make each little pastry feel special.
The combination of flaky pastry, smooth cream cheese, vanilla, optional lemon, and powdered sugar glaze creates a treat that feels nostalgic and comforting. It is simple enough for a weekend morning but pretty enough for brunch or a special gathering.
What makes these pastries so memorable is not just their flavor. It is the way they fill the kitchen with a bakery-like aroma and bring people toward the table with smiles.
Whether you serve them warm with coffee, add fruit preserves for a seasonal twist, or freeze a batch for later, these Mini Cheese Danish are the kind of sweet little recipe that can become part of your own family traditions.
Mini Cheese Danish

These Mini Cheese Danish pastries are sweet, flaky, and filled with a smooth cream cheese center. Store-bought puff pastry keeps the recipe simple, while the vanilla cream cheese filling and powdered sugar glaze give each Danish a bakery-style finish. They are perfect for dessert, brunch, breakfast trays, coffee breaks, or anytime you want a small homemade pastry without making dough from scratch.
Recipe Details
- Prep Time: 20 minutes
- Cook Time: 15 minutes
- Total Time: 35 minutes
- Course: Dessert
- Cuisine: American
- Servings: 12 Danish
- Calories: 200 kcal
Equipment
- Oven
- Baking sheet
Ingredients
For the Filling
- 1 tablespoon Lemon Juice optional
- ¼ cup Granulated Sugar can substitute with sugar alternative
- 1 teaspoon Vanilla Extract use pure extract for best flavor
- 8 oz Cream Cheese softened
For the Glaze
- 1 tablespoon Milk dairy-free options available
- 1 beaten egg Egg can be replaced with milk
- 1 cup Powdered Sugar no direct replacement
For the Pastry
- 1 package Puff Pastry store-bought
Instructions
Step 1: Preheat the Oven
Preheat your oven to 400°F (200°C).
Step 2: Cut the Puff Pastry
Roll out the puff pastry on a lightly floured surface if needed.
Cut it into even squares.
Step 3: Make the Cream Cheese Filling
In a bowl, combine the cream cheese, granulated sugar, vanilla extract, and lemon juice.
Mix until the filling is smooth and creamy.
Step 4: Fill the Pastry Squares
Place a spoonful of the cream cheese filling in the center of each puff pastry square.
Step 5: Fold and Seal
Fold the corners of each pastry square over the filling.
Press gently to seal so the Danish holds its shape while baking.
Step 6: Brush and Bake
Brush the pastry with the beaten egg or milk.
Bake for 15 minutes, or until the pastries are puffed and golden.
Step 7: Make the Glaze
Mix the powdered sugar with the milk until smooth.
Adjust slightly if needed to reach a drizzleable consistency.
Step 8: Glaze and Serve
Drizzle the glaze over the warm pastries.
Serve fresh while the Danish pastries are flaky and tender.
Notes
You can add fruit preserves for extra flavor or use different extracts for variation.
Serving Suggestions
These mini cheese Danish pastries pair well with:
- Hot coffee
- Iced coffee
- Black tea
- Fresh berries
- Brunch casseroles
- Fruit salad
- Warm milk
Storage
How to Store
Store leftovers in an airtight container at room temperature for short-term storage or in the refrigerator for longer freshness.
How to Reheat
Warm gently in the oven or air fryer for a few minutes to bring back some of the flaky texture. Avoid overheating so the glaze does not melt too much.

Fernando is the creator and writer behind the food blog Eating with your Hands. Living and working in cities like Paris, Barcelona, and Berlin, and being married to a Canadian foodie, has given Fernando a passion and interest in food and inspired him to run EWYH.