

Apple & Cheese Danishes are the kind of pastry that can make an ordinary morning feel softer, sweeter, and a little more special. With flaky puff pastry, tender diced apples, warm cinnamon, and a creamy cheese filling tucked inside each golden parcel, these danishes bring together comfort and elegance in the easiest possible way.
There is something deeply nostalgic about the smell of apples baking with cinnamon. It is the kind of aroma that fills the kitchen slowly, then settles into every corner of the house like a quiet invitation to gather.
For me, these danishes feel like a small piece of home wrapped in buttery pastry. They bring back the image of a grandmother’s kitchen, where puff pastry was rolled out with care, cream cheese was softened on the counter, and diced apples waited in a bowl with sugar and spice.
That is the charm of this recipe. It feels warm, personal, and homemade, yet it does not require complicated pastry skills or hours of preparation.
You begin with one sheet of thawed puff pastry, a few Granny Smith apples, softened cream cheese, sugar, cinnamon, and an egg wash. From there, the recipe turns simple ingredients into golden, bakery-style danishes that look impressive but are surprisingly easy to make.
These Apple & Cheese Danishes are perfect for weekend brunch, holiday mornings, casual desserts, afternoon coffee, or any day when you want something sweet without making an entire cake or pie. They are flaky on the outside, creamy in the center, and filled with the sweet-tart flavor of apples.
The best part is how flexible they are. You can keep them classic, add a little lemon juice, use pears instead of apples, sprinkle in nuts, or dust them with powdered sugar before serving.
This is the kind of recipe that invites you to enjoy the process. Rolling, filling, folding, brushing, baking, and finally watching the pastry puff into golden layers makes the kitchen feel alive.
Table of Contents
- What Are Apple & Cheese Danishes?
- Recipe Overview
- Why You’ll Love Apple & Cheese Danishes
- Ingredients You’ll Need
- Optional Add-Ins and Substitutions
- Directions
- Step 1: Preheat the Oven
- Step 2: Prepare the Baking Sheet
- Step 3: Thaw the Puff Pastry
- Step 4: Lightly Flour the Surface
- Step 5: Roll Out the Puff Pastry
- Step 6: Cut the Pastry into Squares
- Step 7: Prepare the Apples
- Step 8: Soften the Cream Cheese
- Step 9: Combine the Filling Ingredients
- Step 10: Taste the Filling
- Step 11: Add Optional Flavorings
- Step 12: Place Filling on Each Pastry Square
- Step 13: Fold the Corners
- Step 14: Pinch to Seal
- Step 15: Transfer to the Baking Sheet
- Step 16: Prepare the Egg Wash
- Step 17: Brush the Danishes
- Step 18: Bake the Danishes
- Step 19: Watch for Browning
- Step 20: Remove from the Oven
- Step 21: Cool Before Serving
- Step 22: Add Optional Finishing Touches
- Serving Suggestions
- Storage Tips
- Variations
- Common Mistakes
- Helpful Notes
- Frequently Asked Questions
- Final Thoughts
- Apple and Cheese Danishes
What Are Apple & Cheese Danishes?
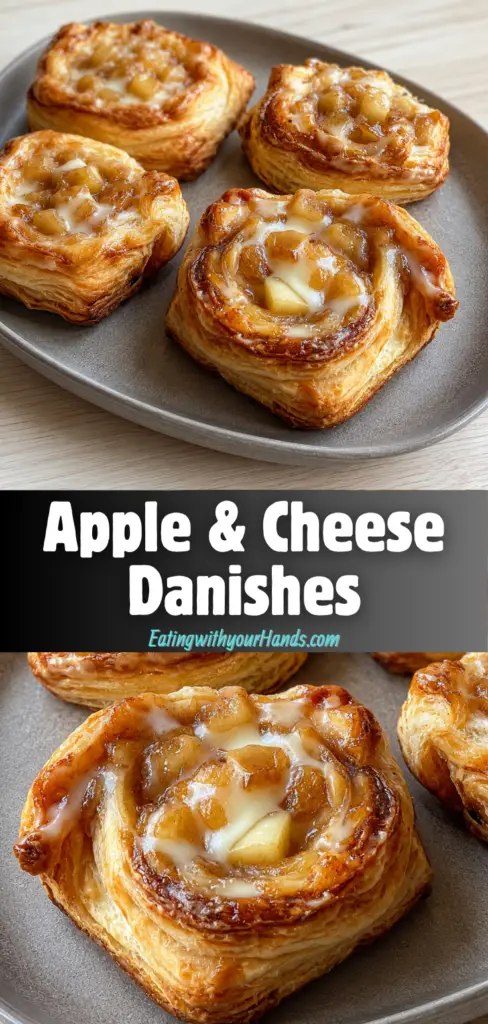
Apple & Cheese Danishes are flaky pastries made with puff pastry squares filled with a sweet apple and cream cheese mixture. The filling combines diced Granny Smith apples, softened cream cheese, granulated sugar, and cinnamon for a creamy, fruity center.
Each pastry square is folded around the filling to create a little pocket. Then the tops are brushed with egg wash so they bake into a beautiful golden finish.
The result is a pastry that feels both cozy and elegant. The puff pastry becomes crisp and buttery, while the filling turns soft, creamy, and gently sweet.
These danishes are inspired by classic fruit and cheese pastries, but this version keeps the method very approachable. Instead of making pastry dough from scratch, you use thawed puff pastry for a quick and reliable shortcut.
They are lovely for breakfast, brunch, dessert, or snacking. They can also be frozen unbaked, which makes them convenient for planning ahead.
Recipe Overview
Prep Time: 15 minutes
Cook Time: 25 minutes
Cooling Time: 10 minutes
Total Time: 50 minutes
Servings: About 4 to 8 danishes, depending on how you cut the pastry
Why You’ll Love Apple & Cheese Danishes
They Are Quick to Prepare
These danishes only need about 15 minutes of prep time. That makes them perfect when you want something homemade but do not want to spend the whole morning baking.
Because the recipe uses puff pastry, you do not need to make dough from scratch. You simply thaw, roll, cut, fill, fold, and bake.
They Use Minimal Ingredients
This recipe keeps things beautifully simple. You only need puff pastry, apples, cream cheese, sugar, cinnamon, and an egg for the wash.
These are easy-to-find ingredients that come together in a very satisfying way. The short ingredient list also makes the recipe feel manageable, even for beginner bakers.
The Puff Pastry Makes Them Feel Special
Puff pastry is one of those ingredients that instantly makes a recipe feel elegant. As it bakes, it rises into crisp, flaky layers that look and taste like something from a bakery.
Even though the process is simple, the final danishes feel impressive. They are lovely enough for guests but easy enough for an everyday treat.
The Filling Is Sweet, Creamy, and Cozy
The filling is the heart of this recipe. The cream cheese brings richness and a smooth texture, while the apples add sweet-tart freshness.
Cinnamon gives everything warmth. Together, the filling tastes like apple pie and cheesecake tucked inside a buttery pastry.
They Work for Many Occasions
Apple & Cheese Danishes can be served for breakfast, brunch, dessert, or a sweet snack. They are cozy enough for a quiet weekday morning and pretty enough for a festive table.
You can serve them warm from the oven or let them cool slightly. Either way, they bring a homemade charm to the table.
They Are Freezer-Friendly
These danishes can be frozen before baking. That means you can assemble a batch ahead of time and bake them fresh when you need them.
This is especially helpful for busy mornings or gatherings. You can do the prep work early, then enjoy warm pastries later with very little effort.
They Are Easy to Customize
This recipe gives you a simple base that can be adjusted in many ways. You can add lemon juice, vanilla extract, almond extract, nuts, dried fruit, or different spices.
You can also substitute pears for apples. That makes the recipe flexible while still keeping the same cozy pastry style.
Ingredients You’ll Need
Puff Pastry
You will need 1 sheet of puff pastry, thawed. Puff pastry is what gives the danishes their flaky, buttery structure.
Make sure the pastry is thawed but still cold when you work with it. If it becomes too warm, it can get sticky and harder to shape.
A brand like Pepperidge Farm works well if available. Any good-quality puff pastry sheet can be used as long as it is properly thawed.
Granny Smith Apples
You will need 2 medium Granny Smith apples, peeled and diced. Granny Smith apples are a great choice because their tartness balances the sweet cream cheese filling.
They also hold up well during baking. The apple pieces become tender without turning completely mushy.
If Granny Smith apples are not available, you can use another tart apple variety. The key is choosing apples that have enough flavor to stand out inside the pastry.
Cream Cheese
You will need 8 ounces of softened cream cheese. Cream cheese gives the filling its rich, creamy texture and creates that classic cheese danish flavor.
Make sure it is softened before mixing. Cold cream cheese can stay lumpy and make the filling harder to combine.
You can also use Neufchâtel cheese for a lighter option. It has a similar texture with a slightly lighter feel.
Granulated Sugar
You will need ¼ cup of granulated sugar. The sugar sweetens the filling and balances the tart apples.
You can adjust the amount slightly depending on how sweet you like your danishes. If your apples are very tart, you may prefer the full amount.
Ground Cinnamon
You will need 1 teaspoon of ground cinnamon. Cinnamon adds warmth and depth to the filling.
It pairs beautifully with both apples and cream cheese. This is what gives the danishes their cozy baked-apple aroma.
Egg
You will need 1 egg for the egg wash. The egg wash gives the pastry a golden, glossy finish as it bakes.
Without the egg wash, the pastry will still bake, but the color may be paler. Brushing the tops makes the danishes look more polished and bakery-style.
Optional Add-Ins and Substitutions
Lemon Juice
You can add 1 tablespoon of lemon juice to the apple filling. Lemon juice gives the filling a brighter flavor and helps balance the sweetness.
This is especially nice if you want the apples to taste fresh and lively. It adds a small zing without changing the recipe too much.
Pears Instead of Apples
Pears can be used instead of apples for a sweeter twist. Choose pears that are ripe but still firm enough to dice.
The flavor will be softer and more delicate than apple. It is a lovely variation for a different kind of fruit danish.
Vanilla or Almond Extract
A splash of vanilla extract can make the filling taste warmer and more rounded. Almond extract gives it a slightly nutty, bakery-style flavor.
Use either one lightly. A small amount is enough to add depth without overpowering the apples.
Chopped Nuts
Chopped walnuts or pecans can be added for crunch. They make the filling more textured and add a rich, nutty note.
This variation works especially well if you like pastries with a little bite. Just avoid nuts if serving anyone with allergies.
Greek Yogurt Instead of Cream Cheese
Greek yogurt can be used for a lighter version. It will create a tangier and slightly less rich filling.
The texture may be softer than cream cheese, so use it carefully. Cream cheese gives the most classic result.
Non-Dairy Cream Cheese
If you need a dairy-free version, try a non-dairy cream cheese alternative. Choose one with a thick, spreadable texture.
The flavor may vary depending on the brand. Still, it can work well as a substitute in this style of pastry.
Raisins or Dried Cranberries
Raisins or dried cranberries can be mixed into the filling for a fruity twist. Raisins add sweetness, while dried cranberries add a tart contrast.
Use a small amount so the filling does not become too crowded. The apples should still be the main fruit.
Powdered Sugar
You can dust the baked danishes with powdered sugar before serving. This gives them a sweet, pretty finish.
It is optional but lovely for presentation. Add it once the danishes have cooled slightly so the sugar does not melt immediately.
Directions
Step 1: Preheat the Oven
Preheat your oven to 375°F (190°C). This temperature is important because puff pastry needs good heat to rise and become flaky.
A properly heated oven helps the pastry puff quickly. If the oven is not hot enough, the pastry may bake flatter and less crisp.
Step 2: Prepare the Baking Sheet
Line a baking sheet with parchment paper. This keeps the danishes from sticking and makes cleanup much easier.
Parchment paper also helps protect the bottoms from over-browning. It gives the pastries a clean surface to bake on.
Step 3: Thaw the Puff Pastry
Make sure your puff pastry sheet is thawed according to the package instructions. It should be flexible enough to unfold without cracking.
At the same time, it should still feel cool to the touch. If it becomes too soft, place it in the refrigerator for a few minutes before rolling.
Step 4: Lightly Flour the Surface
Sprinkle a small amount of flour on your work surface. This keeps the puff pastry from sticking as you roll it out.
Do not use too much flour. A light dusting is enough to help the dough move easily without drying it out.
Step 5: Roll Out the Puff Pastry
Place the thawed puff pastry on the floured surface. Gently roll it out until it is about ⅛-inch thick.
Try to keep the shape as even as possible, but do not worry if the edges are not perfect. Puff pastry is forgiving, and the final danishes will still look beautiful.
Step 6: Cut the Pastry into Squares
Cut the rolled puff pastry into squares, roughly 4×4 inches each. You can make them slightly larger or smaller depending on the size you prefer.
Larger squares will create bigger danishes with more room for filling. Smaller squares will make more petite pastries that are great for brunch trays.
Step 7: Prepare the Apples
Peel 2 medium Granny Smith apples. Then dice them into small, even pieces.
Small pieces work best because they soften more easily in the oven. They also fit better inside the pastry pockets.
Step 8: Soften the Cream Cheese
Make sure the cream cheese is softened before mixing. It should be easy to press with a spoon or spatula.
If the cream cheese is too cold, it will not blend smoothly with the apples, sugar, and cinnamon. Let it sit at room temperature until softened.
Step 9: Combine the Filling Ingredients
In a mixing bowl, combine the diced apples, softened cream cheese, ¼ cup granulated sugar, and 1 teaspoon ground cinnamon. Stir until everything is evenly mixed.
The filling should look creamy and chunky at the same time. The apples should be coated in the cream cheese mixture.
Step 10: Taste the Filling
Taste a small amount of the filling before assembling the danishes. This lets you decide if you want a little more sugar or cinnamon.
If the apples are especially tart, you may want a touch more sweetness. If you enjoy stronger spice, you can add a tiny extra pinch of cinnamon.
Step 11: Add Optional Flavorings
If using lemon juice, vanilla extract, almond extract, nuts, raisins, or dried cranberries, add them now. Stir gently until they are evenly distributed.
Keep optional additions modest so the filling does not become too loose or too heavy. The apple and cream cheese should remain the main flavors.
Step 12: Place Filling on Each Pastry Square
Place a generous spoonful of filling in the center of each pastry square. Try not to overfill them, even if the filling looks tempting.
Too much filling can leak out during baking. A balanced spoonful gives the pastry enough room to fold and seal.
Step 13: Fold the Corners
Fold the corners of each pastry square over the filling. Bring the edges toward the center to create a small pastry pocket.
The shape does not have to be perfect. Handmade pastries often look more charming when each one has its own little character.
Step 14: Pinch to Seal
Pinch the folded edges gently to help seal the filling inside. Make sure the pastry is closed enough to hold during baking.
If the corners do not stay together, lightly press them with your fingertips. You can also use a tiny dab of egg wash to help them stick.
Step 15: Transfer to the Baking Sheet
Place the assembled danishes on the parchment-lined baking sheet. Leave space between each one so the pastry can puff.
Puff pastry expands as it bakes. If the danishes are too close together, they may stick to each other.
Step 16: Prepare the Egg Wash
Crack 1 egg into a small bowl. Beat it with a fork until the yolk and white are fully combined.
This egg wash will be brushed over the tops of the danishes. It helps create a glossy, golden finish.
Step 17: Brush the Danishes
Use a pastry brush to lightly coat the tops of the danishes with egg wash. Be gentle so you do not pull apart the folded pastry.
Avoid using too much egg wash. A light, even layer is all you need for good color.
Step 18: Bake the Danishes
Place the baking sheet in the preheated oven. Bake for about 25 minutes, or until the danishes are puffed and golden brown.
The pastry should look flaky and crisp. The tops should have a warm golden color from the egg wash.
Step 19: Watch for Browning
Check the danishes near the end of baking. If they are browning too quickly, keep a close eye on them.
Every oven can behave a little differently. The goal is golden pastry that is crisp, not overly dark.
Step 20: Remove from the Oven
Carefully remove the baking sheet from the oven. The filling will be hot, so avoid touching the centers right away.
Let the danishes rest on the baking sheet for a few minutes. This helps the pastry settle slightly.
Step 21: Cool Before Serving
Let the danishes cool for about 10 minutes before serving. This makes them easier to handle and gives the filling time to set.
They are wonderful when served warm. The pastry will still be crisp, and the filling will be soft and creamy.
Step 22: Add Optional Finishing Touches
If desired, dust the danishes with powdered sugar just before serving. This adds a sweet, pretty finish.
You can also serve them with whipped cream or vanilla ice cream if turning them into dessert. For brunch, they are lovely on their own.

Serving Suggestions
Serve Warm
Apple & Cheese Danishes are especially delicious warm from the oven. The pastry is crisp, and the filling is soft and fragrant.
Let them cool just enough so the filling is not too hot. Then serve them while they still feel fresh and cozy.
Serve for Brunch
These danishes make a beautiful addition to a brunch table. They pair well with fresh fruit, coffee, tea, or a light salad.
Because they look bakery-style, they can make a simple brunch feel more special. Arrange them on a platter for a warm, inviting presentation.
Serve as Dessert
For dessert, serve the danishes with a dollop of whipped cream or a scoop of vanilla ice cream. The creamy topping pairs beautifully with apples and cinnamon.
This makes the pastry feel more indulgent. It is a simple way to turn a small danish into a plated dessert.
Serve with Coffee or Tea
The sweet and creamy filling works wonderfully with coffee or tea. The flaky pastry makes it feel like something you would enjoy at a cozy café.
This is a great option for an afternoon treat. It feels special without being too heavy.
Serve with Powdered Sugar
A light dusting of powdered sugar gives the danishes a finished look. It makes them feel prettier without adding much extra effort.
Wait until the pastries have cooled slightly before dusting. If they are too hot, the sugar may melt.
Storage Tips
Refrigerate Leftovers
Store leftover Apple & Cheese Danishes in an airtight container in the refrigerator for up to 3 days. Because the filling contains cream cheese, refrigeration is best.
Let them cool completely before storing. This helps prevent excess moisture from collecting in the container.
Reheat Before Serving
To enjoy leftovers, warm them gently before serving. Reheating helps bring back some of the pastry’s crispness.
The oven or toaster oven works better than the microwave for texture. The microwave can soften the pastry.
Freeze Unbaked Danishes
You can freeze the danishes before baking. Assemble them, place them on a baking sheet, and freeze until firm.
Once frozen, transfer them to an airtight container or freezer bag. They can be kept frozen for up to a month.
Bake from Frozen
When ready to bake, place the frozen danishes on a parchment-lined baking sheet. Bake them straight from the freezer.
Add a few extra minutes to the baking time. Watch for puffed, golden pastry to know they are done.
Variations
Lemon Apple Cheese Danishes
Add 1 tablespoon of lemon juice to the apple filling. This gives the danishes a bright, fresh flavor.
Lemon works especially well with Granny Smith apples. It enhances their tartness without overpowering the cream cheese.
Pear and Cheese Danishes
Use diced pears instead of apples. This creates a softer, sweeter pastry filling.
Choose pears that are ripe but still firm. Very soft pears may release too much juice while baking.
Vanilla Apple Cheese Danishes
Add a small splash of vanilla extract to the filling. Vanilla gives the cream cheese mixture a warmer, sweeter aroma.
This version tastes especially cozy. It is simple but makes the filling feel more rounded.
Almond Apple Danishes
Add a small amount of almond extract to the filling. Almond extract gives a bakery-style flavor that pairs nicely with apple and cream cheese.
Use it carefully because almond extract can be strong. A little goes a long way.
Nutty Apple Danishes
Add chopped walnuts or pecans to the filling. They bring crunch and a deeper flavor.
This variation is great for fall or holiday brunches. The nuts make the danishes feel more textured and hearty.
Spiced Apple Danishes
Try adding a pinch of nutmeg or allspice with the cinnamon. This gives the filling a more seasonal flavor.
Do not overdo it, because the spices should support the apples. The cinnamon should still remain the main warm spice.
Dried Fruit Apple Danishes
Mix raisins or dried cranberries into the filling. This adds chewy texture and an extra layer of fruit flavor.
Cranberries bring tartness, while raisins bring sweetness. Either option works well with cinnamon.
Lighter Cheese Danishes
Use Greek yogurt instead of cream cheese for a lighter filling. The flavor will be tangier and less rich.
This option works if you want a fresher, lighter pastry. Cream cheese remains the best choice for the classic danish texture.
Common Mistakes
Using Puff Pastry That Is Too Warm
Puff pastry needs to stay cool while you work with it. If it gets too warm, it becomes sticky and may not puff as well.
If the pastry softens too much, place it in the refrigerator for a few minutes. Chilled pastry is easier to shape and bakes flakier.
Overfilling the Danishes
It can be tempting to add a lot of filling, but too much can cause leaking. The pastry needs space to puff around the filling.
Use a generous but controlled spoonful. A little filling showing is fine, but the danish should still close properly.
Not Sealing the Edges
If the edges are not pinched well, the filling may escape during baking. Gently press the folded corners together before brushing with egg wash.
The danishes do not need to be perfectly sealed like dumplings. They simply need enough closure to hold the filling in place.
Skipping the Egg Wash
The egg wash gives the pastries their golden, glossy finish. Without it, the pastry may look pale.
This step only takes a moment. It makes the finished danishes look much more polished.
Cutting the Apples Too Large
Large apple chunks may not soften fully during baking. They can also make the pastries harder to fold.
Dice the apples into small, even pieces. This helps the filling bake smoothly inside the pastry.
Not Cooling Before Serving
The filling will be very hot right out of the oven. Letting the danishes cool for about 10 minutes makes them safer and easier to eat.
Cooling also helps the filling settle. The pastry will still be warm and delicious.
Helpful Notes
Keep the Pastry Cold
Cold puff pastry creates the best flaky layers. If the dough becomes sticky, pause and chill it briefly.
This small step makes shaping easier. It also helps the danishes bake with better lift.
Use Softened Cream Cheese
Softened cream cheese mixes more smoothly with sugar, cinnamon, and apples. It creates a creamier filling.
Cold cream cheese can leave lumps. Let it sit at room temperature before starting.
Choose Tart Apples
Granny Smith apples are ideal because they balance the sweetness of the filling. Their tart flavor keeps the danishes from tasting too sugary.
If using a sweeter apple, you can slightly reduce the sugar if desired. Taste the filling before assembling.
Adjust Sweetness to Taste
The recipe uses ¼ cup granulated sugar, but sweetness can be adjusted. Some apples are naturally sweeter than others.
Taste the filling and decide if it needs more sugar. The pastry itself is buttery rather than very sweet, so the filling carries most of the sweetness.
Use Parchment Paper
Parchment paper makes cleanup easier and helps prevent sticking. It is especially useful if any filling leaks during baking.
It also helps the bottoms bake more evenly. This keeps the danishes easier to remove from the tray.
Serve the Same Day for Best Texture
These danishes taste best the day they are baked. The pastry is at its crispiest when fresh.
Leftovers are still delicious, but the pastry may soften in the refrigerator. Reheat gently for the best texture.
Frequently Asked Questions
Can I Freeze Apple & Cheese Danishes?
Yes, Apple & Cheese Danishes can be frozen before baking. Assemble them, freeze them on a baking sheet until firm, then transfer them to an airtight container or freezer bag.
They can be frozen for up to a month. When ready to bake, place them in the oven straight from the freezer and add a few extra minutes to the baking time.
Can I Freeze Baked Danishes?
You can freeze baked danishes, but the pastry texture is best when they are frozen unbaked. Baked puff pastry may soften after thawing.
If freezing baked danishes, let them cool completely first. Reheat them in the oven to help restore some crispness.
What Can I Substitute for Cream Cheese?
Neufchâtel cheese is a good lower-fat alternative. It has a similar texture and works well in the filling.
Greek yogurt can be used for a tangier, lighter option. A plant-based cream cheese alternative can also be used for a dairy-free version.
Can I Use Pears Instead of Apples?
Yes, pears can replace apples in this recipe. They create a sweeter, softer fruit filling.
Use pears that are ripe but not overly soft. This helps prevent the filling from becoming too watery.
How Do I Know When the Danishes Are Done?
The danishes are done when they are puffed, flaky, and golden brown. The tops should have a glossy color from the egg wash.
If they look pale, give them a few more minutes. The pastry should look crisp and fully baked.
Can I Make These Ahead of Time?
Yes, you can assemble the danishes ahead and freeze them before baking. This is the best make-ahead method.
You can also prepare the filling a little ahead of time and keep it chilled. Assemble the pastries just before baking for the freshest texture.
How Should I Store Leftovers?
Store leftovers in an airtight container in the refrigerator for up to 3 days. Let them cool fully before storing.
Reheat in the oven or toaster oven for best texture. This helps the pastry become crisp again.
Can I Add Nuts?
Yes, chopped walnuts or pecans can be added to the filling. They bring crunch and a richer flavor.
Use a small amount so the filling still folds easily inside the pastry. Omit nuts if allergies are a concern.
Can I Use Other Spices?
Yes, nutmeg or allspice can be added for a seasonal touch. Use only a small pinch.
Cinnamon should remain the main spice. The goal is warmth, not overpowering flavor.
Final Thoughts
Apple & Cheese Danishes are a beautiful reminder that simple ingredients can create something memorable. With one sheet of puff pastry, a few apples, cream cheese, sugar, cinnamon, and an egg wash, you can make pastries that feel warm, homemade, and special.
They have the flaky comfort of puff pastry, the creamy richness of cheese filling, and the cozy sweetness of baked apples. Each bite feels soft in the center and crisp around the edges.
This is the kind of recipe that fits many moments. It works for brunch with family, a quiet cup of coffee, a festive dessert tray, or a weekday morning that needs a little sweetness.
The recipe is also forgiving and flexible. You can add lemon, vanilla, almond extract, nuts, dried fruit, powdered sugar, or even swap apples for pears.
Most importantly, these danishes bring that homemade feeling into the kitchen. They invite you to slow down, fold pastry by hand, breathe in the smell of cinnamon apples, and share something warm with the people around you.
Whether you serve them fresh from the oven, dust them with powdered sugar, or pair them with whipped cream or vanilla ice cream, Apple & Cheese Danishes are made to be enjoyed slowly. They are simple, flaky, creamy, sweet, and full of the kind of comfort that never goes out of style.
Apple and Cheese Danishes

These Apple and Cheese Danishes are flaky, creamy, and filled with a sweet cinnamon-apple mixture. Thawed puff pastry makes the recipe simple, while Granny Smith apples and softened cream cheese create a rich, bakery-style filling.
Recipe Information
- Prep Time: 15 minutes
- Cook Time: 25 minutes
- Total Time: 40 minutes
- Course: Dessert
- Cuisine: American
- Servings: 4 danishes
- Calories: 250 kcal
Equipment
- Oven
- Baking sheet
Ingredients
Dough
- 1 sheet puff pastry, thawed
Creates the flaky, golden pastry base for the danishes.
Filling
- 1 teaspoon ground cinnamon
Adds warm spice to the apple and cream cheese filling. - 8 oz cream cheese, softened
Gives the filling a smooth, creamy texture. - 2 medium Granny Smith apples, peeled and diced
Add tart apple flavor and soft fruit texture. - 1 egg, for egg wash
Helps the pastry bake with a golden finish. - ¼ cup granulated sugar
Sweetens the filling and balances the tart apples.
Instructions
- Preheat the oven to 375°F (190°C).
- Roll out the thawed puff pastry on a clean surface.
- Cut the puff pastry into squares.
- In a bowl, combine the diced Granny Smith apples, softened cream cheese, granulated sugar, and ground cinnamon.
- Mix until the filling is evenly combined.
- Spoon a portion of the apple cream cheese filling into the center of each pastry square.
- Fold the corners of each pastry square over the filling.
- Brush the pastry with egg wash.
- Place the danishes on a baking sheet.
- Bake for 25 minutes, or until the pastry is puffed and golden brown.
- Let the danishes cool slightly before serving.
Notes
- Sprinkle powdered sugar over the danishes before serving for extra sweetness.
- Serve warm for the best flaky texture and creamy filling.
- Granny Smith apples work well because their tart flavor balances the sweet cream cheese mixture.

Fernando is the creator and writer behind the food blog Eating with your Hands. Living and working in cities like Paris, Barcelona, and Berlin, and being married to a Canadian foodie, has given Fernando a passion and interest in food and inspired him to run EWYH.