

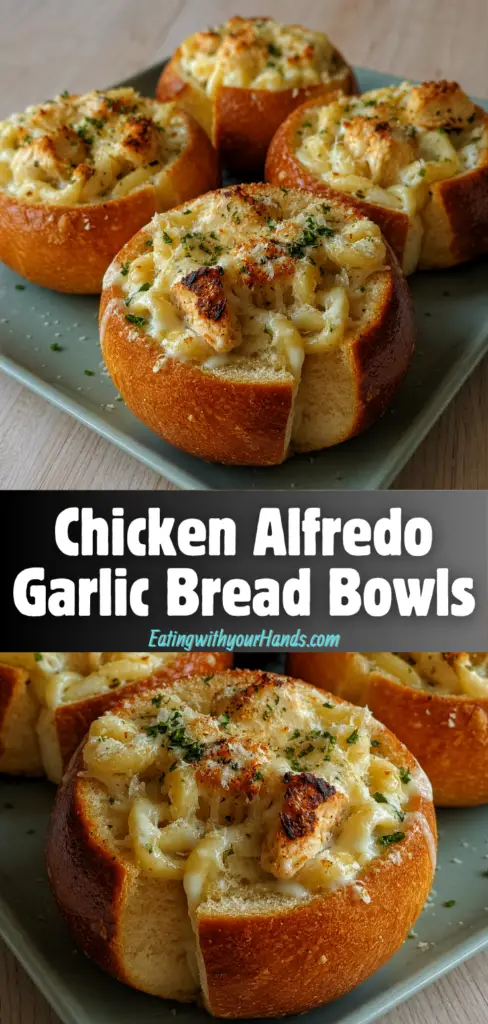
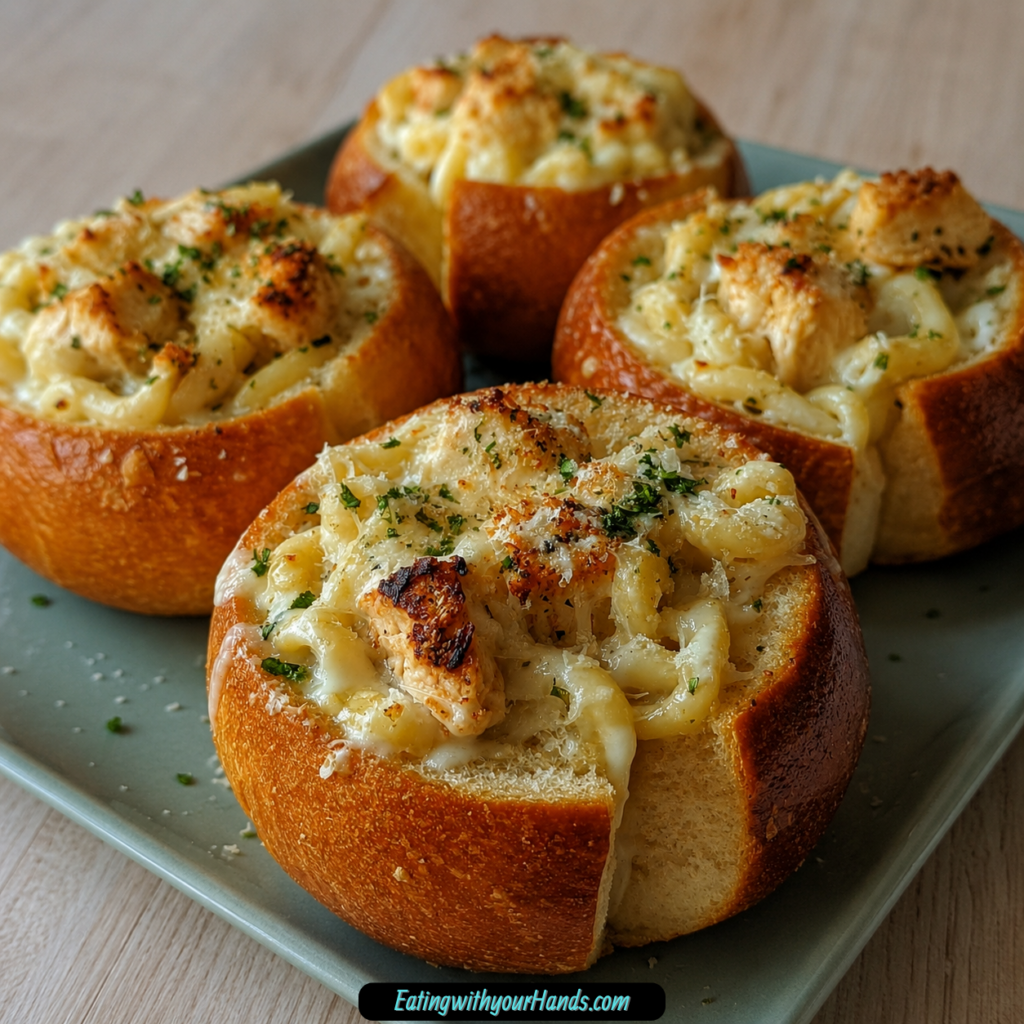
There are some dinners that feel comforting before you even take the first bite. Chicken Alfredo Garlic Bread Bowls are exactly that kind of meal.
The moment buttery garlic bread begins to toast in the oven and creamy Alfredo sauce warms around tender chicken and pasta, the whole kitchen feels softer somehow. It is the kind of aroma that makes people drift toward the table early, asking if dinner is ready even though you have not called them yet.
This recipe takes the cozy richness of chicken Alfredo and turns it into something even more fun: a creamy pasta filling tucked inside crisp, golden garlic bread bowls. Instead of serving pasta on a plate with bread on the side, the bread becomes part of the meal.
Each kaiser roll is hollowed out, brushed with melted butter, sprinkled with garlic and herb seasoning, filled generously with pasta, chicken, Alfredo sauce, and Parmesan, then baked until the outside turns warm and crisp. It is simple, satisfying, and easy enough for a weeknight, but it still feels special enough to serve when family or friends come over.
What I love most about this dish is how inviting it feels. It does not ask for complicated techniques or hard-to-find ingredients.
It is made with familiar pantry-friendly items, but the final result looks like something everyone will remember. The bread bowl makes the meal playful, the Alfredo sauce makes it creamy, and the garlic butter gives every bite that warm, savory edge.
Table of Contents
- What Are Chicken Alfredo Garlic Bread Bowls?
- Why This Recipe Feels So Comforting
- Recipe Overview
- Why You’ll Love Chicken Alfredo Garlic Bread Bowls
- Ingredients You’ll Need
- Ingredient Notes
- Directions
- Step 1: Preheat the Oven
- Step 2: Gather Your Ingredients
- Step 3: Cut the Chicken Into Cubes
- Step 4: Cook the Pasta Until Al Dente
- Step 5: Heat the Olive Oil
- Step 6: Season and Cook the Chicken
- Step 7: Check the Chicken Texture
- Step 8: Combine the Pasta and Chicken
- Step 9: Add the Alfredo Sauce
- Step 10: Add the Parmesan Cheese
- Step 11: Taste and Adjust the Filling
- Step 12: Prepare the Kaiser Rolls
- Step 13: Hollow Out the Rolls
- Step 14: Melt the Butter
- Step 15: Season the Buttered Rolls
- Step 16: Place Rolls on a Baking Sheet
- Step 17: Fill the Bread Bowls
- Step 18: Add Optional Extra Parmesan
- Step 19: Bake the Bowls
- Step 20: Let Them Cool Slightly
- Step 21: Garnish and Serve
- Pro Tips for the Best Chicken Alfredo Garlic Bread Bowls
- Variations
- Serving Suggestions
- Storage Tips
- Reheating Instructions
- Freezing Instructions
- Make-Ahead Instructions
- Common Mistakes to Avoid
- Helpful Notes
- Frequently Asked Questions
- Final Thoughts
- Chicken Alfredo Garlic Bread Bowls
What Are Chicken Alfredo Garlic Bread Bowls?
Chicken Alfredo Garlic Bread Bowls are a comforting baked meal made with hollowed kaiser rolls filled with creamy chicken Alfredo pasta. The bread bowls are brushed with melted butter and garlic herb seasoning, then baked until golden and crisp.
Inside each bowl is a rich mixture of cooked pasta, browned chicken breast cubes, Alfredo sauce, and shredded Parmesan cheese. The filling is creamy and hearty, while the bread adds a crispy, buttery contrast.
This recipe is a creative twist on traditional chicken Alfredo. Instead of serving garlic bread beside the pasta, the bread becomes the edible bowl.
The result is warm, cheesy, creamy, and satisfying. It is perfect for casual family dinners, cozy weekends, relaxed gatherings, or any night when you want comfort food that feels a little more exciting than usual.
Why This Recipe Feels So Comforting
Chicken Alfredo already has a way of making dinner feel cozy. The creamy sauce, tender chicken, and pasta all come together in a way that feels familiar and filling.
But when you spoon that mixture into a buttery garlic bread bowl, the dish becomes even more comforting. The bread crisps around the edges, the inside softens slightly from the creamy filling, and each bite gives you a little bit of everything.
There is also something generous about serving food in bread bowls. They make each portion feel personal, like everyone at the table gets their own little edible dish.
The buttery garlic aroma is another reason this recipe feels special. It brings warmth into the kitchen before the bowls even come out of the oven.
This is the kind of meal that fits many moods. It is easy enough for a weeknight but cozy enough for a weekend dinner, and it can be prepared ahead to make serving even easier.
Recipe Overview
Prep Time: 15 minutes
Cook Time: 30 minutes
Total Time: 45 minutes
Servings: 6 bowls
These Chicken Alfredo Garlic Bread Bowls come together in three main parts: cooking the pasta, preparing the chicken Alfredo filling, and baking everything inside hollowed kaiser rolls.
The pasta is cooked until al dente so it holds its shape inside the creamy sauce. The chicken is cut into 1-inch cubes and browned with olive oil, salt, pepper, and garlic herb seasoning.
The filling is then mixed with Alfredo sauce and Parmesan cheese before being spooned into buttery garlic bread bowls. After baking, the rolls become golden and crisp while the filling stays creamy and warm.
Why You’ll Love Chicken Alfredo Garlic Bread Bowls
They Are Quick Enough for Busy Nights
With only 15 minutes of prep time, this recipe is practical for nights when you want something satisfying without spending hours in the kitchen. The whole dish comes together in about 45 minutes.
The steps are easy to follow, and the ingredients are simple. Once the pasta and chicken are cooked, the rest is mostly assembly.
They Use Simple Ingredients
You do not need anything complicated to make these bowls. Chicken breasts, pasta, kaiser rolls, Alfredo sauce, butter, Parmesan, olive oil, and seasoning are all easy to find.
The recipe feels indulgent without requiring a long shopping list. That makes it especially helpful when you want something comforting but manageable.
They Are Beginner-Friendly
Even if you are not an experienced cook, this recipe is approachable. The chicken is cooked in a skillet, the pasta is boiled, and the bread bowls are assembled by hollowing out rolls and filling them.
There is no complicated dough-making or sauce-making required. A jar of Alfredo sauce keeps the recipe simple while still giving it a creamy, satisfying flavor.
They Are Perfect for Gatherings
These bowls are fun to serve because each person gets an individual portion. They look impressive on a baking sheet or platter, especially when the bread is golden and the filling is creamy.
They are great for family dinners, casual get-togethers, cozy weekends, and relaxed entertaining. They feel playful without being fussy.
They Can Be Made Ahead
The filling can be prepared in advance and stored in the refrigerator. When it is time to serve, hollow out the rolls, fill them, and bake.
This makes the recipe useful for busy days or gatherings when you want to avoid too much last-minute cooking.
Ingredients You’ll Need
For the Chicken Alfredo Filling
3 boneless skinless chicken breasts, cut into 1-inch cubes, about 18 ounces combined
1 pound dry pasta, such as penne, fettuccine, or your choice
1 jar Alfredo sauce, about 15 ounces or 425 grams
½ cup shredded Parmesan cheese, about 50 grams
1 tablespoon olive oil
Salt, to taste
Freshly ground black pepper, to taste
For the Garlic Bread Bowls
6 kaiser rolls, or more if needed
½ cup unsalted butter, melted, about 8 tablespoons or 113 grams
3 to 4 teaspoons garlic and herb seasoning, divided
Ingredient Notes
Chicken Breasts
Boneless skinless chicken breasts work well because they cook quickly and provide a tender, lean protein for the filling. Cutting them into 1-inch cubes helps them cook evenly.
Try to keep the pieces similar in size. This prevents some pieces from drying out while others are still cooking.
Pasta
Penne, fettuccine, or your favorite pasta shape can be used. Penne is especially easy to spoon into the bread bowls because it fits neatly inside the rolls.
Fettuccine gives a more classic Alfredo feel, but it can be a little harder to pack into the bread bowls. Use whichever pasta shape you enjoy most.
Kaiser Rolls
Kaiser rolls are sturdy enough to hold the creamy filling while still becoming crisp and golden in the oven. Their round shape also makes them perfect for turning into bowls.
Hollow them carefully and leave about a ½-inch wall so the rolls can hold the filling without tearing or collapsing.
Alfredo Sauce
A 15-ounce jar of Alfredo sauce keeps this recipe simple and convenient. Choose a sauce you already enjoy because its flavor will be a major part of the dish.
The sauce coats the pasta and chicken, helping everything stay creamy inside the bread bowls.
Parmesan Cheese
Shredded Parmesan adds salty, savory richness to the filling. It helps deepen the Alfredo flavor and gives the dish a more finished taste.
You can also sprinkle extra Parmesan on top before serving if you want a cheesier finish.
Melted Butter
Melted unsalted butter is brushed on the rolls before baking. It helps the bread turn golden, crisp, and flavorful.
Using unsalted butter gives you more control over the saltiness, especially since Alfredo sauce, Parmesan, and seasoning already contain flavor.
Garlic and Herb Seasoning
Garlic and herb seasoning is divided between the chicken and the bread bowls. It gives the entire recipe a savory, aromatic flavor.
The seasoning on the bread is especially important because it turns the rolls into garlic bread bowls instead of plain bread containers.
Olive Oil
Olive oil is used to cook the chicken. It helps the chicken brown and prevents it from sticking to the skillet.
A tablespoon is enough to coat the skillet and create a flavorful base for cooking.
Directions
Step 1: Preheat the Oven
Preheat your oven to 375°F, or 190°C. This gives the oven time to heat fully before the bread bowls go in.
A properly preheated oven helps the rolls become golden and crisp instead of drying out slowly. Since the filling is already cooked before baking, the oven’s main job is to toast the bread and warm everything together.
While the oven heats, prepare your pasta, chicken, and rolls. This keeps the process smooth from start to finish.
Step 2: Gather Your Ingredients
Place all your ingredients on the counter before you begin. You will need chicken breasts, pasta, kaiser rolls, Alfredo sauce, melted butter, garlic and herb seasoning, Parmesan cheese, olive oil, salt, and black pepper.
This step may seem small, but it makes cooking much easier. When everything is measured and within reach, you can focus on the timing and texture.
It also helps you avoid realizing halfway through the recipe that something is missing. For a dish with several parts, preparation keeps the cooking experience relaxed.
Step 3: Cut the Chicken Into Cubes
Take the 3 boneless skinless chicken breasts and cut them into 1-inch cubes. Try to make the pieces as even as possible.
Even pieces cook at the same rate, which helps keep the chicken juicy. If some cubes are too small, they may dry out before the larger pieces are done.
Place the chicken pieces in a bowl or on a clean plate while you prepare the pasta. Keep your work surface clean after handling raw chicken.
Step 4: Cook the Pasta Until Al Dente
Bring a large pot of water to a boil. Add the pasta and cook according to the package directions until al dente.
Al dente pasta is important because it will continue to warm in the oven after being mixed with the sauce and placed inside the rolls. If the pasta is overcooked at this stage, it may become too soft in the final dish.
Once the pasta is cooked, drain it well and set it aside. Let it cool slightly before mixing it with the Alfredo sauce and chicken.
Step 5: Heat the Olive Oil
Place a skillet over medium heat and add 1 tablespoon of olive oil. Let the oil heat until it shimmers gently.
The oil should be hot enough to sear the chicken, but it should not be smoking. If it smokes, lower the heat slightly before adding the chicken.
A properly heated skillet helps the chicken brown on the outside while staying tender inside.
Step 6: Season and Cook the Chicken
Add the chicken cubes to the skillet. Season them with salt, freshly ground black pepper, and about 1 tablespoon of garlic and herb seasoning.
Stir occasionally as the chicken cooks. Let the pieces sit briefly between stirs so they can develop a golden color.
Cook the chicken for about 7 to 10 minutes, or until browned and cooked through. The pieces should be golden on the outside and juicy inside.
Step 7: Check the Chicken Texture
Once the chicken is cooked, look for a light golden color and firm texture. The pieces should no longer look pink in the center.
Avoid overcooking the chicken. Since it will bake again inside the bread bowls, cooking it too long in the skillet can make it dry.
Remove the skillet from the heat once the chicken is done. Let it rest for a moment while you prepare the mixing bowl.
Step 8: Combine the Pasta and Chicken
In a large mixing bowl, add the cooked pasta and cooked chicken. Use a bowl large enough to toss everything without spilling.
Gently stir the chicken and pasta together. This helps distribute the chicken evenly before the sauce is added.
If the pasta has stuck together slightly, loosen it with a spoon before adding the Alfredo sauce. You want the sauce to coat each piece well.
Step 9: Add the Alfredo Sauce
Pour the jar of Alfredo sauce over the pasta and chicken. Use a spoon or spatula to scrape out the jar so none of the sauce is wasted.
Mix gently until the pasta and chicken are evenly coated. The filling should look creamy but not soupy.
If your pasta is still very hot, the sauce will loosen slightly as you stir. That is normal and helps it spread through the mixture.
Step 10: Add the Parmesan Cheese
Add ½ cup shredded Parmesan cheese to the bowl. Stir until it is evenly mixed into the pasta and chicken.
The Parmesan adds savory depth and helps the filling taste richer. It also blends beautifully with the Alfredo sauce.
Take your time mixing so the cheese does not clump in one area. Every bread bowl should get some of that cheesy flavor.
Step 11: Taste and Adjust the Filling
Taste a small amount of the pasta mixture. Add more salt or black pepper if needed.
Because Alfredo sauce and Parmesan can already be salty, it is best to season gradually. You can always add more, but you cannot easily remove it.
The filling should taste creamy, savory, and well balanced. The garlic bread bowl will add even more flavor once baked.
Step 12: Prepare the Kaiser Rolls
Take the 6 kaiser rolls and place them on a cutting board. Cut off the tops, about an inch down, to create lids or openings.
Do not cut too deeply. You want enough height left in the bottom portion to hold the filling.
Set the tops aside if you want to toast and serve them along with the bowls. They can be used for dipping into extra filling.
Step 13: Hollow Out the Rolls
Use your fingers or a small knife to gently hollow out the inside of each roll. Leave about a ½-inch wall around the sides and bottom.
Be careful not to tear through the bread. If the walls are too thin, the filling may leak or the bowl may collapse.
The hollowed bread pieces can be saved for another use or toasted as small garlic bread bites. The main goal is to create a sturdy edible bowl.
Step 14: Melt the Butter
Melt ½ cup unsalted butter in a small bowl. This is about 8 tablespoons or 113 grams.
Make sure the butter is fully melted so it can be brushed easily over the rolls. If it cools and thickens, warm it slightly again.
The melted butter helps the rolls become golden and gives them that classic garlic bread flavor.
Step 15: Season the Buttered Rolls
Brush the outside of each hollowed roll with melted butter. Make sure to coat the sides and edges well.
Sprinkle the remaining garlic and herb seasoning over the buttered rolls. This gives the bread bowls their bold, savory flavor.
You can also brush a little butter inside the bowls if you want the interior to be more flavorful. Just avoid soaking them too much.
Step 16: Place Rolls on a Baking Sheet
Arrange the hollowed rolls on a baking sheet. Leave a little space between them so the heat can circulate.
If the rolls are crowded too tightly, they may not toast evenly. A little space helps the edges become crisp.
For easy cleanup, you can line the baking sheet with parchment paper. This is especially helpful if some Alfredo filling bubbles over.
Step 17: Fill the Bread Bowls
Spoon the chicken Alfredo pasta mixture generously into each roll. Press down gently so the filling settles into the bowl.
Do not press so hard that the bread tears. The goal is to fit in plenty of filling while keeping the roll intact.
Fill each bowl to the top, but avoid piling it so high that it spills during baking. A generous but controlled amount works best.
Step 18: Add Optional Extra Parmesan
If desired, sprinkle a little extra Parmesan over the filled bread bowls before baking. This gives the tops a slightly cheesier finish.
This step is optional because the filling already includes Parmesan. Still, it can make the bowls look more inviting.
A small sprinkle is enough. Too much cheese on top can brown quickly, so keep it light.
Step 19: Bake the Bowls
Place the baking sheet in the preheated oven. Bake for 15 to 20 minutes.
The rolls should become golden and crispy, and the filling should be heated through. The aroma of garlic butter and Alfredo sauce will fill the kitchen as they bake.
Begin checking around the 15-minute mark. The bread should be golden, not dark brown.
Step 20: Let Them Cool Slightly
Remove the baking sheet from the oven and let the bowls cool for a few minutes. The filling will be very hot.
This short resting time also helps the sauce settle slightly. It makes the bowls easier to handle and serve.
Do not let them sit too long before serving. They are best enjoyed warm, while the bread is crisp and the Alfredo filling is creamy.
Step 21: Garnish and Serve
Serve the Chicken Alfredo Garlic Bread Bowls warm. If desired, garnish with extra Parmesan cheese or fresh parsley for color.
A simple green salad or steamed vegetables makes a nice pairing. The freshness balances the richness of the Alfredo filling.
Serve each bowl with a fork and knife, or let everyone tear into the garlic bread as they eat. That is part of the fun.
Pro Tips for the Best Chicken Alfredo Garlic Bread Bowls
Do not overcook the pasta. Al dente pasta holds up better when mixed with sauce and baked.
Cook the chicken just until done. Overcooked chicken can become dry, especially after the bowls are baked.
Leave a ½-inch wall when hollowing the rolls. This keeps the bread bowls sturdy enough to hold the filling.
Brush the rolls generously with butter. The butter helps create that crisp, golden garlic bread texture.
Watch the bowls near the end of baking. Bread can go from golden to too dark quickly.
Let the bowls cool slightly before serving. The filling will be hot, and a short rest makes them easier to eat.
Variations
Chicken Alfredo Broccoli Bread Bowls
Add cooked broccoli to the pasta mixture before filling the rolls. Broccoli adds color, texture, and extra nutrition.
Make sure the broccoli is not too watery. Excess moisture can make the filling thinner and soften the bread too much.
Spinach Alfredo Bread Bowls
Mix in spinach for a fresh, green addition. Spinach pairs beautifully with Alfredo sauce and chicken.
You can use cooked spinach or stir fresh spinach into the warm filling until it softens. Drain any extra moisture if needed.
Mushroom Alfredo Bread Bowls
Add sautéed mushrooms for a deeper, savory flavor. Mushrooms bring an earthy taste that works well with garlic and Parmesan.
Cook the mushrooms before adding them to the filling. This removes extra moisture and improves their texture.
Bacon Chicken Alfredo Bowls
Stir in cooked bacon for a heartier version. Bacon adds smoky, salty flavor and a little crispness.
Use a moderate amount so it does not overpower the creamy Alfredo filling. A sprinkle on top before serving also works well.
Sausage Alfredo Bread Bowls
For a richer version, mix in cooked sausage instead of or alongside the chicken. This creates a more robust, hearty meal.
Make sure the sausage is fully cooked before adding it to the filling. Drain any excess grease if needed.
Spicy Chicken Alfredo Bread Bowls
Add red pepper flakes to the Alfredo sauce for a spicy twist. Start with a small amount and adjust to taste.
The heat balances the richness of the sauce and makes the dish feel a little bolder.
Gluten-Free Version
Use gluten-free pasta and gluten-free rolls. This keeps the same concept while making the recipe suitable for gluten-free needs.
Check the Alfredo sauce and seasoning as well to make sure all ingredients meet your needs.
Dairy-Free Version
Use plant-based Alfredo sauce and dairy-free butter. You can also use a dairy-free Parmesan-style alternative if desired.
The texture and flavor may differ slightly, but the recipe can still be creamy and satisfying.
Serving Suggestions
Chicken Alfredo Garlic Bread Bowls are best served warm from the oven. The contrast between crisp bread and creamy filling is strongest when they are fresh.
For a complete meal, serve them with a simple green salad. A crisp salad helps balance the richness of the Alfredo sauce.
Steamed vegetables also pair nicely. Broccoli, peas, spinach, or green beans can make the meal feel more rounded.
You can garnish each bowl with extra Parmesan cheese. A light sprinkle adds flavor and makes the bowls look finished.
Fresh parsley or basil also works well. It adds color and a little freshness to the creamy dish.
These bowls are hearty enough to serve on their own. For a gathering, place them on a large platter and let everyone take one.
Storage Tips
Store leftover Chicken Alfredo Garlic Bread Bowls in an airtight container in the refrigerator for up to 3 days. Let them cool before sealing the container.
The bread will soften after storage because of the creamy filling. For best texture, reheat in the oven rather than the microwave.
If you have extra filling, store it separately. It can be used for baked pasta, casseroles, or another quick meal.
Reheating Instructions
Reheat leftovers in the oven until warmed through. This helps bring back some of the crispness in the bread.
If reheating from the refrigerator, place the bowls on a baking sheet and warm them gently. Keep an eye on the bread so it does not overbrown.
The microwave can be used if you are in a hurry, but the bread will be softer. The oven is better for texture.
Freezing Instructions
You can freeze the filled rolls before baking. Prepare the rolls, add the filling, wrap tightly in plastic wrap, and place them in an airtight container.
Freeze for up to 2 months. When ready to enjoy, bake from frozen and add a few extra minutes to the baking time.
For best results, freeze them before the final bake rather than after baking. This helps the bread keep a better texture.
Make-Ahead Instructions
You can prepare the chicken Alfredo filling up to 2 days in advance. Store it in an airtight container in the refrigerator.
When you are ready to serve, hollow out the rolls, brush them with butter, fill them, and bake. This makes dinner feel fresh without requiring all the work at once.
You can also hollow the rolls a little earlier in the day. Keep them covered so they do not dry out before baking.
Common Mistakes to Avoid
Overcooking the Chicken
Chicken breast can dry out if cooked too long. Cook it just until golden brown and cooked through.
Remember that it will bake again inside the bread bowls. Keeping it juicy in the skillet helps the final dish taste better.
Not Hollowing the Rolls Enough
If the rolls are not hollowed enough, there will not be enough space for the filling. This can cause the Alfredo mixture to overflow.
Leave about a ½-inch wall around the bread. That gives you room for filling while keeping the bowl sturdy.
Hollowing the Rolls Too Much
If the bread walls are too thin, the rolls may tear or collapse. Be gentle when removing the inside.
The bread should still feel strong enough to hold the creamy pasta mixture.
Using Cold Pasta Straight From the Pot
Let the pasta cool slightly after draining. This helps the sauce cling better and prevents the filling from becoming too loose.
The pasta should still be warm enough to mix easily. It does not need to be cold.
Baking Too Long
The rolls should be golden and crispy, not dark brown. Keep an eye on them during the last few minutes.
Since the filling is already cooked, you only need to heat everything through and toast the bread.
Forgetting to Season the Chicken
Alfredo sauce is creamy, but the chicken still needs seasoning. Salt, pepper, and garlic herb seasoning make the filling more flavorful.
Seasoning the chicken while it cooks helps every bite taste complete.
Helpful Notes
Rotisserie chicken can be used for a quicker version. Simply shred or chop it and mix it with the cooked pasta, Alfredo sauce, and Parmesan.
Cooked broccoli or peas can be added to the filling for extra nutrition. Make sure vegetables are not too wet before mixing.
Leftover filling is useful on its own. Spoon it into a baking dish, top with cheese, and bake for a simple pasta casserole.
For extra garlic flavor, add a little more garlic herb seasoning to the melted butter. Taste the seasoning first so the bread does not become too salty.
If your kaiser rolls are small, you may need more than 6 rolls. The filling amount may stretch further depending on the size of the bread bowls.
Frequently Asked Questions
Can Chicken Alfredo Garlic Bread Bowls Be Frozen?
Yes, these bowls can be frozen before baking. Prepare the rolls, fill them with the chicken Alfredo pasta mixture, wrap tightly, and store them in an airtight container.
They can be frozen for up to 2 months. Bake from frozen and add a few extra minutes to the baking time.
Can Ingredients Be Substituted?
Yes, this recipe is flexible. You can use rotisserie chicken instead of cooking chicken breasts from scratch.
You can also use gluten-free pasta and rolls if needed. For a dairy-free version, use plant-based Alfredo sauce and dairy-free butter.
Can I Make a Vegetarian Version?
Yes, you can replace the chicken with sautéed vegetables. Mushrooms, spinach, broccoli, or bell peppers can work well.
Make sure the vegetables are cooked and any extra moisture is removed before mixing them with the sauce and pasta.
How Do I Store Leftovers?
Store leftovers in an airtight container in the refrigerator for up to 3 days. Let the bowls cool before storing.
For best texture, reheat them in the oven so the bread can crisp up again. The microwave will warm them but may soften the bread.
Can the Filling Be Made Ahead?
Yes, the filling can be made up to 2 days in advance. Store it covered in the refrigerator until you are ready to assemble the bowls.
When ready to serve, hollow out the rolls, add the filling, brush the bread with butter and seasoning, and bake.
What Can I Do With Extra Filling?
Extra filling can be turned into another meal. Place it in a baking dish, top with more Parmesan or cheese, and bake until warm.
You can also reheat it as a simple pasta dish. It is creamy, hearty, and easy to enjoy without the bread bowls.
What Kind of Pasta Works Best?
Penne works especially well because it is easy to spoon into the bread bowls. Fettuccine also works if you prefer a more classic Alfredo texture.
Any pasta shape you enjoy can be used. Just cook it al dente so it does not become too soft after baking.
How Do I Keep the Bread Bowls From Getting Soggy?
Do not overfill the bowls with too much sauce. Make sure the filling is creamy but not watery.
Also, leave a sturdy bread wall when hollowing the rolls. Baking them until golden helps the outside stay crisp.
Final Thoughts
Chicken Alfredo Garlic Bread Bowls are the kind of recipe that makes dinner feel warm, generous, and a little playful. They take familiar comfort food and turn it into something memorable without making the process difficult.
The creamy Alfredo pasta, tender chicken, Parmesan, buttery garlic bread, and crisp toasted edges all come together in one cozy bowl. Every bite has richness, softness, crunch, and savory flavor.
This is a meal made for sharing. It is easy enough for a weeknight, but it also has that special look and aroma that makes it perfect for casual gatherings.
As the bread bowls bake, the kitchen fills with the scent of garlic butter and creamy sauce. By the time they reach the table, everyone already knows dinner is going to be comforting.
So gather your ingredients, hollow out those rolls, and let the oven do the final work. These Chicken Alfredo Garlic Bread Bowls are simple, satisfying, and full of the kind of warmth that makes a meal feel like home.
Chicken Alfredo Garlic Bread Bowls

These Chicken Alfredo Garlic Bread Bowls are a cozy, hearty dinner made with tender chicken, pasta, creamy Alfredo sauce, Parmesan cheese, and crisp garlic-butter bread bowls. Each kaiser roll is hollowed out, seasoned, filled with the creamy chicken pasta mixture, and baked until golden and crunchy.
Recipe Information
- Prep Time: 15 minutes
- Cook Time: 30 minutes
- Total Time: 45 minutes
- Course: Dinner
- Cuisine: Italian
- Servings: 6 bowls
- Calories: 600 kcal
Equipment
- Pot
- Oven
Ingredients
For the Chicken and Pasta
- 1 pound dry pasta, penne, fettuccine, or your choice
Forms the hearty pasta base for the Alfredo filling. - 3 pieces boneless skinless chicken breasts, cut into 1-inch cubes, about 18 oz combined
Adds tender, bite-sized chicken pieces to the creamy filling.
For the Garlic Bread
- ½ cup shredded Parmesan cheese, about 50 g
Adds salty, cheesy flavor to the Alfredo pasta mixture. - 6 pieces kaiser rolls, or more if needed
Used as the crispy bread bowls for serving. - 1 tablespoon olive oil
Used to cook the chicken until browned. - Salt and freshly ground black pepper, to taste
Seasons the chicken and balances the creamy sauce. - ½ cup unsalted butter, melted, about 8 tablespoons / 113 g
Brushed over the rolls to create a rich garlic bread flavor. - 1 jar Alfredo sauce, about 15 oz / 425 g
Coats the chicken and pasta in a creamy sauce. - 3-4 teaspoons garlic and herb seasoning, divided
Adds savory herb flavor to both the chicken and the bread bowls.
Instructions
- Preheat the oven to 375°F (190°C).
- Cook the pasta according to the package instructions until al dente.
- Drain the pasta and set it aside.
- Heat the olive oil in a skillet over medium heat.
- Add the cubed chicken breasts to the skillet.
- Season the chicken with salt, freshly ground black pepper, and 1 tablespoon of the garlic and herb seasoning.
- Cook until the chicken is browned and fully cooked through.
- In a large bowl, combine the cooked pasta, cooked chicken, Alfredo sauce, and shredded Parmesan cheese.
- Mix until the pasta and chicken are evenly coated in the creamy Alfredo sauce.
- Cut the tops off the kaiser rolls.
- Hollow out the centers of the rolls to create bread bowls.
- Brush the outside of each roll with melted unsalted butter.
- Sprinkle the rolls with the remaining garlic and herb seasoning.
- Place the prepared rolls on a baking sheet.
- Fill each bread bowl with the chicken Alfredo pasta mixture.
- Bake for 15 to 20 minutes, or until the rolls are golden, crisp, and heated through.
- Serve warm.
Notes
- Add broccoli, spinach, mushrooms, or peas to the pasta for extra flavor and nutrition.
- Use penne for easier filling, or fettuccine for a more classic Alfredo-style texture.
- Serve right away so the bread bowls stay crisp on the outside and creamy inside.

Fernando is the creator and writer behind the food blog Eating with your Hands. Living and working in cities like Paris, Barcelona, and Berlin, and being married to a Canadian foodie, has given Fernando a passion and interest in food and inspired him to run EWYH.