
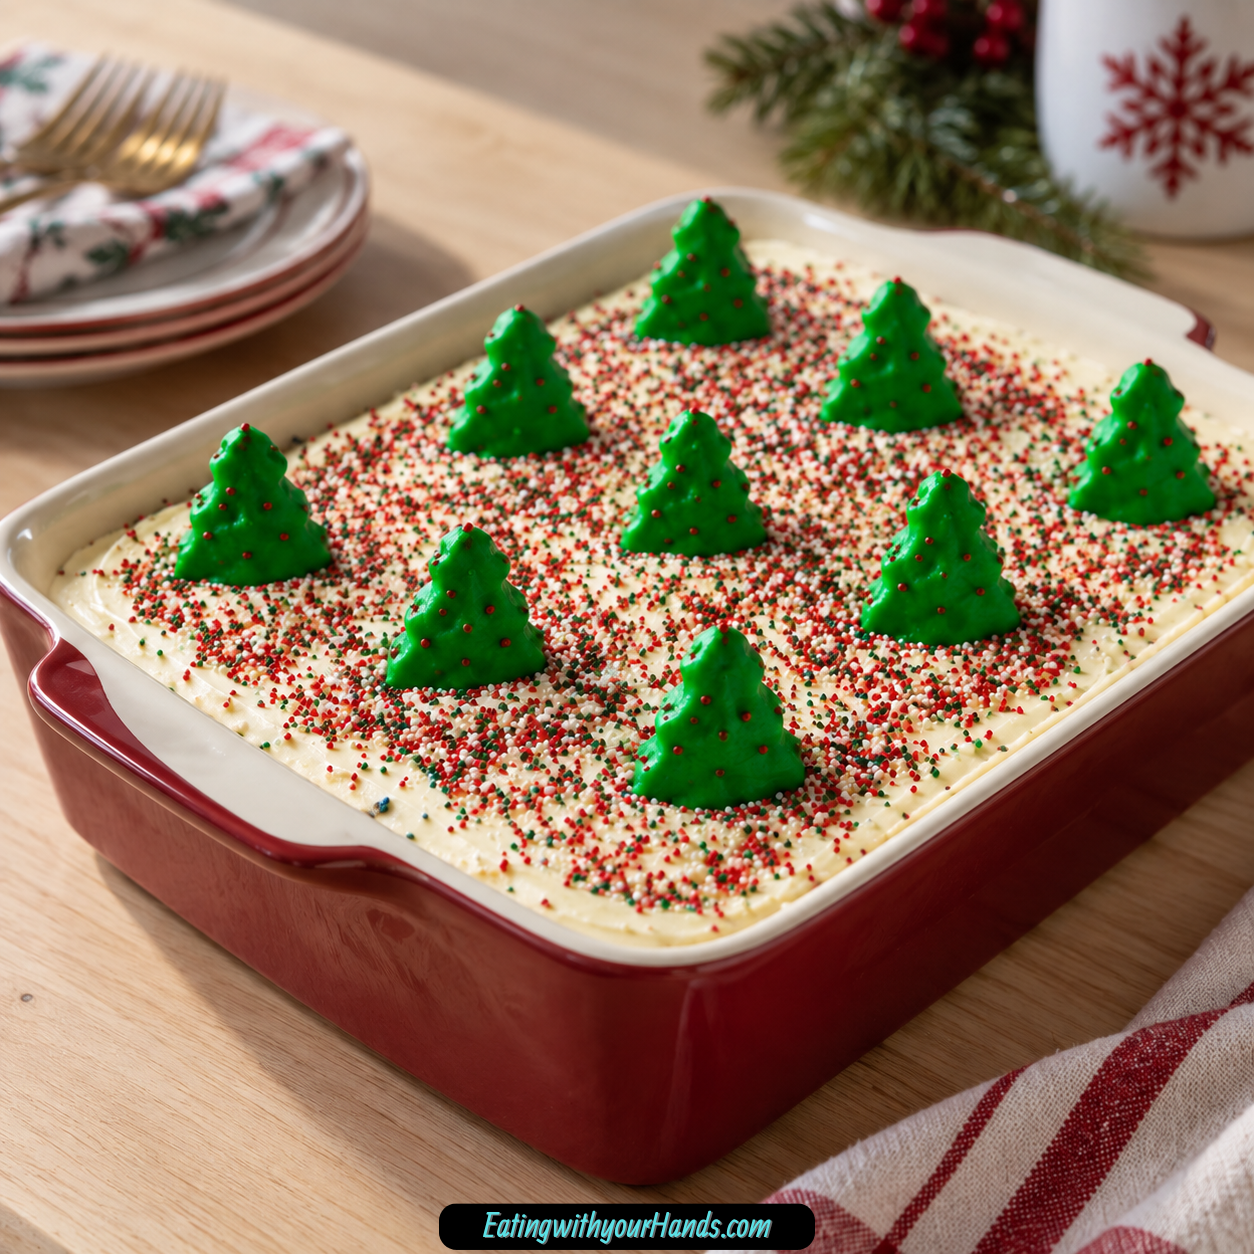
Christmas Dirt Cake is the kind of holiday dessert that makes people smile before they even take a bite. It is playful, creamy, chocolatey, and full of festive charm, with crushed Oreos, smooth pudding, fluffy cream cheese filling, Little Debbie Christmas Tree Brownies, and cheerful holiday sprinkles layered into one no-bake dessert.
There is something wonderfully nostalgic about a dirt cake. It has the kind of spoonable, layered texture that feels casual and fun, yet this Christmas version looks festive enough for a holiday table.
This dessert is perfect for the busy season because it does not require baking. When the oven is full, the schedule is tight, and everyone still wants something sweet, this chilled dessert steps in beautifully.
The Oreo crust gives the bottom layer that classic chocolate “dirt” texture. Melted salted butter helps bind the crumbs together so the dessert has a firm base underneath the creamy layers.
The cream cheese mixture brings richness and structure. Softened cream cheese, softened salted butter, powdered sugar, vanilla extract, and Cool Whip blend into a light, sweet layer that makes every scoop taste creamy.
The pudding layer keeps the dessert smooth and comforting. Instant vanilla pudding and whole milk create a soft base that pairs perfectly with the crushed cookies and brownie pieces.
Then come the Little Debbie Christmas Tree Brownies, which make this dessert feel unmistakably festive. They add surprise, color, chocolate flavor, and a fun holiday touch that kids and adults both notice right away.
Table of Contents
- Why You’ll Love This Christmas Dirt Cake
- Recipe Details
- Ingredients
- Ingredient Notes
- Optional Swaps, Variations, Add-Ins, and Serving Ideas
- Why This Recipe Works
- Directions
- Step 1: Choose Your Serving Dish
- Step 2: Crush the Oreos
- Step 3: Melt the Butter for the Crust
- Step 4: Mix the Oreo Crust
- Step 5: Press the Crust into the Dish
- Step 6: Smooth the Crust Layer
- Step 7: Soften the Cream Cheese
- Step 8: Soften the Butter
- Step 9: Beat the Cream Cheese and Butter
- Step 10: Add Powdered Sugar
- Step 11: Add Vanilla Extract
- Step 12: Check for Smoothness
- Step 13: Add the Cool Whip
- Step 14: Fold Gently
- Step 15: Set the Cream Cheese Mixture Aside
- Step 16: Prepare the Pudding Bowl
- Step 17: Add the Whole Milk
- Step 18: Whisk the Pudding
- Step 19: Check the Pudding Thickness
- Step 20: Spread the First Pudding Layer
- Step 21: Add the First Cream Cheese Layer
- Step 22: Prepare the Christmas Tree Brownies
- Step 23: Add the First Brownie Layer
- Step 24: Add the Remaining Pudding
- Step 25: Add the Remaining Cream Cheese Mixture
- Step 26: Finish with More Brownies
- Step 27: Add Holiday Sprinkles
- Step 28: Cover the Dessert
- Step 29: Chill for at Least 4 Hours
- Step 30: Chill Overnight for Best Results
- Step 31: Serve Cold
- Step 32: Serve for Parties
- Step 33: Store Leftovers
- Step 34: Avoid Freezing
- Serving Ideas
- Storage
- Freezing
- Make-Ahead
- Helpful Notes for Best Results
- Variations
- Troubleshooting
- The Oreo Crust Is Too Loose
- The Cream Cheese Mixture Has Lumps
- The Cream Cheese Layer Is Not Fluffy
- The Pudding Is Runny
- The Layers Look Messy
- The Brownies Do Not Fit the Dish
- The Dessert Needs to Be Made Ahead
- The Dessert Needs to Be Gluten-Free
- The Dessert Needs a Cool Whip Substitute
- The Dessert Was Frozen
- Frequently Asked Questions
- Can I make Christmas Dirt Cake ahead of time?
- Can I use homemade whipped cream instead of Cool Whip?
- What if I cannot find Christmas Tree Brownies?
- Can I make this dessert gluten-free?
- Why is my dessert runny?
- How long does Christmas Dirt Cake last?
- Can I freeze Christmas Dirt Cake?
- Can I serve this in cups?
- Why This Recipe Works So Well
- Final Thoughts
- Christmas Dirt Cake
Why You’ll Love This Christmas Dirt Cake
This is a no-bake dessert, which makes it perfect for busy holiday schedules. You can assemble the layers, cover the dish, and let the refrigerator do the rest.
It is fun, festive, and kid-approved. The crushed Oreos, creamy layers, brownies, and sprinkles make it feel playful and exciting.
It has creamy layers with cookies, pudding, and brownies. Every scoop gives you a mix of soft filling, chocolate crumbs, and festive brownie pieces.
It is easy to make ahead for stress-free entertaining. Overnight chilling is recommended for the best texture and flavor.
It uses simple, store-bought ingredients. Oreos, pudding mix, Cool Whip, and Little Debbie Christmas Tree Brownies keep the prep easy.
It looks impressive with minimal effort. Holiday sprinkles and Christmas Tree Brownies make the top look cheerful without complicated decorating.
Recipe Details
Christmas Dirt Cake is a no-bake dessert. It is assembled in layers and chilled until cold, creamy, and scoopable.
The dessert uses a large serving dish. The Oreo crust is pressed into the bottom before the pudding, cream cheese mixture, brownies, and sprinkles are added.
The Oreo crust is made with 36 regular Oreos and 3 tablespoons melted salted butter. The Oreos are crushed finely with a food processor or rolling pin.
The cream cheese mixture uses 1 package softened cream cheese, 5 tablespoons softened salted butter, ⅔ cup powdered sugar, 1 teaspoon vanilla extract, and 8 ounces thawed Cool Whip.
The pudding layer uses 2 boxes instant vanilla pudding and 2½ cups whole milk. Each pudding box is 3.9 ounces.
The festive brownie layer uses 8 to 10 Little Debbie Christmas Tree Brownies. They can be broken or cut as needed to fit the dish.
Festive holiday sprinkles finish the dessert. They add color, decoration, and extra Christmas cheer.
Christmas Dirt Cake should chill for at least 4 hours before serving. Overnight chilling is best for clean layers and blended flavors.
Leftovers should be stored covered in the refrigerator for up to 4 days. Freezing is not recommended because the creamy layers can change texture when thawed.
Ingredients
For the Oreo Crust
- 36 regular Oreos
- 3 tablespoons salted butter, melted
For the Cream Cheese Mixture
- 1 (8-ounce) package cream cheese, softened
- 5 tablespoons salted butter, softened
- ⅔ cup powdered sugar
- 1 teaspoon vanilla extract
- 8 ounces Cool Whip, thawed
For the Pudding Layer
- 2 (3.9-ounce) boxes instant vanilla pudding
- 2½ cups whole milk
For the Brownie Layer and Decoration
- 8-10 Little Debbie Christmas Tree Brownies
- Festive holiday sprinkles
Ingredient Notes
Regular Oreos form the classic “dirt” crust and layers. They bring the chocolate cookie flavor that makes dirt cake so nostalgic.
The Oreos should be crushed finely. A food processor works quickly, but a rolling pin also works well.
Melted salted butter helps bind the Oreo crust together. It gives the crumbs enough moisture to press into the bottom of the dish.
Softened cream cheese adds richness and structure to the creamy layer. It should be fully softened to avoid lumps.
Softened salted butter enhances the flavor and smoothness of the cream cheese mixture. It blends best when it is soft.
Powdered sugar sweetens the cream cheese mixture. It mixes smoothly into the cream cheese and butter.
Vanilla extract adds warmth and depth. It gives the creamy layer a more rounded flavor.
Cool Whip keeps the cream cheese layer light and fluffy. It should be thawed before folding into the mixture.
Instant vanilla pudding creates a smooth, creamy base. Whole milk helps the pudding set properly.
Little Debbie Christmas Tree Brownies create the festive surprise layer. They make the dessert feel fun, nostalgic, and clearly Christmas-ready.
Festive holiday sprinkles finish the top. They add color and holiday cheer with almost no effort.
Optional Swaps, Variations, Add-Ins, and Serving Ideas
Chocolate Pudding Christmas Dirt Cake
Use chocolate pudding instead of vanilla pudding for a richer twist. This makes the dessert even more chocolate-forward.
The chocolate pudding pairs well with Oreos and brownies. It is a simple variation for chocolate lovers.
Individual Christmas Dirt Cake Cups
Serve the dessert in individual cups for parties. This makes it easy for guests to grab their own portion.
Individual cups also show off the layers beautifully. They are great for holiday buffets and dessert tables.
Homemade Whipped Cream Version
You can use homemade whipped cream instead of Cool Whip. Stabilized whipped cream works best to maintain structure.
This keeps the creamy layer from becoming too loose. The texture may be different from the Cool Whip version.
Brownie Bite Version
If you cannot find Christmas Tree Brownies, use any brownie bites. This keeps the brownie layer in the dessert.
The look will be different, but the chocolate brownie surprise remains. It is a helpful substitute.
Festive Brownie Shape Version
You can cut brownies into festive shapes if Christmas Tree Brownies are not available. This keeps the holiday spirit in the dessert.
Use shapes that fit your serving dish. The brownies can be broken or cut as needed.
Gluten-Free Christmas Dirt Cake
Use gluten-free sandwich cookies and gluten-free brownies for an easy swap. This creates a gluten-free direction for the dessert.
Check the other ingredients as needed. The layering method stays the same.
Extra Sprinkle Christmas Dirt Cake
Use festive holiday sprinkles generously over the top. This makes the dessert brighter and more cheerful.
Sprinkles are the easiest decoration. They add instant Christmas color.
Make-Ahead Christmas Dirt Cake
Prepare the dessert a day in advance. Overnight chilling is actually recommended.
The flavors blend as the cake sits. The layers also become cleaner and easier to scoop.
Why This Recipe Works
Christmas Dirt Cake works because it combines familiar textures in a fun layered dessert. The Oreo crust is crumbly and chocolatey, the pudding is smooth, the cream cheese layer is fluffy, and the brownies add soft, festive bites.
The no-bake method makes the dessert practical. You do not need to turn on the oven or wait for baked layers to cool.
The melted butter helps the Oreo crumbs become a crust. Pressing the mixture evenly into the serving dish creates the base for the dessert.
The cream cheese mixture adds richness. Cream cheese, butter, powdered sugar, vanilla, and Cool Whip create a sweet layer that feels light but still indulgent.
The pudding layer adds creamy softness. Whisking the pudding mix with whole milk until thickened gives the dessert structure.
The brownies make it playful. Little Debbie Christmas Tree Brownies turn a classic dirt cake into a holiday dessert with surprise pieces inside.
Chilling is what brings everything together. At least 4 hours helps the layers set, while overnight chilling gives the best texture and flavor.
Directions
Step 1: Choose Your Serving Dish
Set out a large serving dish before you begin. This dessert is assembled directly in the dish and will stay there while it chills.
Choose something deep enough to hold all the layers. The Oreo crust, pudding, cream cheese mixture, brownies, and sprinkles all need room.
Step 2: Crush the Oreos
Place 36 regular Oreos in a food processor or crush them with a rolling pin. Crush them finely so they form a classic dirt-style crumb.
A food processor will make the crumbs even and quick. A rolling pin works too if you crush the cookies in a sealed bag.
Step 3: Melt the Butter for the Crust
Melt 3 tablespoons salted butter. The butter should be fully melted so it can coat the Oreo crumbs.
Salted butter helps bind the crust together. It also adds a little flavor balance to the sweet cookies.
Step 4: Mix the Oreo Crust
Add the crushed Oreos to a bowl. Pour the melted salted butter over the crumbs.
Mix until the crumbs are evenly coated. The texture should be damp enough to press into the dish.
Step 5: Press the Crust into the Dish
Transfer the Oreo mixture to the bottom of the large serving dish. Spread it evenly across the base.
Press the crumbs down gently but firmly. This creates the crust layer for the Christmas Dirt Cake.
Step 6: Smooth the Crust Layer
Use the back of a spoon or spatula to smooth the crust. Try to make the thickness even from edge to edge.
A level crust helps the next layers sit neatly. Set the dish aside while you prepare the creamy mixture.
Step 7: Soften the Cream Cheese
Use 1 package of cream cheese, 8 ounces, softened. The cream cheese must be fully softened to avoid lumps.
Let it sit until it is easy to beat. Soft cream cheese creates a smoother layer.
Step 8: Soften the Butter
Use 5 tablespoons salted butter, softened. It should be soft enough to blend smoothly with the cream cheese.
Softened butter improves the texture of the cream cheese mixture. It also adds flavor and smoothness.
Step 9: Beat the Cream Cheese and Butter
Add the softened cream cheese and softened salted butter to a mixing bowl. Beat them together until smooth and creamy.
Take your time with this step. A smooth base helps prevent lumps in the finished dessert.
Step 10: Add Powdered Sugar
Add ⅔ cup powdered sugar to the cream cheese and butter mixture. Mix until fully combined.
The powdered sugar sweetens the creamy layer. Keep mixing until the mixture looks smooth.
Step 11: Add Vanilla Extract
Add 1 teaspoon vanilla extract. Mix it into the cream cheese mixture.
The vanilla adds warmth and depth. It helps the creamy layer taste complete.
Step 12: Check for Smoothness
Scrape down the sides of the bowl. Beat again briefly if needed.
The mixture should be creamy and free of visible lumps. This makes the dessert texture much better.
Step 13: Add the Cool Whip
Add 8 ounces thawed Cool Whip to the bowl. Do not beat it harshly.
Cool Whip keeps the cream cheese layer light and fluffy. It should be folded in gently.
Step 14: Fold Gently
Use a spatula and light strokes to fold the Cool Whip into the cream cheese mixture. Fold until combined.
Try to keep the mixture airy. Overmixing can make the layer less fluffy.
Step 15: Set the Cream Cheese Mixture Aside
Once the cream cheese mixture is smooth and fluffy, set it aside. It will be used in two layers.
Keep it nearby while you prepare the pudding. The dessert will be assembled shortly.
Step 16: Prepare the Pudding Bowl
Set out a separate mixing bowl. Add 2 boxes instant vanilla pudding.
Each box should be 3.9 ounces. This pudding creates the smooth, creamy base.
Step 17: Add the Whole Milk
Pour in 2½ cups whole milk. Whole milk helps the pudding set properly.
Add the milk to the pudding mix before whisking. Make sure the bowl is large enough for mixing.
Step 18: Whisk the Pudding
Whisk the instant vanilla pudding mix and whole milk together. Whisk for about 2 minutes.
The mixture should thicken. It should become smooth and creamy.
Step 19: Check the Pudding Thickness
Look at the pudding after whisking. It should be thick enough to spread.
If it still looks too loose, keep whisking briefly. Properly thickened pudding helps prevent a runny dessert.
Step 20: Spread the First Pudding Layer
Spoon half of the pudding over the Oreo crust. Spread it evenly.
Use a spatula to smooth it gently. Try not to disturb the crust underneath.
Step 21: Add the First Cream Cheese Layer
Spoon half of the cream cheese mixture over the pudding. Spread it evenly to the edges.
This layer should be light and fluffy. Use gentle strokes so the pudding layer stays in place.
Step 22: Prepare the Christmas Tree Brownies
Set out 8 to 10 Little Debbie Christmas Tree Brownies. These create the festive surprise layer.
Break or cut them as needed to fit the dish. The goal is to create a brownie layer across the dessert.
Step 23: Add the First Brownie Layer
Place a layer of Little Debbie Christmas Tree Brownies on top of the cream cheese mixture. Fit the pieces into the dish.
This layer adds soft brownie texture and holiday personality. It is one of the most fun parts of the dessert.
Step 24: Add the Remaining Pudding
Spread the remaining pudding over the brownie layer. Use a spatula to smooth it.
Work gently so the brownies stay in place. Cover as much of the layer as possible.
Step 25: Add the Remaining Cream Cheese Mixture
Spoon the remaining cream cheese mixture over the pudding. Spread it evenly.
This creates the final creamy layer. Smooth it gently toward the edges.
Step 26: Finish with More Brownies
Add another layer of brownies on top. Break or cut them as needed to fit the dish.
This makes the top festive and fun. The brownies also signal what is hidden inside the layers.
Step 27: Add Holiday Sprinkles
Sprinkle festive holiday sprinkles generously over the top. This is the fun decorating moment.
Get creative with the sprinkles. They bring color, cheer, and a Christmas dessert-table look.
Step 28: Cover the Dessert
Cover the dish before chilling. Use a lid, plastic wrap, or another secure cover.
Covering keeps the dessert fresh in the refrigerator. It also protects the toppings.
Step 29: Chill for at Least 4 Hours
Refrigerate the Christmas Dirt Cake for at least 4 hours. This gives the layers time to set.
The pudding firms up, the Oreo crust settles, and the cream cheese layer becomes scoopable. Do not rush this step.
Step 30: Chill Overnight for Best Results
Overnight chilling is best for clean layers and melded flavors. If you can make it a day ahead, the dessert will be even better.
The flavors blend as the dessert sits. The layers hold together more beautifully when well chilled.
Step 31: Serve Cold
Serve Christmas Dirt Cake cold, straight from the refrigerator. The layers hold together best when chilled.
Use a large spoon or dessert server to scoop through the layers. Each serving should include crust, pudding, cream cheese mixture, brownies, and sprinkles.
Step 32: Serve for Parties
This dessert is perfect for holiday buffets and dessert tables. It is easy to scoop and share.
You can also serve it in individual cups for parties. That makes the dessert portable and neat.
Step 33: Store Leftovers
Cover leftovers and store them in the refrigerator. The dessert will stay fresh for up to 4 days.
Keep it cold until serving. The creamy layers need refrigeration.
Step 34: Avoid Freezing
Freezing is not recommended for this dessert. The creamy layers can change texture when thawed.
For best results, enjoy it from the refrigerator within the storage window. Make it ahead by chilling overnight instead of freezing.
Serving Ideas
Christmas Dirt Cake is best served cold. The layers hold together beautifully when well chilled, which makes it easy to scoop and serve.
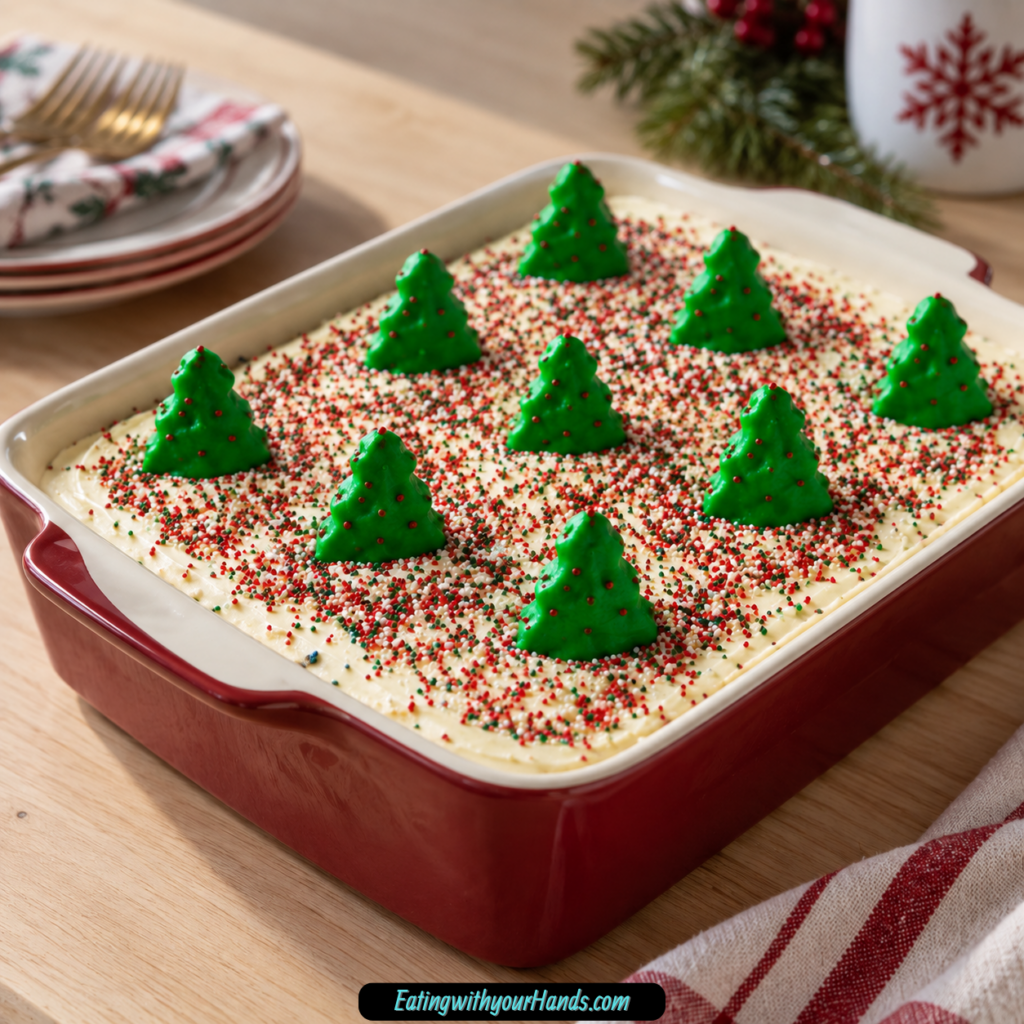
Serve it straight from the large serving dish for a casual holiday dessert. It looks playful and festive with brownies and sprinkles on top.
This dessert is perfect for holiday buffets. Guests can scoop their own servings and enjoy the creamy layers with crunchy Oreo crumbs.
It also works beautifully for dessert tables. The Little Debbie Christmas Tree Brownies make it look cheerful with very little decorating effort.
For parties, serve it in individual cups. Individual portions are fun, neat, and easy for guests to grab.
Christmas Dirt Cake is a great dessert for Christmas parties, potlucks, cozy family nights, and winter gatherings. It tastes nostalgic, creamy, and chocolatey in every spoonful.
Storage
Store leftover Christmas Dirt Cake covered in the refrigerator. It will stay fresh for up to 4 days.
Keep the dessert cold because of the pudding, cream cheese, and Cool Whip layers. Covering it also protects the top from drying out.
This dessert is ideal for making ahead. It tastes even better the next day after the flavors have fully blended.
Freezing
Freezing is not recommended for Christmas Dirt Cake. The creamy layers can change texture when thawed.
Because this dessert stores well in the refrigerator, make-ahead chilling is the better option. Prepare it the day before and keep it covered.
Enjoy it within 4 days for the best texture. Keep it refrigerated until serving.
Make-Ahead
Christmas Dirt Cake is perfect for making ahead. Overnight chilling is actually recommended for the best texture and flavor.
Assemble the dessert, cover it, and refrigerate it. The layers will become cleaner and the flavors will meld as it rests.
This makes it a helpful dessert for holiday schedules. You can prepare it before a party and serve it cold when guests arrive.
Helpful Notes for Best Results
Use a food processor to crush the Oreos evenly and quickly. A rolling pin also works if you do not have a food processor.
Make sure the cream cheese is fully softened before mixing. This helps avoid lumps in the cream cheese layer.
Beat the cream cheese and butter until smooth before adding powdered sugar and vanilla. Taking your time here improves the final texture.
Fold the Cool Whip gently. Light strokes help keep the mixture fluffy.
Whisk the pudding for about 2 minutes until thickened. Properly thickened pudding helps prevent a runny dessert.
Refrigerate overnight for the best texture and flavor. At least 4 hours is needed, but overnight is best.
You can substitute chocolate pudding for a richer twist. Individual serving cups also work great for parties.
Variations
Chocolate Christmas Dirt Cake
Use chocolate pudding instead of vanilla pudding. This makes the dessert richer and more chocolatey.
The chocolate pudding works well with Oreos and brownies. It is a simple way to deepen the flavor.
Individual Christmas Dirt Cake Cups
Layer the dessert in individual cups instead of one large dish. This works great for parties.
Each cup can include Oreo crust, pudding, cream cheese mixture, brownies, and sprinkles. It makes serving easy.
Homemade Whipped Cream Christmas Dirt Cake
Use homemade whipped cream instead of Cool Whip. Stabilized whipped cream works best to maintain structure.
This substitution changes the texture. Use stabilized whipped cream if you want the layers to hold.
Brownie Bite Dirt Cake
If Little Debbie Christmas Tree Brownies are not available, use any brownie bites. This keeps the surprise brownie layer.
The look will be less Christmas-specific. Sprinkles can still make the dessert festive.
Festive Cut Brownie Dirt Cake
Use cut brownies shaped for the holidays. This is another option if Christmas Tree Brownies are unavailable.
Cut or break them as needed to fit the dish. The brownies should still layer into the dessert.
Gluten-Free Christmas Dirt Cake
Use gluten-free sandwich cookies and gluten-free brownies. This creates an easy gluten-free swap.
Check the pudding and other ingredients if needed. The no-bake layering method stays the same.
Extra Sprinkle Dirt Cake
Add festive holiday sprinkles generously on top. This gives the dessert more holiday color.
Sprinkles are simple but effective. They make the dessert look fun with minimal effort.
Troubleshooting
The Oreo Crust Is Too Loose
Make sure the Oreos are crushed finely and mixed well with the melted salted butter. The crumbs should be evenly coated.
Press the crust firmly into the bottom of the serving dish. A compact crust holds better under the layers.
The Cream Cheese Mixture Has Lumps
Make sure the cream cheese is fully softened. Soft cream cheese blends much more smoothly with butter.
Beat the cream cheese and softened butter until smooth before adding the powdered sugar and vanilla. Take your time during this step.
The Cream Cheese Layer Is Not Fluffy
Fold the Cool Whip gently with a spatula. Use light strokes to keep the mixture airy.
Do not stir too aggressively. Overmixing can reduce the fluffy texture.
The Pudding Is Runny
Whisk the pudding mix and whole milk for about 2 minutes until thickened. The pudding should not be poured while thin.
Make sure the pudding has fully thickened before layering. This helps the dessert hold together.
The Layers Look Messy
Spread each layer gently with a spatula. Avoid pressing too hard into the layer underneath.
Chill the dessert for at least 4 hours. Overnight chilling gives cleaner layers and a better texture.
The Brownies Do Not Fit the Dish
Break or cut the Little Debbie Christmas Tree Brownies as needed. They do not need to fit perfectly.
Arrange them in a layer across the dessert. The playful look is part of the charm.
The Dessert Needs to Be Made Ahead
Make the dessert a day in advance. Overnight chilling is recommended.
Keep it covered in the refrigerator until serving. The flavor and texture improve as it chills.
The Dessert Needs to Be Gluten-Free
Use gluten-free sandwich cookies and gluten-free brownies. This creates an easy swap.
Check any other ingredients if needed. The layering method remains the same.
The Dessert Needs a Cool Whip Substitute
Use homemade whipped cream if desired. Stabilized whipped cream works best to maintain structure.
The final texture may vary. Use a stabilized version for best layering.
The Dessert Was Frozen
Freezing is not recommended. The creamy layers can change texture when thawed.
For best results, store the dessert covered in the refrigerator. Enjoy within 4 days.
Frequently Asked Questions
Can I make Christmas Dirt Cake ahead of time?
Yes, Christmas Dirt Cake is perfect for making a day in advance. Overnight chilling is actually recommended.
The dessert tastes even better once the flavors have blended. Keep it covered in the refrigerator until serving.
Can I use homemade whipped cream instead of Cool Whip?
Yes, homemade whipped cream can be used instead of Cool Whip. Stabilized whipped cream works best to maintain structure.
The texture may be different. Use a version that can hold up in layered desserts.
What if I cannot find Christmas Tree Brownies?
You can substitute any brownie bites. You can also cut brownies into festive shapes.
This keeps the brownie layer in the dessert. Holiday sprinkles can help keep the Christmas look.
Can I make this dessert gluten-free?
Yes, use gluten-free sandwich cookies and gluten-free brownies. This is an easy swap.
Check other ingredients as needed. The dessert is still layered and chilled the same way.
Why is my dessert runny?
Make sure the pudding has fully thickened before layering. Whisk it with the whole milk for about 2 minutes.
Also allow enough chilling time. At least 4 hours is needed, and overnight chilling is best.
How long does Christmas Dirt Cake last?
Store leftovers covered in the refrigerator for up to 4 days. Keep it cold until serving.
The dessert tastes even better the next day. The flavors blend as it chills.
Can I freeze Christmas Dirt Cake?
Freezing is not recommended. The creamy layers can change texture when thawed.
Make it ahead by refrigerating it overnight instead. This gives the best flavor and texture.
Can I serve this in cups?
Yes, individual serving cups work great for parties. They make the dessert easy to serve.
Layer each cup with crumbs, pudding, cream cheese mixture, brownies, and sprinkles. Keep the cups chilled until serving.
Why This Recipe Works So Well
Christmas Dirt Cake works so well because it takes a familiar no-bake dessert and turns it into something festive with simple store-bought ingredients. The crushed Oreos create the classic dirt cake base, while pudding and cream cheese filling make the dessert soft and creamy.
The salted butter in the crust helps bind the Oreo crumbs. It gives the base enough structure to hold the first pudding layer.
The cream cheese mixture adds richness and sweetness. Cream cheese, butter, powdered sugar, vanilla, and Cool Whip create a fluffy layer that balances the pudding.
The vanilla pudding brings smoothness. Whole milk helps it set properly so it can be spread into the dish.
The Little Debbie Christmas Tree Brownies make the dessert memorable. They add brownie pieces, color, and a playful holiday surprise inside the layers.
The sprinkles finish everything with Christmas cheer. They make the top look fun without requiring careful decorating.
The recipe is also flexible. Chocolate pudding, individual cups, stabilized whipped cream, brownie bites, festive brownie shapes, gluten-free sandwich cookies, and gluten-free brownies all give you ways to adapt it.
Most of all, this dessert works because it feels joyful, casual, and nostalgic. It is creamy, chocolatey, no-bake, make-ahead friendly, and easy to scoop onto plates during the busiest, happiest days of the season.
Final Thoughts
Christmas Dirt Cake is a festive no-bake dessert made with crushed Oreos, salted butter, cream cheese, powdered sugar, vanilla, Cool Whip, instant vanilla pudding, whole milk, Little Debbie Christmas Tree Brownies, and holiday sprinkles. It is layered in a large serving dish, chilled for at least 4 hours, and served cold.
Make it for Christmas parties, potlucks, holiday buffets, dessert tables, individual party cups, or cozy family nights. With its creamy layers, Oreo crust, brownie surprises, make-ahead convenience, and cheerful sprinkles, this Christmas Dirt Cake brings playful holiday sweetness to every scoop.
Christmas Dirt Cake
Festive, creamy, chocolatey, and completely no-bake, this Christmas Dirt Cake layers a buttery Oreo crust with vanilla pudding, a smooth cream cheese mixture, Cool Whip, Christmas Tree Brownies, and holiday sprinkles. It is a chilled dessert made for holiday parties, clean layered servings, and sweet Christmas table fun.
Recipe Details
- Prep Time: 20 minutes
- Chill Time: 4 hours
- Total Time: 4 hours 20 minutes
- Servings: 8
- Calories: 420 kcal
Ingredients
For the Oreo Crust and Layers
- 36 regular Oreos
- 3 tablespoons salted butter melted
- 8 -10 Little Debbie Christmas Tree Brownies
- Festive holiday sprinkles
For the Cream Cheese Mixture
- 1 8-ounce package cream cheese, softened
- 5 tablespoons salted butter softened
- ⅔ cup powdered sugar
- 1 teaspoon vanilla extract
- 8 ounces Cool Whip thawed
For the Vanilla Pudding
- 2 3.9-ounce boxes instant vanilla pudding
- 2½ cups whole milk
Instructions
Step 1: Make the Oreo Crust
Crush Oreos finely and mix with melted butter. Press evenly into the bottom of a large serving dish to form the crust.
Step 2: Beat the Cream Cheese and Butter
In a bowl, beat softened cream cheese and softened butter until smooth. Make sure the mixture is creamy before adding the next ingredients.
Step 3: Add Sugar and Vanilla
Add powdered sugar and vanilla extract. Mix until combined.
Step 4: Fold in the Cool Whip
Gently fold in Cool Whip and set aside. Keep the mixture light and smooth for layering.
Step 5: Make the Pudding
In another bowl, whisk pudding mix and milk for 2 minutes until thickened.
Step 6: Start the First Layers
Spread half of the pudding over the Oreo crust. Layer half of the cream cheese mixture on top.
Step 7: Add the Brownies
Add a layer of Christmas Tree Brownies over the cream cheese mixture.
Step 8: Repeat the Layers
Repeat layers with remaining pudding, cream cheese mixture, and brownies.
Step 9: Add Holiday Sprinkles
Top with festive holiday sprinkles. Spread them over the top for a Christmas finish.
Step 10: Chill Before Serving
Refrigerate for at least 4 hours or overnight before serving.
Notes
- Use a food processor for evenly crushed Oreos.
- Ensure cream cheese is fully softened for a smooth texture.
- Chill overnight for the best flavor and clean layers.
- Store covered in the refrigerator for up to 4 days.
Serving Suggestions
Serve this Christmas Dirt Cake chilled after it has refrigerated for at least 4 hours or overnight. The Oreo crust, vanilla pudding, cream cheese mixture, Cool Whip, Christmas Tree Brownies, and festive holiday sprinkles make it a fun no-bake dessert for holiday parties.
This dessert is best served cold so the layers stay clean and creamy. Chill overnight for the best flavor and neatest slices, exactly as noted.
Storage
How to Store
Store covered in the refrigerator for up to 4 days. Keep it chilled so the pudding, cream cheese mixture, Oreo crust, and brownie layers stay fresh.
Chill Time Tip
Refrigerate for at least 4 hours or overnight before serving. Chilling overnight gives the dessert the best flavor and clean layers.
Oreo Tip
Use a food processor for evenly crushed Oreos. This helps the Oreo crust press more evenly into the bottom of the large serving dish.
Cream Cheese Tip
Ensure cream cheese is fully softened for a smooth texture. Beat it with the softened butter until smooth before adding powdered sugar, vanilla extract, and Cool Whip.
Layering Tip
Spread half of the pudding over the Oreo crust, then add half of the cream cheese mixture and a layer of Christmas Tree Brownies. Repeat with the remaining pudding, cream cheese mixture, and brownies before finishing with festive holiday sprinkles.

Fernando is the creator and writer behind the food blog Eating with your Hands. Living and working in cities like Paris, Barcelona, and Berlin, and being married to a Canadian foodie, has given Fernando a passion and interest in food and inspired him to run EWYH.