
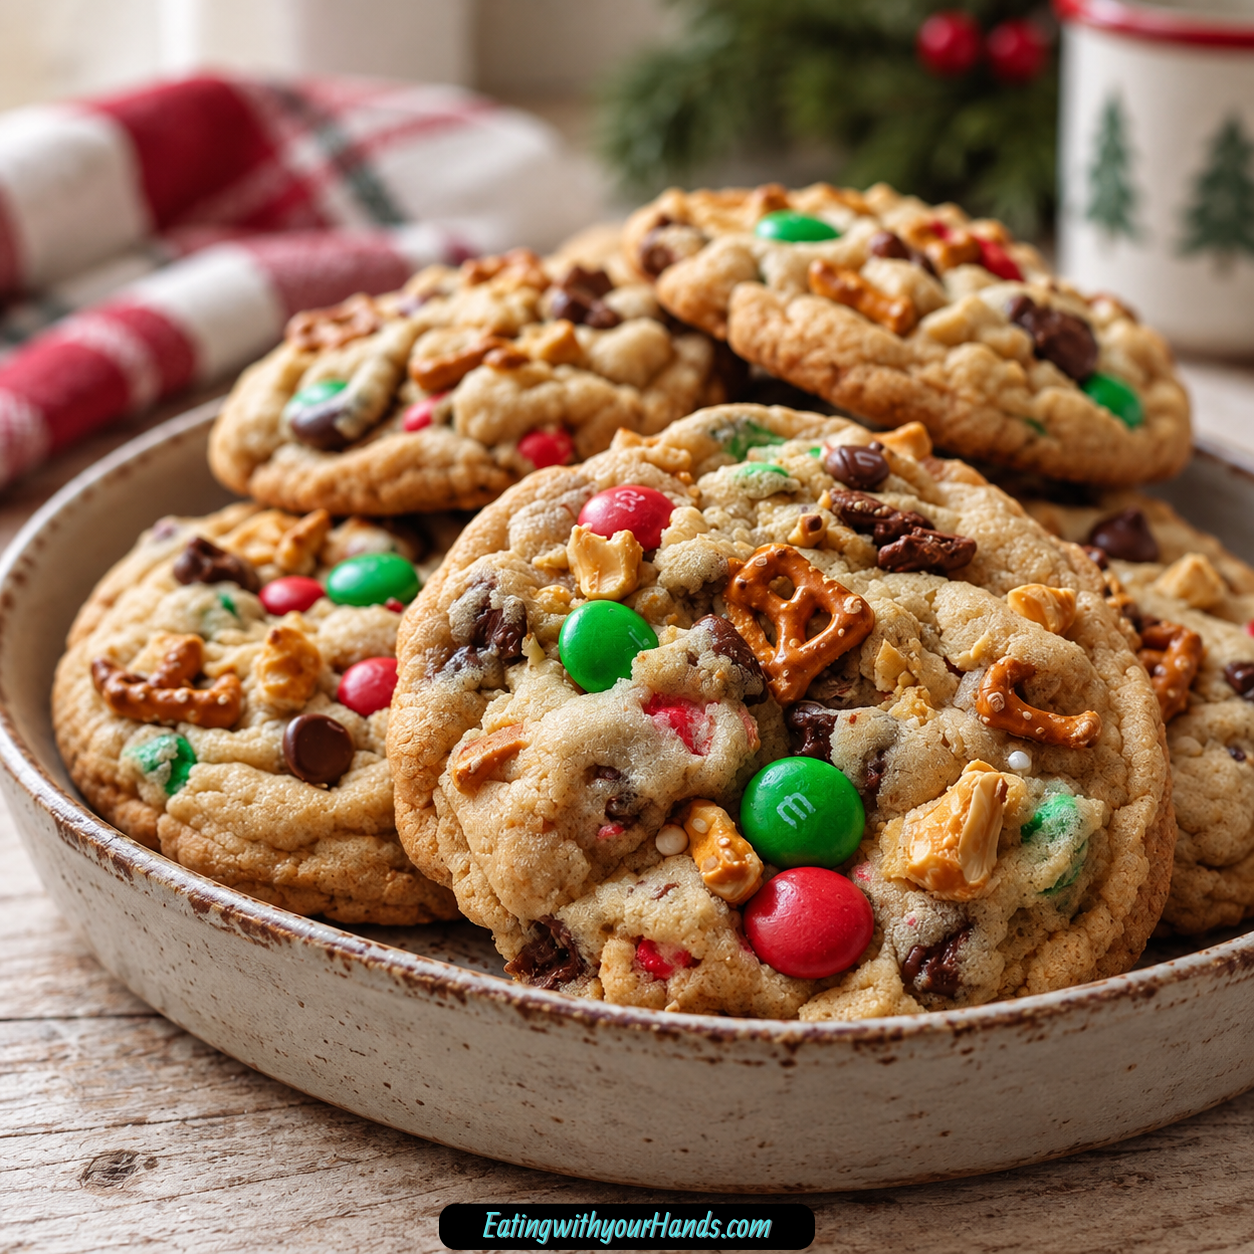

There is a certain kind of holiday cookie that looks like Christmas before you even take the first bite. These Christmas Monster Cookies are exactly that kind of treat, packed with red and green M&M’s, chocolate chips, oats, and salty little pretzel pieces that peek through every thick, golden cookie.
I wait all year for the excuse to make them. The moment a tray goes into the oven and the smell of butter, brown sugar, vanilla, oats, and chocolate starts filling the kitchen, it feels like Christmas baking has officially begun.
These cookies also bring me straight back to childhood. My mom used to let us help with the part every kid actually wants to do: throwing in all the fun mix-ins while she handled the parts that required a little more attention.
Now I make my own version using the same spirit, with a few touches that have become part of the way I bake them. The extra vanilla is one of my favorite details because it adds even more warmth to a cookie already loaded with so many textures and flavors.
And these really are loaded cookies. Each batch combines old-fashioned oats, holiday M&M’s, mini pretzels, semi-sweet chocolate chips, and white chocolate chips, so almost every bite has a slightly different combination.
That is what gives Monster Cookies their personality. One bite might lean chocolatey, another might have a salty pretzel crunch, and the next may deliver a chewy oat center with a bright candy shell.
The texture is every bit as important as the mix-ins. The edges bake until lightly golden and a little crisp, while the centers stay soft and chewy because the cookies are pulled from the oven before they look completely finished in the middle.
There is also an extra egg yolk in the dough, which supports that chewy center. Combined with the dark brown sugar and old-fashioned oats, it helps create the substantial, satisfying texture that makes these cookies feel more indulgent than a basic chocolate chip cookie.
They are festive enough for holiday parties, casual enough for family baking days, and simple enough that kids can help without turning the process into a complicated decorating project. And because the dough is basically a playground for mix-ins, there is plenty of room to change the cookies while keeping their big, cheerful personality.
Table of Contents
- Why Christmas Monster Cookies Always Get Attention
- Ingredients for Christmas Monster Cookies
- Why the Extra Egg Yolk Matters
- Dark Brown Sugar vs. Light Brown Sugar
- Choosing the Right Oats
- The Pretzel Crunch
- Holiday M&M’s and Chocolate
- Ingredient Substitutions
- How to Make Christmas Monster Cookies
- Step 1: Preheat the Oven
- Step 2: Line the Baking Sheets
- Step 3: Cream the Butter and Sugars
- Step 4: Add the Eggs and Extra Yolk
- Step 5: Add the Vanilla
- Step 6: Whisk the Dry Ingredients Separately
- Step 7: Add the Dry Ingredients Gradually
- Step 8: Fold in the Old-Fashioned Oats
- Step 9: Add the Holiday M&M’s
- Step 10: Fold in the Crushed Pretzels
- Step 11: Add Both Kinds of Chocolate Chips
- Step 12: Decide Whether the Dough Needs Chilling
- Step 13: Scoop the Dough
- Step 14: Bake for 10–12 Minutes
- Step 15: Rotate the Pans if Needed
- Step 16: Remove the Cookies Before the Centers Look Fully Done
- Step 17: Cool on the Baking Sheet for 5 Minutes
- Step 18: Transfer to a Cooling Rack
- How to Get Thick Monster Cookies
- The Best Pretzel Texture
- Why Slight Underbaking Works
- Variations for Christmas Monster Cookies
- Candy Substitutions
- Making Gluten-Free Christmas Monster Cookies
- How to Store Christmas Monster Cookies
- Freezing Unbaked Cookie Dough
- Freezing Baked Monster Cookies
- Frequently Asked Questions About Christmas Monster Cookies
- Nutritional Information
- The Cookie I Still Want Every Christmas
- Irresistible Christmas Monster Cookies
Why Christmas Monster Cookies Always Get Attention
The first thing that makes these cookies stand out is the appearance. Red and green M&M’s are scattered through the golden oat dough, so every cookie already looks dressed for the holidays before you add anything else.
The dough almost resembles Christmas confetti once everything has been folded together. There is no icing to pipe and no decorative sugar to arrange after baking; the holiday color is built right into the cookie.
Texture is another reason they disappear so quickly. Old-fashioned oats bring chewiness, pretzels create crunchy salty pockets, and the two kinds of chocolate melt into softer spots throughout the center.
Then there are the edges. Because the cookies bake for only 10–12 minutes and are removed while the middle is still soft, the outside becomes lightly golden without drying out the interior.
That contrast makes them especially satisfying. A cookie can be crisp around the perimeter, chewy in the middle, crunchy from pretzels, and melty from chocolate all at the same time.
They are also easy enough to make with kids. There are no complicated shaping techniques, so little helpers can focus on pouring in the oats, candies, pretzels, and chips.
That brings back the part of Christmas baking I remember most fondly from childhood. The recipe feels playful rather than precious, and the slightly chaotic abundance of mix-ins is part of the charm.
Ingredients for Christmas Monster Cookies
The ingredient list is generous because these cookies are meant to be packed with texture. Precise measurements still matter, especially for the flour, leaveners, butter, and sugars that form the base.
- 2 sticks (1 cup) salted butter, softened at room temperature
- 1 cup packed dark brown sugar
- ½ cup granulated sugar
- 2 large eggs
- 1 egg yolk
- 1 tablespoon pure vanilla extract
- 2 cups all-purpose flour, spooned and leveled
- 2 teaspoons baking soda
- 2 teaspoons baking powder
- ½ teaspoon kosher salt
- 2 cups old-fashioned oats, not quick oats
- 1 ¼ cups holiday M&M’s
- 1 cup mini pretzel sticks, roughly crushed
- 1 cup semi-sweet chocolate chips
- ½ cup white chocolate chips
The base is rich and buttery, but the dark brown sugar is especially important to the flavor. It gives the cookies deeper caramel notes than granulated sugar alone could provide.
The granulated sugar still has a role, helping balance the dough alongside the softer brown sugar. Using both creates a cookie with enough structure at the edges while preserving the chewy center.
Why the Extra Egg Yolk Matters
The dough uses 2 large eggs plus 1 additional egg yolk. That extra yolk is included specifically to support a chewier cookie texture.
It joins the softened butter, brown sugar, and granulated sugar before the flour goes in. Once mixed, the wet base should look smooth and glossy.
There is no need to add another whole egg in place of the yolk. The recipe specifically calls for that extra yolk as part of the balance.
Dark Brown Sugar vs. Light Brown Sugar
Dark brown sugar is the preferred choice because it gives the cookie a richer caramel character. It works particularly well with oats, chocolate, and the salty pretzel pieces.
Light brown sugar can be substituted if that is what you have. The cookies will still work, although the flavor will be somewhat lighter.
Keep the quantity the same at 1 packed cup. There is no need to change any of the other ingredients just because the brown sugar variety changes.
Choosing the Right Oats
Use 2 cups old-fashioned oats rather than quick oats. The old-fashioned variety holds its shape better and contributes the chewy texture intended for the finished cookie.
Quick oats absorb more liquid and can make the cookies drier. That is why they are not the preferred choice here.
If you are in a pinch, the FAQ suggests pulsing quick oats in a blender a few times to mimic the desired texture. Fresh old-fashioned oats remain the recommended option when available.
The Pretzel Crunch
The recipe uses 1 cup mini pretzel sticks, roughly crushed. You want a mixture of smaller pieces and visible chunks rather than turning every pretzel into powder.
The finer crumbs work their way into the dough and add salty flavor throughout. The larger pieces remain noticeable and give certain bites a distinct crunchy contrast.
That salty note is what keeps all the chocolate and candy sweetness from feeling one-dimensional. It is a small detail that makes the cookies much more interesting.
Holiday M&M’s and Chocolate
Use 1 ¼ cups red and green holiday M&M’s. They supply the obvious Christmas color and also bring a crisp candy shell against the soft cookie center.
Semi-sweet chocolate chips add another full cup of chocolate. Their deeper flavor sits nicely beside the sweeter candy pieces.
The final ½ cup white chocolate chips introduces another kind of sweetness and color. Together, the chocolate components make the cookies feel abundant without relying on one single type of mix-in.
Ingredient Substitutions
Salted butter is the standard choice because it gives the cookie additional flavor. If you use unsalted butter instead, add an extra ¼ teaspoon salt.
Light brown sugar can replace dark brown sugar. The finished flavor will be a little less deeply caramel-like, but the substitution still works.
Holiday M&M’s can also be replaced with other festive candies. Reese’s Pieces or chopped peppermint bark are suggested alternatives when you want to change the holiday character.
For a gluten-free variation, use a 1:1 gluten-free flour blend in place of the regular all-purpose flour. Keep the rest of the recipe structure the same.
How to Make Christmas Monster Cookies
The process is straightforward, but the most important details are butter temperature, proper creaming, gentle mixing, and knowing when the cookies are ready even though the centers still look soft.
Step 1: Preheat the Oven
Set the oven to 350°F. Let it fully preheat while you prepare the dough.
Starting with an oven that has already reached temperature gives the cookies a more predictable spread and baking time. It also helps the edges begin setting quickly enough to preserve a soft center.
Arrange your ingredients nearby so you can move smoothly through the mixing process. This is especially useful once the dry ingredients and mix-ins start going into the bowl.
Step 2: Line the Baking Sheets
Line the baking sheets with parchment paper. This makes cleanup much easier and provides a reliable baking surface for the thick cookie dough.
There is no need to grease the parchment. The cookies can go directly onto the lined sheets once they are portioned.
Set the prepared sheets aside until the dough is ready. You will be placing the scooped portions about 2 inches apart.
Step 3: Cream the Butter and Sugars
Place 2 sticks, or 1 cup, softened salted butter in a large mixing bowl. Add 1 cup packed dark brown sugar and ½ cup granulated sugar.
Beat the mixture for 2–3 minutes until it becomes light and fluffy. Do not rush this stage because the creaming process helps establish the cookie’s structure.
The butter should be softened but not greasy or melted. When pressed, it should accept a fingerprint while still holding its basic shape.
Step 4: Add the Eggs and Extra Yolk
Add the 2 large eggs and the 1 extra egg yolk to the creamed butter mixture. Mix until they are fully incorporated.
The dough base should become smoother and more glossy after the eggs are mixed in. Make sure there are no obvious streaks of egg remaining.
The additional yolk is part of what supports the chewy center, so keep it separate from the two whole eggs rather than changing the ratio.
Step 5: Add the Vanilla
Pour in 1 tablespoon pure vanilla extract. Mix until it disappears into the wet ingredients.
This is a generous amount of vanilla, and it is one of the details that gives these cookies their warm flavor. It complements the dark brown sugar, oats, and chocolate rather than competing with them.
Once the vanilla is incorporated, stop beating. The next stage is about combining the dry ingredients.
Step 6: Whisk the Dry Ingredients Separately
In another bowl, add 2 cups spooned-and-leveled all-purpose flour, 2 teaspoons baking soda, 2 teaspoons baking powder, and ½ teaspoon kosher salt. Whisk everything together until the leaveners and salt are evenly distributed.
This separate mixing step helps prevent concentrated pockets of baking soda or baking powder in the finished cookies. Once combined, the dry mixture can be introduced gradually.
Do not pack the flour into the measuring cup. Spoon and level it to preserve the intended flour quantity.
Step 7: Add the Dry Ingredients Gradually
Add the dry mixture to the wet ingredients in portions. Mix only until the flour disappears into the dough.
Avoid continuing to beat after the dough is combined. Overmixing is unnecessary and can interfere with the texture you want.
The dough will become thicker as the flour goes in. That is expected because it still needs to support a large volume of oats, candy, pretzels, and chocolate.
Step 8: Fold in the Old-Fashioned Oats
Add 2 cups old-fashioned oats to the dough. Stir gently until they are distributed throughout.
The oats bring both structure and chewiness. Because the cookies contain so many add-ins, folding them in before the candy and chocolate helps create a more even base.
Avoid substituting quick oats if possible. Their higher absorption can make the cookies drier.
Step 9: Add the Holiday M&M’s
Fold in 1 ¼ cups holiday M&M’s. Work slowly enough that the candies remain intact and their colors stay visible.
You want the red and green pieces distributed across the dough rather than clustered in only one section. A few streaks of color are perfectly fine.
This is also the moment when the dough really starts looking festive. The candies should remain clearly visible among the oats.
Step 10: Fold in the Crushed Pretzels
Add 1 cup roughly crushed mini pretzel sticks. Try to include both small crumbs and larger crunchy pieces.
The varied sizes create more interesting texture. Some pretzel bits blend into the dough while others stay recognizable after baking.
Fold only until they are dispersed. There is no reason to crush them further once they are in the bowl.
Step 11: Add Both Kinds of Chocolate Chips
Fold in 1 cup semi-sweet chocolate chips and ½ cup white chocolate chips. Continue gently until the mix-ins are reasonably spread throughout the dough.
At this point, the dough will look heavily loaded. That is exactly what a Monster Cookie should look like.
Stop mixing as soon as everything is distributed. Extra stirring can break down the pretzels and smear the colorful candy coating unnecessarily.
Step 12: Decide Whether the Dough Needs Chilling
If you prefer a thicker, puffier cookie, refrigerate the dough for 30 minutes before baking. This is also useful if your kitchen is warm or the butter feels especially soft.
Chilling is not required for every batch. It is an optional step specifically for greater thickness and better control when the dough feels warm.
Once chilled, continue with the same scooping and baking process. There is no change to the oven temperature.
Step 13: Scoop the Dough
Portion the dough into 2-tablespoon scoops. Try to keep the portions reasonably consistent so the cookies finish baking at roughly the same time.
There is no need to flatten the cookies before baking unless your own shaping naturally does so. Simply place the portions onto the prepared parchment.
Leave about 2 inches between each mound. The cookies need space to spread without merging together.
Step 14: Bake for 10–12 Minutes
Place the baking sheet in the 350°F oven and bake for 10–12 minutes. Watch the edges rather than waiting for the centers to appear fully baked.
The edges should just begin turning golden. The centers should still look soft when you remove the tray.
That slightly underdone appearance is intentional. The cookies continue cooking from the heat of the sheet after leaving the oven.
Step 15: Rotate the Pans if Needed
If your oven has hot spots, rotate the pans halfway through baking. You can also swap pan positions when baking more than one sheet.
This helps the cookies brown more evenly. The goal is to avoid one side becoming dark while another remains pale.
Not every oven needs this adjustment. Use it when you know your oven tends to bake unevenly.
Step 16: Remove the Cookies Before the Centers Look Fully Done
Do not wait for the center of each cookie to become firm and deeply golden. Pull the tray when the edges are just starting to brown.
This slight underbaking is what protects the chewy texture. The hot baking sheet gives the centers several additional minutes of gentle cooking after the tray leaves the oven.
Trust the visual cue rather than forcing the cookies to look finished in the oven. They will change noticeably during the cooling stage.
Step 17: Cool on the Baking Sheet for 5 Minutes
Leave the cookies on the baking sheet for 5 minutes. Do not immediately try to move them to a rack.
During this time, the centers firm up enough to hold together while staying chewy. The edges also gain more structure.
This short rest is part of the baking process. Skipping it can cause very soft cookies to break during transfer.
Step 18: Transfer to a Cooling Rack
After 5 minutes, move the cookies carefully to a rack. Let them continue cooling until they are firm enough to handle comfortably.
The final texture should have a tender, chewy center surrounded by slightly crisp edges. Pretzel pieces and M&M shells provide additional crunch inside that soft structure.
Once cooled, the cookies are ready for a holiday platter, storage container, or freezer stash.

How to Get Thick Monster Cookies
If you like cookies that bake up especially puffy, chill the dough for 30 minutes before scooping and baking. Cooler butter spreads more slowly in the oven.
This step is particularly useful in a warm kitchen. Softened butter should hold its shape rather than looking shiny or greasy before the recipe begins.
If your cookies repeatedly come out flat, check the butter temperature first. Butter that has become too warm or partially melted can lead to excessive spreading.
Fresh baking soda matters as well. The FAQ specifically recommends checking it if flat cookies become a recurring problem.
The Best Pretzel Texture
Do not crush every pretzel into an identical fine crumb. A mixture of sizes works better for these Monster Cookies.
The smaller particles spread salty flavor through the dough. Larger chunks survive baking and give you those satisfying crunchy moments against the chewy oats and melted chocolate.
This is one recipe where uneven pieces are actually useful. Rough crushing creates more texture than turning the pretzels into a uniform powder.
Why Slight Underbaking Works
The cookies should come out when the edges have begun turning golden but the centers still look soft. That soft appearance is part of the method rather than a sign that something has gone wrong.
Cookies continue cooking on the hot tray during the 5-minute cooling period. If you wait until the center looks fully baked in the oven, that residual heat can take the cookies too far.
The result of pulling them slightly early is the texture you want: crisp enough around the edges but soft and chewy through the middle.
This is especially important in a cookie packed with oats and pretzels. Longer baking can shift all of those textures toward dryness.
Variations for Christmas Monster Cookies
Monster Cookies are naturally suited to experimentation because the dough is designed to carry plenty of mix-ins. The variations can change the flavor without losing the big, festive personality of the cookie.
Add Toasted Coconut
Shredded coconut can be added for a more tropical variation. Toasting it first gives it extra crunch.
No exact quantity is specified, so add it according to preference. Fold it in with the other mix-ins rather than changing the base dough.
Add Peanut Butter Chips
Peanut butter chips pair especially well with the salty pretzel pieces. They bring another sweet-and-salty combination into the cookie.
Again, no exact amount is supplied. Treat them as an optional addition rather than replacing one of the measured ingredients unless you specifically choose to do so.
Use Dried Cranberries
For a tart contrast, replace some of the M&M’s with dried cranberries. The fruit gives the cookie a chewy, less candy-forward bite.
Keep the substitution limited to part of the M&M quantity as described. The holiday candy can still remain visible in the dough.
Add Chopped Pecans
Chopped pecans can be folded into the dough when you want another crunchy element. They fit naturally with oats, brown sugar, and chocolate.
No fixed amount is provided. Add them according to your preference.
Drizzle with White Chocolate
Melted white chocolate can be drizzled over the cookies after they are completely cool. This gives the finished cookies an extra decorative finish.
Let the baked cookies cool before adding the drizzle. The white chocolate is a finishing variation, not part of the base baking method.
Candy Substitutions
Holiday M&M’s create the classic Christmas version, but they are not the only option. Reese’s Pieces can be used for a different candy profile.
Chopped peppermint bark is another holiday-focused substitution. It brings in a stronger mint-and-chocolate character.
These substitutions are useful when you want to keep the Monster Cookie idea but change the personality. The oats, pretzels, and chocolate still provide plenty of texture underneath.
Making Gluten-Free Christmas Monster Cookies
Replace the all-purpose flour with a 1:1 gluten-free flour blend. Keep the same 2-cup measurement.
No additional method changes are specified. Follow the same mixing sequence and the same 10–12 minute baking range.
The old-fashioned oats remain part of the recipe. Use the products appropriate for your own gluten-free needs.
How to Store Christmas Monster Cookies
Allow the cookies to cool before transferring them to storage. Keep them in an airtight container at room temperature.
Stored this way, the cookies remain good for up to 5 days. The airtight environment helps protect the soft center from drying.
One optional trick is to place a slice of bread inside the container. The bread is intended to help the cookies stay soft.
Keep the container closed when you are not taking cookies out. That is especially helpful if you want them to retain the texture they had shortly after baking.
Freezing Unbaked Cookie Dough
The dough can be frozen after portioning. Scoop individual dough balls and arrange them on a tray.
Freeze them until firm, then transfer the frozen portions to bags. This gives you cookies that can move directly from freezer to oven when you want a fresh batch.
Bake the frozen dough without thawing. Add 1–2 extra minutes to the normal baking time.
Continue watching the visual cues even with the additional time. The edges should turn lightly golden while the centers remain soft.
Freezing Baked Monster Cookies
Fully baked cookies freeze well too. Cool them completely before stacking them for freezer storage.
Layer the cookies between pieces of parchment paper inside an airtight container. Freeze them for up to 3 months.
When you want a cookie, let it thaw at room temperature. Another option is warming a frozen cookie in the microwave for 10 seconds.
That makes freezing especially convenient during the holidays. A stash can be waiting for a cookie plate even when there is no time for a fresh baking session.
Frequently Asked Questions About Christmas Monster Cookies
Can I use quick oats instead of old-fashioned oats?
Old-fashioned oats are strongly preferred. They hold their shape and provide the chewy texture intended for the cookie.
Quick oats absorb more liquid and may make the cookies dry. If you are in a pinch, the suggested workaround is pulsing quick oats in a blender a few times, although fresh old-fashioned oats remain the better choice.
Butter that is too soft or melted is one possible reason. Properly softened butter should accept a fingerprint when pressed but should not look greasy.
Check the freshness of your baking soda as well. Old leavening can affect the way the cookies rise and spread.
If your kitchen is warm, chill the dough for 30 minutes before baking. That gives the butter a chance to firm before the cookies go into the oven.
Yes. Layer completely cooled cookies between parchment paper in an airtight container and freeze them for up to 3 months.
Thaw them at room temperature when you want to serve them. For a faster option, microwave a frozen cookie for 10 seconds.
Can I bake the dough directly from frozen?
Yes. Freeze the scooped dough balls on a tray first, then transfer them to freezer bags.
When you want cookies, bake the frozen portions directly from the freezer. Add 1–2 extra minutes to the baking time.
Can I use unsalted butter?
Yes. Replace the salted butter with the same quantity of unsalted butter.
Add an extra ¼ teaspoon salt to compensate. Keep the original ½ teaspoon kosher salt in the recipe as well.
Can I use light brown sugar?
Yes. Light brown sugar can replace the dark brown sugar in the same quantity.
Dark brown sugar provides richer caramel notes, so the flavor will be somewhat lighter with the substitution. The cookie structure remains based on the same mixing method.
What other candies can I use?
Reese’s Pieces and chopped peppermint bark are both suggested alternatives to holiday M&M’s. They create different flavors while keeping the fun, heavily loaded Monster Cookie style.
You can also use some dried cranberries in place of part of the M&M’s when you want a tart contrast.
That is intentional. The cookies should leave the oven when the edges just begin turning golden and the centers still look soft.
They continue cooking on the hot baking sheet for 5 minutes. That residual heat firms the middle without drying it out.
Nutritional Information
The nutritional values are estimates and can vary depending on the specific brands and mix-ins used.
Per cookie:
- Calories: about 220
- Fat: 10g
- Carbohydrates: 30g
- Fiber: 2g
Different candy substitutions and optional additions can change those values. Cookie size can also affect the nutritional amount per serving.
The Cookie I Still Want Every Christmas
There are plenty of holiday recipes I enjoy, but these Christmas Monster Cookies carry a different kind of nostalgia for me. They remind me of being a kid in the kitchen, waiting for my mom to reach the part where we were finally allowed to start throwing all the fun ingredients into the bowl.
That was always the best stage. Oats, candy, chocolate, and crunchy pieces went in, the dough became increasingly colorful, and baking suddenly felt less like following instructions and more like making something together.
Now I get to watch the same kind of excitement happen in my own kitchen. The red and green M&M’s still look like Christmas confetti, the pretzel pieces still provide those little salty surprises, and I still have trouble resisting the dough while I am making the batch.
The cookies themselves are unapologetically generous. There is nothing delicate about a thick Monster Cookie filled with oats, semi-sweet chocolate, white chocolate, candy, and pretzels, and that is exactly the point.
They are meant to look abundant on a holiday tray. They are meant to be the cookies someone notices across the room and reaches for before deciding whether they should really take another dessert.
And yes, they tend to disappear quickly at parties. That is why I have learned to quietly set aside a few before the plate goes out.
Some end up in the freezer, waiting for a night when I want one warmed for 10 seconds and tasting almost freshly baked. Santa can have his share, but I have never believed he should get every good cookie in the house.
That small ritual has become part of the fun too. Bake the tray, let the centers stay soft, watch the M&M’s and chocolate settle into the warm oats, and hide a couple before everyone else realizes just how good they are.
Christmas Monster Cookies began as one of those recipes tied to the way my mom baked with us, but now they belong to my own holiday season just as strongly. And every year, when that first batch comes out with golden edges, chewy centers, bright red and green candy, and salty pretzel crunch, I remember exactly why I waited all year to make them again.
Irresistible Christmas Monster Cookies

Chewy, festive, and loaded with sweet-and-salty mix-ins, these Christmas Monster Cookies bring together holiday M&M’s, crushed pretzels, oats, semi-sweet chocolate, and white chocolate in one colorful cookie. With crisp edges, soft centers, and plenty of texture, they make an easy holiday dessert that stands out on any Christmas cookie tray.
Recipe Details
- Prep Time: 15 minutes
- Cook Time: 12 minutes
- Total Time: 27 minutes
- Course: Dessert
- Cuisine: American
- Servings: 24 cookies
- Calories: 220 kcal
Ingredients
For the Cookie Dough
- 2 cups old fashioned oats
- ½ teaspoon kosher salt
- 2 teaspoons baking powder
- 2 teaspoons baking soda
- 2 cups all-purpose flour
- 1 tablespoon vanilla extract
- 2 large eggs plus 1 egg yolk
- ½ cup granulated sugar
- 1 cup dark brown sugar
- 2 sticks 1 cup salted butter at room temperature
For the Mix-Ins
- ½ cup white chocolate chips
- 1 cup semi-sweet chocolate chips or chunks
- 1 cup mini pretzel sticks crushed
- 1 ¼ cups holiday M&M’s
Instructions
Step 1: Prepare the Oven and Baking Sheets
Preheat the oven to 350°F.
Line baking sheets with parchment paper and set them aside while you prepare the cookie dough.
Step 2: Cream the Butter and Sugars
In a large bowl, beat the room-temperature salted butter, dark brown sugar, and granulated sugar together.
Continue mixing until the mixture becomes light and fluffy.
Step 3: Add the Eggs and Vanilla
Add the 2 large eggs plus 1 egg yolk to the butter mixture.
Pour in the vanilla extract and mix until the eggs and vanilla are fully incorporated.
Step 4: Combine the Dry Ingredients
In a separate bowl, whisk together the all-purpose flour, baking soda, baking powder, and kosher salt.
Mix until the leavening ingredients and salt are evenly distributed through the flour.
Step 5: Finish the Dough
Gradually add the dry ingredients to the wet mixture.
Mix only until the flour mixture is incorporated and a cohesive cookie dough forms.
Step 6: Fold in the Oats and Mix-Ins
Fold in the old fashioned oats, holiday M&M’s, crushed mini pretzel sticks, semi-sweet chocolate chips or chunks, and white chocolate chips.
Gently mix until all of the add-ins are evenly distributed throughout the dough.
Step 7: Shape the Cookies
Scoop the dough into balls and arrange them on the prepared baking sheets.
Leave about 2 inches between each portion so the cookies have room to spread.
Step 8: Bake
Bake for 10–12 minutes, until the edges are lightly golden.
For crispier cookies, bake them an additional 1–2 minutes as noted.
Step 9: Cool
Let the cookies rest on the baking sheets for 5 minutes after they come out of the oven.
Transfer them to a rack to continue cooling.
Notes
- Store in an airtight container for up to 5 days.
- For crispier cookies, bake an extra 1–2 minutes.
- Substitute M&M’s with other holiday candies if desired.
Serving Suggestions
Serve Irresistible Christmas Monster Cookies once they have cooled enough to set around the edges. The combination of oats, holiday M&M’s, salty pretzels, semi-sweet chocolate, and white chocolate gives every cookie a mix of chewy, crunchy, sweet, and salty textures.
This recipe makes 24 cookies, making it a good choice for Christmas parties, cookie exchanges, dessert trays, or holiday treat boxes.
If you prefer a crispier texture, extend the baking time by 1–2 minutes. You can also replace the holiday M&M’s with other holiday candies if desired while keeping the rest of the cookie dough unchanged.
Storage
How to Store
Store the cooled cookies in an airtight container for up to 5 days.
Butter Tip
Use 2 sticks, equal to 1 cup, salted butter at room temperature.
Cream it with the dark brown sugar and granulated sugar until light and fluffy.
Egg Tip
Use 2 large eggs plus 1 egg yolk.
Mix them into the creamed butter and sugar before adding the dry ingredients.
Oat Tip
Use 2 cups old fashioned oats and fold them into the finished dough with the remaining mix-ins.
M&M’s Tip
Use 1 ¼ cups holiday M&M’s.
They can be substituted with other holiday candies if desired.
Pretzel Tip
Use 1 cup crushed mini pretzel sticks for a salty crunch throughout the cookies.
Chocolate Tip
Use 1 cup semi-sweet chocolate chips or chunks plus ½ cup white chocolate chips.
Fold both into the dough with the M&M’s, pretzels, and oats.
Baking Tip
Bake at 350°F for 10–12 minutes, until the edges are lightly golden.
For crispier cookies, bake for an extra 1–2 minutes.
Cooling Tip
Cool the cookies on the baking sheets for 5 minutes before transferring them to a rack.

Fernando is the creator and writer behind the food blog Eating with your Hands. Living and working in cities like Paris, Barcelona, and Berlin, and being married to a Canadian foodie, has given Fernando a passion and interest in food and inspired him to run EWYH.