
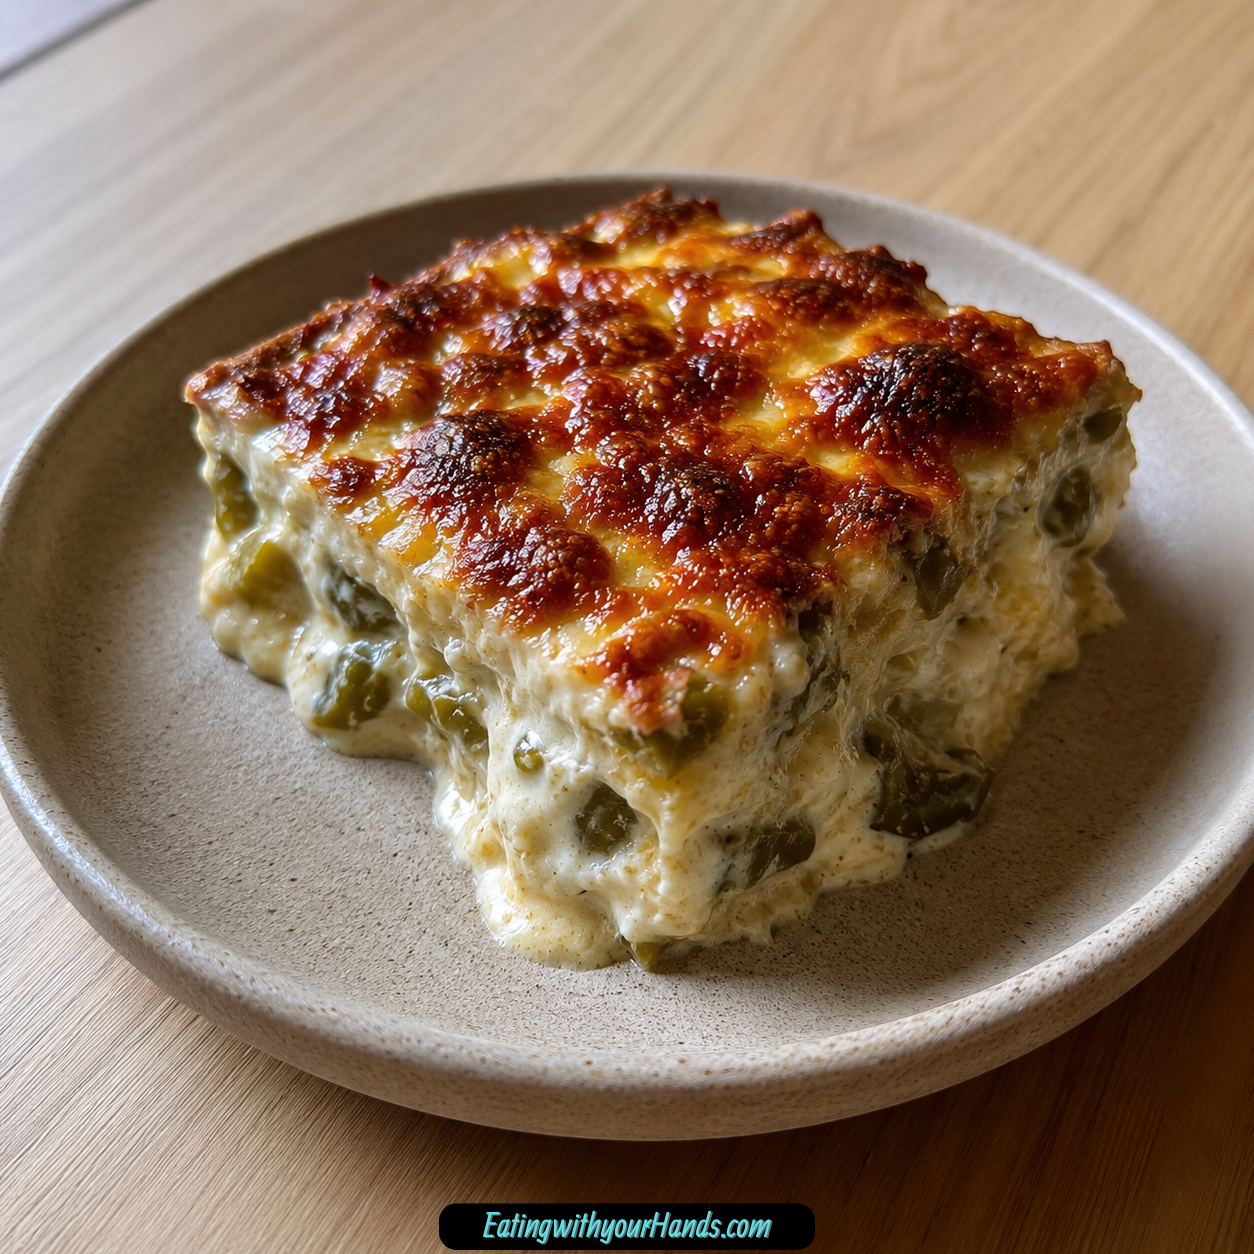

Creamy Chile Relleno Casserole is the kind of dish that brings warmth to the table before anyone even takes a bite. It has tender green chiles, layers of Monterey Jack or Pepper Jack cheese, cheddar, and a creamy egg mixture that bakes into a golden, bubbling casserole full of comfort.
There is something deeply nostalgic about the smell of chiles and cheese baking together. It feels like the kind of meal that belongs to family gatherings, cozy nights, and tables where people keep coming back for one more square.
This casserole has all the spirit of a cheesy chile relleno-style dish, but it keeps the process simple and easy. Instead of complicated prep, you layer drained whole green chiles with cheese, pour over a seasoned egg mixture, and let the oven do the work.
It is rich, creamy, gently spicy, and satisfying without needing a long ingredient list. The eggs, milk, cream, flour, baking powder, and seasonings create a soft, savory base that holds the layers together.
This is also the kind of one-dish meal that works for busy weeknights and festive gatherings alike. It feels special enough for guests but easy enough to make when you simply want something warm, cheesy, and dependable.
Creamy Chile Relleno Casserole is flexible, freezer-friendly, and easy to customize. You can add tomatoes, corn, chorizo, ground beef, black beans, quinoa, salsa, sour cream, cilantro, avocado, or adjust the cheeses to make it fit your table.
Table of Contents
- Why You’ll Love This Creamy Chile Relleno Casserole
- Recipe Details
- Ingredients
- Ingredient Notes
- Optional Swaps, Variations, Add-Ins, and Serving Ideas
- Tomato Chile Relleno Casserole
- Corn Chile Relleno Casserole
- Roasted Red Pepper Casserole
- Lighter Cheese Casserole
- Greek Yogurt Variation
- Chorizo Chile Relleno Casserole
- Ground Beef Chile Relleno Casserole
- Gluten-Free Chile Relleno Casserole
- Extra Creamy Casserole
- Spicier Pepper Jack Version
- Vegetarian Protein Add-Ins
- Dairy-Free Direction
- Why This Recipe Works
- Directions
- Step 1: Preheat the Oven
- Step 2: Prepare the Baking Dish
- Step 3: Drain the Green Chiles
- Step 4: Make the First Chile Layer
- Step 5: Add the First Monterey Jack or Pepper Jack Layer
- Step 6: Add the First Cheddar Layer
- Step 7: Crack the Eggs
- Step 8: Whisk the Eggs
- Step 9: Add the Whole Milk
- Step 10: Add the Heavy Cream
- Step 11: Add the Flour
- Step 12: Add the Baking Powder
- Step 13: Add the Salt
- Step 14: Add the Black Pepper
- Step 15: Add the Garlic Powder
- Step 16: Add the Onion Powder
- Step 17: Whisk Until Smooth
- Step 18: Pour the First Half of Egg Mixture
- Step 19: Add the Remaining Green Chiles
- Step 20: Add the Remaining Monterey Jack or Pepper Jack
- Step 21: Add the Remaining Cheddar
- Step 22: Pour the Remaining Egg Mixture
- Step 23: Place the Dish in the Oven
- Step 24: Bake the Casserole
- Step 25: Check for Doneness
- Step 26: Let It Cool Briefly
- Step 27: Serve Warm
- Serving Ideas
- Storage
- Reheating
- Freezing
- Make-Ahead
- Helpful Notes for Best Results
- Variations
- Tomato Chile Relleno Casserole
- Corn Chile Relleno Casserole
- Roasted Red Pepper Casserole
- Low-Fat Cheese Casserole
- Greek Yogurt Chile Relleno Casserole
- Chorizo Chile Relleno Casserole
- Ground Beef Chile Relleno Casserole
- Gluten-Free Chile Relleno Casserole
- Cream Cheese Chile Relleno Casserole
- Black Bean Chile Relleno Casserole
- Quinoa Chile Relleno Casserole
- Dairy-Free Chile Relleno Casserole
- Troubleshooting
- Frequently Asked Questions
- Why This Recipe Works So Well
- Final Thoughts
- Creamy Chile Relleno Casserole
Why You’ll Love This Creamy Chile Relleno Casserole
This dish comes together with just 15 minutes of prep time. That makes it a great choice for busy weeknights when you want something comforting without spending too long in the kitchen.
It uses minimal ingredients that may already be in your pantry and refrigerator. Green chiles, cheese, eggs, milk, cream, flour, baking powder, and seasonings create a complete casserole.
The recipe is family-friendly and delicious. The creamy texture and cheesy layers make it a guaranteed crowd-pleaser at the dinner table.
Leftovers reheat beautifully, which makes the casserole useful for meal prep or lunchboxes. Store leftovers in the refrigerator for up to 4 days and reheat when needed.
It is a one-dish wonder, so cleanup is easier. The layers bake together in one baking dish until set and golden brown.
The creamy texture and cheesy goodness make it feel like a special treat without too much fuss. It works for cozy nights, festive gatherings, winter evenings, and even sunny picnic-style meals.
Recipe Details
Creamy Chile Relleno Casserole is baked at 350°F, or 175°C. The casserole bakes for about 30 minutes, until set and golden brown on top.
The prep time is 15 minutes. The recipe is designed to be simple, layered, and easy to assemble.
The base uses 2 cans whole green chiles. They should be drained and split open before layering in the baking dish.
The cheese layers include 2 cups shredded Monterey Jack or Pepper Jack cheese and 1 cup shredded cheddar cheese. You can mix and match favorite cheeses.
The creamy mixture is made with 4 large eggs, whole milk, heavy cream, all-purpose flour, baking powder, salt, black pepper, garlic powder, and onion powder. The mixture may look a bit runny, and that is normal.
Half the chiles, half the cheeses, and half the egg mixture are layered first. The process repeats with the remaining chiles, cheese, and egg mixture.
The casserole is done when it is set and golden brown on top. If it jiggles just a little when gently shaken, that is okay because it will firm up as it cools.
Leftovers can be stored in an airtight container in the refrigerator for up to 4 days. For longer storage, cool completely, wrap tightly, and freeze for up to 3 months.
Ingredients
For the Casserole Layers
- 2 cans whole green chiles, drained and split open
- 2 cups shredded Monterey Jack or Pepper Jack cheese (feel free to mix and match your favorite cheeses!)
- 1 cup shredded cheddar cheese
For the Creamy Egg Mixture
- 4 large eggs
- 1 cup whole milk (you can substitute with low-fat or almond milk if desired)
- ½ cup heavy cream (for a lighter version, try using half-and-half)
- ¼ cup all-purpose flour
- ½ teaspoon baking powder
- ½ teaspoon salt
- ¼ teaspoon black pepper
- ¼ teaspoon garlic powder
- ¼ teaspoon onion powder
Ingredient Notes
Whole green chiles are the heart of this casserole. They should be drained and split open so they can be layered evenly in the baking dish.
Monterey Jack cheese gives the casserole a creamy, melty texture. Pepper Jack cheese can be used if you want more spice.
Cheddar cheese adds another layer of flavor. It brings a sharper, familiar cheese note to the casserole.
Eggs help the casserole set. Whisking them until frothy gives the mixture a smooth start.
Whole milk makes the egg mixture creamy. Low-fat milk or almond milk can be used if desired.
Heavy cream gives the casserole richness. Half-and-half can be used for a lighter version.
All-purpose flour helps give the egg mixture structure. Almond flour or a gluten-free flour blend can be used for gluten-free variations.
Baking powder helps the mixture bake into a lighter texture. It is whisked into the egg mixture with the flour and seasonings.
Salt, black pepper, garlic powder, and onion powder season the creamy base. These simple seasonings keep the casserole savory without making the ingredient list long.
Optional Swaps, Variations, Add-Ins, and Serving Ideas
Tomato Chile Relleno Casserole
Diced tomatoes can be added for a fresh twist. They bring moisture, color, and extra flavor.
This variation makes the casserole taste a little brighter. It works well with the cheese and chiles.
Corn Chile Relleno Casserole
Corn can be added for extra flavor and a little sweetness. It gives the dish more texture.
This is a good option when you want a more colorful casserole. Corn pairs well with green chiles and cheese.
Roasted Red Pepper Casserole
Green chiles can be substituted with roasted red peppers for a milder option. This changes the flavor and reduces the chile heat.
Roasted red peppers bring sweetness and softness. They are useful when serving people who prefer a gentler dish.
Lighter Cheese Casserole
Low-fat cheese can be used for a healthier alternative. This changes the richness of the casserole.
Use this option when you want a lighter version. The texture and flavor may be slightly different.
Greek Yogurt Variation
Heavy cream can be substituted with Greek yogurt for a healthier alternative. This gives the casserole a tangier note.
The texture may change slightly. It is a useful option when you want to lighten the creamy base.
Chorizo Chile Relleno Casserole
Cooked chorizo can be added for a heartier dish. It brings bold flavor and makes the casserole more filling.
This variation is good for a richer dinner. The chorizo works well with chiles, cheese, and eggs.
Ground Beef Chile Relleno Casserole
Ground beef can also be added for a heartier version. It turns the casserole into a more substantial meal.
This option is helpful when you want more protein. The creamy cheese layers still remain the focus.
Gluten-Free Chile Relleno Casserole
Almond flour can be used instead of all-purpose flour for a gluten-free version. A gluten-free flour blend can also be used.
Check ingredient labels to ensure they are certified gluten-free. This is especially important for packaged ingredients.
Extra Creamy Casserole
A little cream cheese can be stirred into the egg mixture for extra creaminess. This makes the casserole richer.
Use this option when you want a softer, creamier texture. It adds another layer of cheese flavor.
Spicier Pepper Jack Version
Spicy Pepper Jack cheese can be used instead of regular Monterey Jack. This gives the casserole a stronger kick.
It is a good option if you like heat. The creamy egg mixture balances the spice.
Vegetarian Protein Add-Ins
Black beans can be added for extra protein. They make the casserole more filling while keeping it vegetarian.
Cooked quinoa can also be added. It gives texture and makes the dish heartier.
Dairy-Free Direction
For a dairy-free version, substitute all cheeses with vegan cheese. Substitute the cream with coconut milk.
This changes the flavor and texture, but it keeps the casserole idea. Use dairy-free substitutions that fit your needs.
Why This Recipe Works
Creamy Chile Relleno Casserole works because it layers simple ingredients in a way that feels rich and comforting. Chiles, cheese, and a creamy egg mixture bake together into a soft, golden casserole.
The whole green chiles create the main flavor and structure. Splitting them open makes them easier to layer evenly.
The cheese brings creaminess and flavor. Monterey Jack or Pepper Jack melts into the casserole, while cheddar gives more depth.
The egg mixture holds everything together. Eggs, milk, cream, flour, and baking powder create a custard-like base that bakes around the chiles and cheese.
The seasonings are simple but important. Salt, black pepper, garlic powder, and onion powder keep the casserole savory and balanced.
The layered method helps every serving get chiles, cheese, and egg mixture. Repeating the layers creates a casserole that feels full and even from top to bottom.
Directions
Step 1: Preheat the Oven
Preheat your oven to 350°F, or 175°C. This gives the casserole steady heat so it can bake evenly.
Let the oven fully preheat before placing the baking dish inside. A properly heated oven helps the casserole set and brown.
Step 2: Prepare the Baking Dish
Set out your baking dish before you begin layering. Make sure it is ready to hold the chiles, cheese, and egg mixture.
Having the dish prepared makes the layering process easier. The casserole comes together quickly once the egg mixture is mixed.
Step 3: Drain the Green Chiles
Open 2 cans whole green chiles and drain them well. Removing excess liquid helps the casserole bake properly.
After draining, split the chiles open. This makes them easier to spread across the bottom of the dish.
Step 4: Make the First Chile Layer
Place half of the drained and split open green chiles in the bottom of the baking dish. Spread them evenly.
This first layer creates the base of the casserole. Try to cover the bottom so every serving gets chile flavor.
Step 5: Add the First Monterey Jack or Pepper Jack Layer
Sprinkle half of the shredded Monterey Jack or Pepper Jack cheese over the green chiles. Spread it evenly.
Monterey Jack gives creamy meltiness, while Pepper Jack gives more spice. Either works, and you can mix and match.
Step 6: Add the First Cheddar Layer
Sprinkle half of the shredded cheddar cheese over the first cheese layer. This adds another cheese flavor.
The cheddar gives the casserole a richer, slightly sharper taste. Spread it so the top of the first layer is evenly covered.
Step 7: Crack the Eggs
In a mixing bowl, crack 4 large eggs. Make sure no shell pieces fall into the bowl.
The eggs are the base of the creamy mixture. They help the casserole set as it bakes.
Step 8: Whisk the Eggs
Whisk the eggs until frothy. This helps make the mixture smoother.
The eggs should look well blended before the milk and cream are added. This step gives the mixture a good foundation.
Step 9: Add the Whole Milk
Pour in 1 cup whole milk. Stir it into the eggs until blended.
Whole milk gives the mixture creaminess. Low-fat milk or almond milk can be used if desired.
Step 10: Add the Heavy Cream
Add ½ cup heavy cream. Stir until the milk, cream, and eggs are combined.
The heavy cream makes the casserole rich. Half-and-half can be used for a lighter version.
Step 11: Add the Flour
Sprinkle in ¼ cup all-purpose flour. Whisk it into the egg mixture.
The flour helps give the casserole structure. If making a gluten-free version, almond flour or a gluten-free flour blend can be used.
Step 12: Add the Baking Powder
Add ½ teaspoon baking powder. Mix it in well.
The baking powder helps lighten the texture. It should be evenly distributed through the egg mixture.
Step 13: Add the Salt
Add ½ teaspoon salt to the bowl. Stir it through the mixture.
Salt helps the cheese, chiles, and egg base taste complete. Adjust if needed based on your ingredients.
Step 14: Add the Black Pepper
Add ¼ teaspoon black pepper. Whisk again.
The pepper gives the casserole gentle warmth. It blends into the creamy mixture.
Step 15: Add the Garlic Powder
Add ¼ teaspoon garlic powder. Stir it in.
Garlic powder adds savory flavor without extra prep. It helps the egg mixture taste fuller.
Step 16: Add the Onion Powder
Add ¼ teaspoon onion powder. Mix until fully combined.
Onion powder adds another savory layer. It works well with the chiles and cheese.
Step 17: Whisk Until Smooth
Whisk the egg mixture until smooth. Do not worry if it looks a bit runny, because that is normal.
The mixture should be well blended with no large dry clumps. It will set as it bakes.
Step 18: Pour the First Half of Egg Mixture
Pour half of the egg mixture gently over the first chile and cheese layers. Make sure it covers everything nicely.
Pour slowly so the layers stay in place. The mixture should seep down around the chiles and cheese.
Step 19: Add the Remaining Green Chiles
Layer the remaining drained and split green chiles over the first half of the casserole. Spread them evenly.
This second layer helps the chile flavor run through the full dish. It also gives the casserole more structure.
Step 20: Add the Remaining Monterey Jack or Pepper Jack
Sprinkle the remaining Monterey Jack or Pepper Jack cheese over the second chile layer. Spread it across the top.
This creates more creamy, cheesy filling. Use Pepper Jack if you want a spicier finish.
Step 21: Add the Remaining Cheddar
Add the remaining shredded cheddar cheese. Cover the top evenly.
The cheddar helps the casserole bake into a golden, flavorful dish. It also adds color to the top.
Step 22: Pour the Remaining Egg Mixture
Pour the rest of the egg mixture over the top. Try to cover all the layers.
The casserole should look creamy and inviting. The liquid will settle around the chiles and cheese.
Step 23: Place the Dish in the Oven
Place the baking dish in the preheated oven. Set it carefully on the rack so the layers stay level.
Close the oven and let the casserole bake. The filling will begin to set as it heats.
Step 24: Bake the Casserole
Bake for about 30 minutes. Keep an eye on the casserole near the end.
It should be set and golden brown on top. The cheese should look melted and the egg mixture should no longer be loose.
Step 25: Check for Doneness
Gently shake the dish to check the center. If it jiggles just a little, that is okay.
The casserole will firm up as it cools. It should not look completely liquid in the center.
Step 26: Let It Cool Briefly
Remove the casserole from the oven and let it rest for a few minutes. This helps the layers settle.
The rest also makes slicing and serving easier. The creamy center will firm slightly as it cools.
Step 27: Serve Warm
Serve the Creamy Chile Relleno Casserole warm. Cut it into portions and lift each piece carefully.
Add toppings or sides if desired. Salsa, sour cream, cilantro, avocado, guacamole, salad, and other serving options all fit well.
Serving Ideas
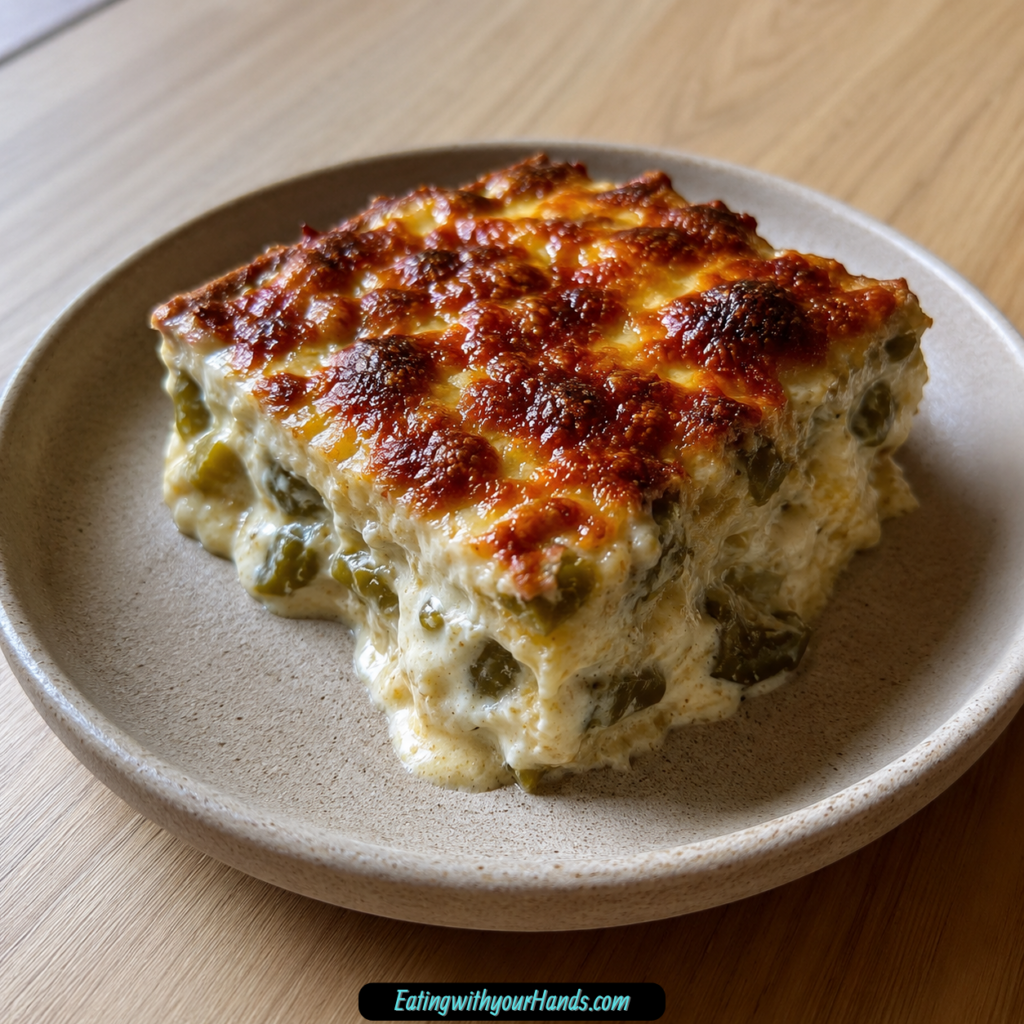
Serve Creamy Chile Relleno Casserole warm, straight from the oven. It is best when the cheese is melted and the center is creamy.
A crisp green salad is a fresh side that balances the richness. It gives the plate color and lightness.
Homemade guacamole pairs beautifully with the chiles and cheese. It adds cool creaminess on the side.
Salsa can be spooned over the top for extra flavor. It also adds brightness and heat.
A dollop of sour cream is another good topping. It cools the spice and adds richness.
Fresh cilantro and avocado slices make a beautiful finish. They bring color, freshness, and a soft texture to the casserole.
Storage
Leftovers can be stored in an airtight container in the refrigerator for up to 4 days. Let the casserole cool before storing.
The texture may firm up after refrigeration. It will soften again when reheated.
Reheating
Reheat leftovers in the microwave or oven until warmed through. Use whichever method is easiest for the portion size.
The oven is helpful for larger portions. The microwave works well for quick reheating.
Freezing
To freeze the casserole, let it cool completely. Wrap it tightly in plastic wrap or aluminum foil.
Store it in the freezer for up to 3 months. When ready to enjoy, thaw it in the refrigerator overnight and reheat in the oven until warmed through.
Make-Ahead
Creamy Chile Relleno Casserole works well for meal prep because leftovers reheat beautifully. It can be made for dinner and enjoyed again for lunchboxes or later meals.
For longer planning, freeze it after cooling completely. Wrap it tightly and store for up to 3 months.
Thaw overnight in the refrigerator before reheating. Warm it in the oven until heated through.
Helpful Notes for Best Results
Drain the whole green chiles well before layering. Extra liquid can affect the texture of the casserole.
Split the chiles open so they layer evenly. This helps every bite get chile flavor.
Do not worry if the egg mixture looks runny before baking. That is normal, and it will set in the oven.
If the casserole jiggles slightly when baked, let it cool. It will firm up as it rests.
Use spicy Pepper Jack cheese if you want a stronger kick. Monterey Jack is milder and creamier.
Different cheese types will alter the flavor profile. Mix and match based on what you enjoy.
For extra creaminess, stir a little cream cheese into the egg mixture. For dairy-free needs, use vegan cheese and coconut milk.
For gluten-free needs, replace all-purpose flour with almond flour or a gluten-free flour blend. Check ingredient labels to make sure they are certified gluten-free.
Variations
Tomato Chile Relleno Casserole
Add diced tomatoes for a fresh twist. They bring extra moisture and flavor.
Tomatoes also add color. They make the casserole feel a little brighter.
Corn Chile Relleno Casserole
Add corn for a sweet, fresh variation. It gives the casserole more texture.
Corn works well with chiles and cheese. It makes the dish feel more colorful.
Roasted Red Pepper Casserole
Substitute the green chiles with roasted red peppers for a milder option. This changes the flavor but keeps the layered casserole style.
Roasted red peppers are sweeter and less spicy. They are helpful for a gentler version.
Low-Fat Cheese Casserole
Use low-fat cheese for a healthier alternative. This reduces some richness.
The casserole will still be cheesy. The flavor and texture may change slightly.
Greek Yogurt Chile Relleno Casserole
Substitute the heavy cream with Greek yogurt for a healthier alternative. This gives the egg mixture a tangier flavor.
The texture may be different from heavy cream. It is still a useful lighter option.
Chorizo Chile Relleno Casserole
Add cooked chorizo for a heartier dish. It brings bold flavor and extra richness.
This variation makes the casserole more filling. It is good for a stronger dinner.
Ground Beef Chile Relleno Casserole
Add ground beef for another hearty option. It gives the casserole more protein.
The beef works with the cheese and chiles. It turns the dish into a more substantial meal.
Gluten-Free Chile Relleno Casserole
Use almond flour instead of all-purpose flour. A gluten-free flour blend can also be used.
Check labels on ingredients to make sure they are certified gluten-free. This keeps the dish aligned for gluten-free needs.
Cream Cheese Chile Relleno Casserole
Stir a little cream cheese into the egg mixture. This gives the casserole extra creaminess.
It makes the texture richer and softer. Use this when you want a more indulgent version.
Black Bean Chile Relleno Casserole
Add black beans for extra protein. This keeps the casserole vegetarian while making it heartier.
Black beans fit well with the chiles and cheese. They add texture and substance.
Quinoa Chile Relleno Casserole
Add cooked quinoa for extra protein. It gives the casserole more texture.
This is another vegetarian-friendly option. It makes the dish more filling.
Dairy-Free Chile Relleno Casserole
Substitute all cheeses with vegan cheese. Replace the cream with coconut milk.
This changes the flavor and texture. It is the listed direction for a dairy-free version.
Troubleshooting
The Casserole Is Too Watery
Drain the whole green chiles well before layering. Extra liquid can make the casserole too loose.
Let the casserole rest after baking. It will firm up as it cools.
The Center Looks Too Runny
The egg mixture looks runny before baking, and that is normal. After baking, the casserole should be set.
If it still looks very liquid, bake a little longer while watching closely. A slight jiggle is okay because it firms as it cools.
The Top Is Browning Too Fast
Keep an eye on the casserole near the end of baking. It should become golden brown, not overly dark.
If the top looks done before the center is set, reduce attention to gentle finishing. Letting it rest after baking helps the texture.
The Flavor Is Too Mild
Use Pepper Jack cheese instead of Monterey Jack for more spice. Spicy Pepper Jack creates a stronger kick.
Salsa, cilantro, avocado slices, or sour cream can also change the finished flavor. Add toppings based on preference.
The Dish Is Too Spicy
Use Monterey Jack instead of Pepper Jack. Roasted red peppers can replace green chiles for a milder option.
Sour cream, guacamole, and avocado slices can also help balance heat. Serve them on the side.
The Recipe Needs to Be Gluten-Free
Replace all-purpose flour with almond flour or a gluten-free flour blend. Check labels to make sure ingredients are certified gluten-free.
This is especially important for packaged ingredients. The casserole can still bake into a creamy dish.
The Recipe Needs to Be Dairy-Free
Use vegan cheese in place of all cheeses. Use coconut milk instead of cream.
This will change the flavor profile. Different cheese substitutes will also affect the texture.
The Casserole Needs More Protein
Add black beans or cooked quinoa for vegetarian protein. These make the casserole heartier.
Cooked chorizo or ground beef can also be added for a meatier dish. Choose the option that fits your meal.
Frequently Asked Questions
Can I freeze the Creamy Chile Relleno Casserole?
Yes, Creamy Chile Relleno Casserole can be frozen. Allow it to cool completely first.
Wrap it tightly in plastic wrap or aluminum foil and store it in the freezer for up to 3 months. Thaw in the refrigerator overnight and reheat in the oven until warmed through.
What can I use as a substitute for heavy cream?
Half-and-half can be used instead of heavy cream. Whole milk can also be used.
Greek yogurt is another lighter option. Keep in mind that substitutions may slightly change the texture and richness.
How can I make this dish gluten-free?
Replace the all-purpose flour with almond flour or a gluten-free flour blend. Check labels on your ingredients to ensure they are certified gluten-free.
The casserole can still be creamy and delicious. The flour swap mainly supports the egg mixture structure.
Can I make this casserole dairy-free?
Yes, substitute all cheeses with vegan cheese and replace the cream with coconut milk. This is the dairy-free direction for the recipe.
The flavor and texture will change. Different vegan cheeses can melt differently.
Can I make it spicier?
Yes, use spicy Pepper Jack cheese instead of regular Monterey Jack. You can also choose Pepper Jack in the main cheese layer.
This gives the casserole more heat. Serve with salsa if you want even more kick.
Can I make it milder?
Yes, use Monterey Jack cheese instead of Pepper Jack. You can also substitute roasted red peppers for the green chiles.
These changes make the casserole gentler. Sour cream or guacamole can also mellow each serving.
What can I serve with it?
Serve the casserole with a crisp green salad or homemade guacamole. Salsa and sour cream also work well.
Fresh cilantro and avocado slices make a beautiful finish. They add color and freshness.
How long do leftovers last?
Leftovers can be stored in the refrigerator for up to 4 days. Keep them in an airtight container.
Reheat in the microwave or oven until warmed through. The casserole reheats well for meal prep or lunchboxes.
Why This Recipe Works So Well
Creamy Chile Relleno Casserole works so well because it takes simple layers and turns them into something warm, cheesy, and satisfying. The chiles bring flavor, the cheese brings richness, and the egg mixture holds everything together.
The whole green chiles create a soft, flavorful base. Draining and splitting them helps them layer evenly.
The two cheeses add depth. Monterey Jack or Pepper Jack melts smoothly, while cheddar adds more flavor.
The egg mixture is creamy but structured. Eggs, milk, cream, flour, and baking powder bake into a soft, set casserole.
The seasonings are simple, but they matter. Salt, black pepper, garlic powder, and onion powder help the base taste savory and complete.
The recipe is also adaptable enough for many tables. Tomatoes, corn, roasted red peppers, low-fat cheese, Greek yogurt, chorizo, ground beef, almond flour, salad, guacamole, salsa, sour cream, cilantro, avocado, cream cheese, black beans, quinoa, vegan cheese, and coconut milk can all shape it differently.
Final Thoughts
Creamy Chile Relleno Casserole is a warm, cheesy, comforting dish made with whole green chiles, Monterey Jack or Pepper Jack, cheddar, eggs, milk, cream, flour, baking powder, and simple seasonings. It feels cozy enough for a quiet night in and festive enough to bring to a gathering.
Serve it warm with crisp green salad, guacamole, salsa, sour cream, cilantro, or avocado slices, and let the creamy chile-cheese layers do the rest. With easy prep, freezer-friendly storage, and a crowd-pleasing flavor, this casserole is the kind of recipe that earns a regular place at the table.
Creamy Chile Relleno Casserole

Creamy, cheesy, and warmly seasoned, this Creamy Chile Relleno Casserole layers whole green chiles with Monterey Jack or Pepper Jack cheese, cheddar cheese, and a rich egg mixture. Baked until set and golden, it makes a comforting Mexican-style casserole for dinner or an easy family meal.
Recipe Details
- Prep Time: 15 minutes
- Cook Time: 30 minutes
- Total Time: 45 minutes
- Course: Casserole, Dinner
- Cuisine: Mexican
- Servings: 6 people
- Calories: 350 kcal
Equipment
- baking dish
- Mixing bowl
Ingredients
For the Casserole
- 2 cups shredded Monterey Jack or Pepper Jack cheese
- 1 cup shredded cheddar cheese
- 2 cans whole green chiles drained and split open
- 4 large eggs
- 1 cup whole milk
- ½ cup heavy cream
- ¼ cup all-purpose flour
- ½ teaspoon baking powder
- ¼ teaspoon garlic powder
- ¼ teaspoon onion powder
- ¼ teaspoon black pepper
- ½ teaspoon salt
Instructions
Step 1: Preheat the Oven
Preheat your oven to 350°F (175°C).
Step 2: Mix the Egg Mixture
In a mixing bowl, combine eggs, milk, heavy cream, flour, baking powder, salt, black pepper, garlic powder, and onion powder. Mix well until the mixture is smooth and evenly combined.
Step 3: Start the First Layer
In a baking dish, layer half of the green chiles. Add half of the Monterey Jack cheese and half of the cheddar cheese over the chiles.
Step 4: Add the First Portion of Egg Mixture
Pour half of the egg mixture over the layered ingredients. Let it spread through the chiles and cheese.
Step 5: Repeat the Layers
Repeat with the remaining chiles, cheeses, and egg mixture. Make sure the final layer is evenly arranged before baking.
Step 6: Bake Until Set and Golden
Bake in the preheated oven for 30 minutes, or until the casserole is set and golden.
Notes
- Serve warm.
- You can add toppings like salsa or avocado if desired.
Serving Suggestions
Serve this Creamy Chile Relleno Casserole warm after it bakes until set and golden. The green chiles, Monterey Jack or Pepper Jack cheese, cheddar cheese, and creamy egg mixture make it rich, soft, and satisfying.
It works well as a dinner casserole or a cozy family meal. Add toppings like salsa or avocado if desired, exactly as noted.
Storage
How to Store
The recipe does not provide specific storage instructions or storage duration, so no exact storage time is added here.
Best Texture Tip
Bake the casserole for 30 minutes, or until it is set and golden. This gives the egg mixture time to firm up around the chiles and melted cheeses.
Serving Tip
Serve warm for the best creamy texture. The cheese and egg layers are most enjoyable when the casserole is fresh from the oven.
Topping Tip
You can add toppings like salsa or avocado if desired. No specific quantities are provided, so no amounts are added here.

Fernando is the creator and writer behind the food blog Eating with your Hands. Living and working in cities like Paris, Barcelona, and Berlin, and being married to a Canadian foodie, has given Fernando a passion and interest in food and inspired him to run EWYH.