
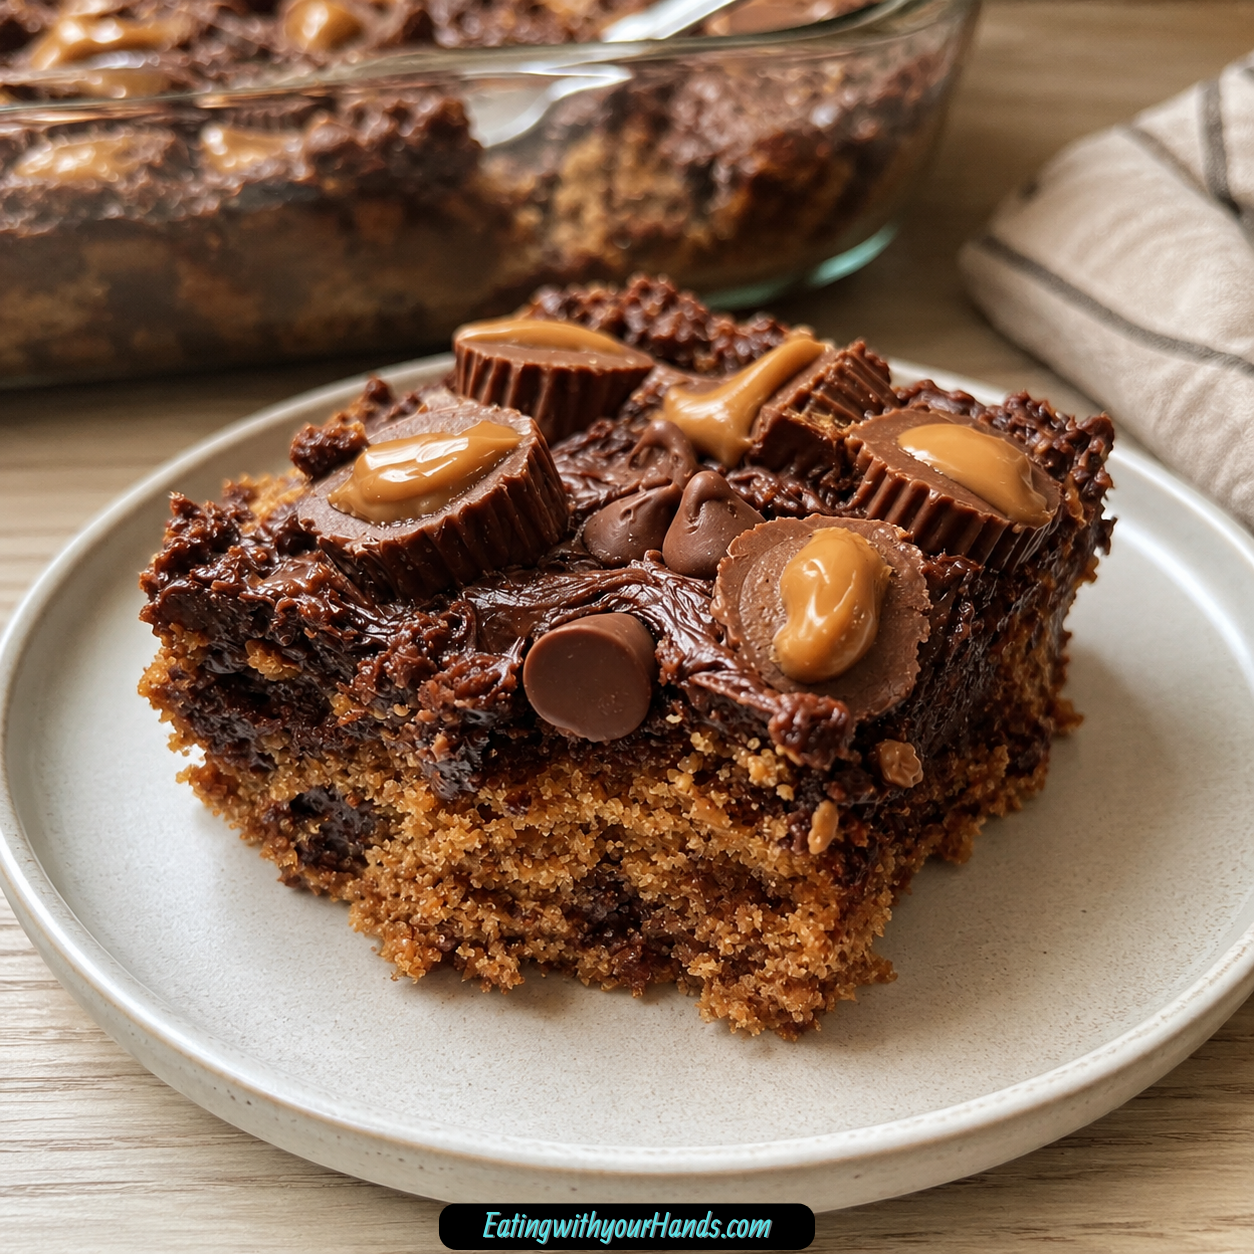
Some desserts feel like they were made for the moments when life is loud, the kitchen is busy, and you still want something warm and unforgettable on the table. Decadent Peanut Butter Cup Dump Cake is exactly that kind of dessert, with deep chocolate flavor, creamy peanut butter richness, and gooey candy pieces baked into every corner.
This is the cake you make when you need a dependable potluck dessert, a birthday treat that disappears fast, or a late-night chocolate fix that does not require a complicated baking session. It has that cozy, homemade feeling people love, but the actual work stays beautifully simple.
The magic is in how the batter bakes up thick and fudgy while the peanut butter cups soften into sweet little pockets on top. The chocolate chips melt just enough to make each bite feel extra indulgent, and the peanut butter brings everything together with that familiar candy-bar comfort.
What I love most about this Peanut Butter Cup Dump Cake is that it feels generous. It is rich, nostalgic, easy to serve, and exactly the kind of dessert that makes people stand near the pan pretending they are only taking “one more small piece.”
Table of Contents
- Why You’ll Love This Recipe
- Recipe Details
- Ingredients
- Optional Swaps, Variations, Add-Ins, and Serving Ideas
- Why This Cake Comes Together So Easily
- Directions
- Step 1: Preheat the Oven to 350°F (175°C)
- Step 2: Prepare a 9×13-Inch Baking Dish
- Step 3: Add the Cake Mix to a Big Mixing Bowl
- Step 4: Add the Instant Chocolate Pudding Mix
- Step 5: Pour in the Whole Milk
- Step 6: Add the Creamy Peanut Butter
- Step 7: Add the Melted Butter
- Step 8: Stir Until the Batter Is Just Combined
- Step 9: Spread the Batter Into the Prepared Pan
- Step 10: Sprinkle the Chopped Mini Peanut Butter Cups Over the Batter
- Step 11: Add the Milk Chocolate Chips
- Step 12: Add the Optional Chopped Peanuts
- Step 13: Add the Extra Peanut Butter Swirl
- Step 14: Bake for 30–35 Minutes
- Step 15: Check the Doneness Carefully
- Step 16: Let the Cake Cool for About 10 Minutes
- Step 17: Serve Warm With Ice Cream or Whipped Cream
- Serving Ideas
- Storage
- Reheating
- Freezing
- Make-Ahead
- Helpful Notes for Best Results
- Variations
- Troubleshooting
- Frequently Asked Questions
- Can I Use a Different Cake Mix Flavor?
- Can I Use 2% Milk Instead of Whole Milk?
- Can I Skip the Pudding Mix?
- Can I Make This Cake Dairy-Free?
- How Do I Make This Nut-Free?
- What Can I Use for Peanut Allergies?
- Can I Freeze Leftovers?
- How Should I Reheat This Cake?
- Can I Serve It Cold?
- What Should the Toothpick Look Like?
- Should I Use Natural Peanut Butter?
- Why This Recipe Works So Well
- Final Thoughts
- Peanut Butter Cup Dump Cake
Why You’ll Love This Recipe
This Decadent Peanut Butter Cup Dump Cake gives you a rich chocolate peanut butter dessert without asking for complicated baking skills. There is no creaming butter, no careful flour measuring, and no delicate layering to worry about.
The batter comes together in one big mixing bowl with chocolate cake mix, instant chocolate pudding mix, whole milk, creamy peanut butter, and melted butter. Once the mixture is just combined, it goes straight into a greased 9×13-inch baking dish.
The flavor is deeply comforting because chocolate and peanut butter are doing exactly what they do best. The chocolate cake mix creates the base, while the peanut butter adds that creamy, nutty richness that makes the whole dessert feel more indulgent.
The pudding mix is one of the most important ingredients for texture. It helps create a cake that stays moist and fudgy instead of turning dry or crumbly.
The toppings make every slice feel exciting. Chopped mini peanut butter cups turn gooey as they bake, and milk chocolate chips add more melty chocolate across the top.
This cake also works well for a crowd. It is baked in a 9×13-inch pan, which makes it easy to scoop, slice, carry, and share at potlucks, parties, family dinners, and casual gatherings.
It is also a flexible dessert when you want to use the swaps and variations included here. You can make a dairy-free direction with almond milk and vegan butter, try candy variations like Reese’s Pieces, or add salted caramel sauce for a sweet-salty swirl.
Most importantly, this Peanut Butter Cup Dump Cake tastes like far more effort than it takes. That is the kind of recipe worth keeping close, especially when you want a dessert that feels warm, fun, and a little over-the-top.
Recipe Details
This recipe makes a Decadent Peanut Butter Cup Dump Cake baked in a 9×13-inch baking dish. The oven temperature is 350°F (175°C), and the cake bakes for 30–35 minutes.
The cake is done when the edges pull away slightly from the pan. A toothpick inserted in the center should come out with just a few moist crumbs, not wet batter.
The batter is intentionally thick and fudgy-looking before it bakes. That texture comes from the combination of cake mix, instant chocolate pudding mix, creamy peanut butter, whole milk, and melted butter.
After baking, the cake should cool for about 10 minutes before serving. This short rest helps the dessert settle enough to serve while still keeping the chocolate chips and peanut butter cups warm and melty.
The cake can be served warm or at room temperature. It is especially good with vanilla ice cream, whipped cream, chocolate syrup, or crushed peanuts.
Leftovers should be covered tightly with plastic wrap or transferred to an airtight container. The cake stays fresh in the refrigerator for 3–4 days.
For reheating, microwave a slice for 10–15 seconds to bring back that warm, melty texture. Frozen slices can be stored for up to 2 months when wrapped properly.
Ingredients
Chocolate Peanut Butter Cake Base
1 box (15.25 oz) chocolate cake mix
1 box (3.9 oz) instant chocolate pudding mix
2 cups whole milk
½ cup creamy peanut butter
½ cup melted butter
Candy and Chocolate Topping
1 cup mini peanut butter cups, chopped
1 cup milk chocolate chips
Optional Crunch and Serving Toppings
½ cup chopped peanuts
Whipped cream or vanilla ice cream
Ingredient Notes
Any brand of chocolate cake mix works for this recipe. Devil’s food cake mix is a great choice when you want the cake to taste extra rich.
The instant chocolate pudding mix is what helps make the texture extra moist and fudgy. If you skip it, the cake can still be tasty, but it will not have the same dense, soft finish.
Whole milk gives the best texture because the fat helps keep the cake tender. Two percent milk can work in a pinch, but whole milk gives the richest result.
Creamy peanut butter is important because the cake needs a smooth, sticky texture. Natural peanut butter is not recommended here because it does not blend into the batter the same way.
Melted butter adds richness and helps the batter come together easily. It also supports the soft, indulgent texture that makes this cake feel so satisfying.
Mini peanut butter cups bring the candy flavor into the dessert. Reese’s are a classic option, but store brands work too.
Milk chocolate chips add even more chocolate on top. The optional chopped peanuts give the cake crunch if you want a little texture contrast.
Optional Swaps, Variations, Add-Ins, and Serving Ideas
Dairy-Free Option
For a dairy-free direction, use almond milk and vegan butter. The cake will still be delicious while keeping the same easy chocolate peanut butter dessert style.
This swap changes the dairy ingredients without changing the overall method. Keep the mixing, baking temperature, baking time, and doneness cues the same.
Peanut Allergy Option
For peanut allergies, use almond butter and chopped chocolate bars instead of peanut butter cups. This keeps the dessert rich and candy-like while moving away from the peanut butter cup topping.
The flavor will be different because almond butter does not taste exactly like peanut butter. It still gives the cake a creamy nut butter richness and a chocolate-filled finish.
Nut-Free Option
For a nut-free version, use sunflower seed butter instead of peanut butter. Skip the peanut butter cups and use more chocolate chips instead.
This keeps the dessert chocolatey and sweet without relying on peanut butter cups. The taste is surprisingly similar enough that the cake still feels indulgent and complete.
Pudding Mix Option
If you are out of instant chocolate pudding mix, you can skip it. The cake will still taste good, but it will be less fudgy.
The pudding mix is one of the reasons the cake stays so moist. Without it, the texture will be closer to a simpler chocolate cake.
Reese’s Pieces Party Variation
Swap the peanut butter cups for 1 cup of Reese’s Pieces. The candy pieces bake into colorful little bites with a slight crackle.
This variation is especially fun for birthdays or casual parties. It gives the cake a festive look while keeping the peanut butter candy theme.
Salted Caramel Swirl Variation
Before baking, drizzle ¼ cup of salted caramel sauce over the batter. Use a knife to swirl it in gently.
Warm the caramel slightly first so it swirls more easily. The sweet-salty flavor works beautifully with the chocolate and peanut butter.
Cookies and Cream Variation
Use vanilla cake mix instead of chocolate cake mix. Keep the peanut butter, then replace the chocolate chips with crushed Oreos.
This variation gives the cake a cookies-and-cream direction while still keeping the peanut butter flavor. It tastes more like a peanut butter cookies-and-cream dessert than the classic chocolate version.
Extra Creative Add-Ins
White chocolate chips can be used instead of milk chocolate chips. This gives the cake a sweeter, creamier chocolate flavor.
A handful of crumbled bacon can also be mixed in for a sweet-salty-crunchy variation. This adds a bold contrast to the soft cake and candy topping.
Why This Cake Comes Together So Easily
This Peanut Butter Cup Dump Cake works because every ingredient has a clear job, but none of those jobs requires difficult technique. The chocolate cake mix gives the dessert its foundation, so you do not need to measure flour, cocoa, leavening, or other dry ingredients separately.
The instant chocolate pudding mix changes the texture in a noticeable way. It helps the cake bake up moist, dense, and fudgy, which is exactly what makes this dessert feel so rich.
Whole milk brings enough liquid to hydrate the cake mix and pudding mix. It also adds tenderness, especially when paired with the melted butter.
Creamy peanut butter blends into the batter and adds flavor throughout the cake. Since the batter is thick, the peanut butter becomes part of the cake’s richness instead of disappearing.
Melted butter adds a deeper dessert flavor and helps the batter feel more indulgent. Because it is melted, it mixes into the bowl easily without needing a mixer.
The chopped mini peanut butter cups and milk chocolate chips stay on top rather than being fully mixed through the batter. This helps them become gooey, melty pockets that make every slice feel loaded.
The optional chopped peanuts add crunch when you want more texture. The serving toppings, like whipped cream or vanilla ice cream, give you a creamy finish that balances the rich chocolate peanut butter base.
Directions
Step 1: Preheat the Oven to 350°F (175°C)
Set your oven to 350°F (175°C) before you begin mixing the batter. Giving the oven time to fully preheat matters because this cake needs steady, even heat from the moment the pan goes in.
A properly preheated oven helps the edges, center, toppings, and thick batter bake at the right pace. Since the cake is meant to be fudgy but not wet, the oven temperature is one of the details you do not want to change.
This is also a good moment to clear a little space on the counter. The recipe moves quickly once the batter is mixed, so having the baking dish, mixing bowl, and toppings ready keeps everything simple.
Step 2: Prepare a 9×13-Inch Baking Dish
Grab a 9×13-inch baking dish and coat it with cooking spray. You can also rub the dish with butter if that is what you prefer.
This step keeps the finished cake from sticking to the pan. Because the batter includes peanut butter, melted butter, pudding mix, chocolate chips, and chopped peanut butter cups, the edges and topping can become sticky as the cake bakes.
Make sure the bottom and sides of the dish are prepared. The edges are one of the doneness cues in this recipe, so you want them to pull away slightly from the pan instead of clinging tightly.
Step 3: Add the Cake Mix to a Big Mixing Bowl
Place 1 box (15.25 oz) chocolate cake mix into a big mixing bowl. The bowl should be large enough to hold all the batter ingredients without making stirring messy.
The chocolate cake mix is the base of the entire dessert. It gives the cake its chocolate flavor and structure, while the other ingredients make it more moist, rich, and peanut buttery.
Using a big bowl also makes it easier to stir gently. Since overmixing can make the cake tough, you want enough room to combine the batter without fighting the bowl.
Step 4: Add the Instant Chocolate Pudding Mix
Add 1 box (3.9 oz) instant chocolate pudding mix to the bowl with the cake mix. This is one of the most important ingredients for getting the fudgy texture.
The pudding mix helps the cake stay moist after baking. It also gives the batter a thicker, richer feel before it even goes into the pan.
Do not prepare the pudding separately. It goes into the bowl as a dry mix along with the cake mix, then combines with the milk, peanut butter, and melted butter.
Step 5: Pour in the Whole Milk
Add 2 cups whole milk to the mixing bowl. The milk hydrates the cake mix and pudding mix, turning the dry ingredients into a thick batter.
Whole milk gives the best texture because it helps make the cake tender. Two percent milk can work in a pinch, but whole milk is the best choice for this rich dessert.
Pour the milk in steadily so it begins moistening the dry ingredients. You do not need to stir yet if you are adding all the base ingredients first.
Step 6: Add the Creamy Peanut Butter
Add ½ cup creamy peanut butter to the bowl. Use creamy peanut butter because the recipe needs that smooth, sticky texture.
The peanut butter brings the signature flavor that makes this more than a basic chocolate dump cake. As it mixes into the batter, it creates a chocolate peanut butter base that tastes rich and cozy.
Do not use natural peanut butter for this recipe. The smoother, stickier style works better for blending into the batter and baking evenly.
Step 7: Add the Melted Butter
Pour in ½ cup melted butter. The melted butter adds richness and helps bring the batter together.
Because the butter is melted, it blends more easily into the thick mixture. This helps keep the method simple and avoids the need for creaming or beating.
Make sure the butter is fully melted before adding it. The recipe is designed around melted butter, not softened butter or cold pieces.
Step 8: Stir Until the Batter Is Just Combined
Stir the cake mix, pudding mix, milk, peanut butter, and melted butter together until everything is just combined. The batter will be thick and fudgy-looking.
Do not overmix the batter. Once the ingredients are combined and no large dry pockets remain, stop stirring.
A few lumps are totally fine. This cake is not meant to have a perfectly silky batter, and leaving a few small lumps is better than overworking the mixture.
The texture at this stage should look rich and heavy. That thick batter is part of what gives the finished cake its dense, moist, chocolate-peanut butter bite.
Step 9: Spread the Batter Into the Prepared Pan
Transfer the thick batter into the greased 9×13-inch baking dish. Use a spoon or spatula to spread it toward the corners and edges.
Try to make the surface as even as you reasonably can. An even layer helps the cake bake consistently, so the edges do not dry out before the center finishes.
Since the batter is thick, it may not pour smoothly like a thin cake batter. That is normal, so gently guide it into place instead of adding extra liquid.
Step 10: Sprinkle the Chopped Mini Peanut Butter Cups Over the Batter
Sprinkle 1 cup chopped mini peanut butter cups evenly over the top of the batter. Spread them across the whole pan so every slice has some of those gooey candy pieces.
The peanut butter cups soften as the cake bakes. They become rich pockets of chocolate and peanut butter instead of staying firm on top.
Take your time with the coverage here. A more even layer of candy means the finished cake tastes balanced from corner to center.
Step 11: Add the Milk Chocolate Chips
Sprinkle 1 cup milk chocolate chips over the top of the batter and chopped peanut butter cups. Try to distribute them evenly across the surface.
The chocolate chips melt into the top as the cake bakes. They add extra chocolate flavor and help make the dessert feel more indulgent.
This step is simple, but it affects every bite. If all the chips land in one spot, some slices will be loaded while others will be plain.
Step 12: Add the Optional Chopped Peanuts
If you are using them, sprinkle ½ cup chopped peanuts over the top. This optional ingredient gives the cake extra crunch.
The chopped peanuts add texture against the soft, fudgy cake. They also make the peanut butter flavor feel a little more pronounced.
If you prefer the cake completely soft and gooey, you can leave them off. If you love contrast, they are a great addition.
Step 13: Add the Extra Peanut Butter Swirl
After the batter is in the pan, drop little spoonfuls of extra peanut butter, about ¼ cup, on top. Use a knife to gently swirl it through the batter.
The goal is to create peanut butter ribbons, not fully mix the peanut butter into the cake. Move the knife lightly through the top so the peanut butter leaves visible streaks.
This swirl makes the cake taste even more peanut buttery. It also adds a homemade look to the top without changing the baking method.
Step 14: Bake for 30–35 Minutes
Place the baking dish in the preheated 350°F (175°C) oven. Bake the cake for 30–35 minutes.
Start checking the cake at 30 minutes because ovens can vary. The goal is to catch it when the center is baked but still fudgy.
During baking, the edges will begin to set and pull away slightly from the pan. The top will look rich, chocolatey, and loaded with softened candy and melted chips.
Step 15: Check the Doneness Carefully
To check doneness, insert a toothpick into the center of the cake. It should come out with just a few moist crumbs.
Do not wait for a bone-dry toothpick. This cake is meant to be fudgy, so a few moist crumbs are exactly what you want.
If the toothpick comes out with wet batter, the cake needs more time. If the edges are pulling away slightly and the center gives moist crumbs, it is ready.
Step 16: Let the Cake Cool for About 10 Minutes
Remove the cake from the oven and let it sit for about 10 minutes. This cooling time allows the cake to settle while keeping the toppings warm and melty.
The cake will be very hot right away, especially where the chocolate chips and peanut butter cups have melted. Waiting briefly makes it easier and safer to serve.
This short rest also helps the texture firm up slightly. You still get a warm, gooey dessert, but the slices or scoops hold together better.
Step 17: Serve Warm With Ice Cream or Whipped Cream
Serve the cake warm with vanilla ice cream or whipped cream. Vanilla ice cream is especially good because it melts over the warm cake and blends with the chocolate peanut butter topping.
Whipped cream gives a lighter finish if you want something creamy without adding more richness. Either option works beautifully with the soft cake and gooey candy pieces.
You can also add chocolate syrup or crushed peanuts when serving. These toppings are especially nice if you want the dessert to feel a little more dressed up.
Serving Ideas
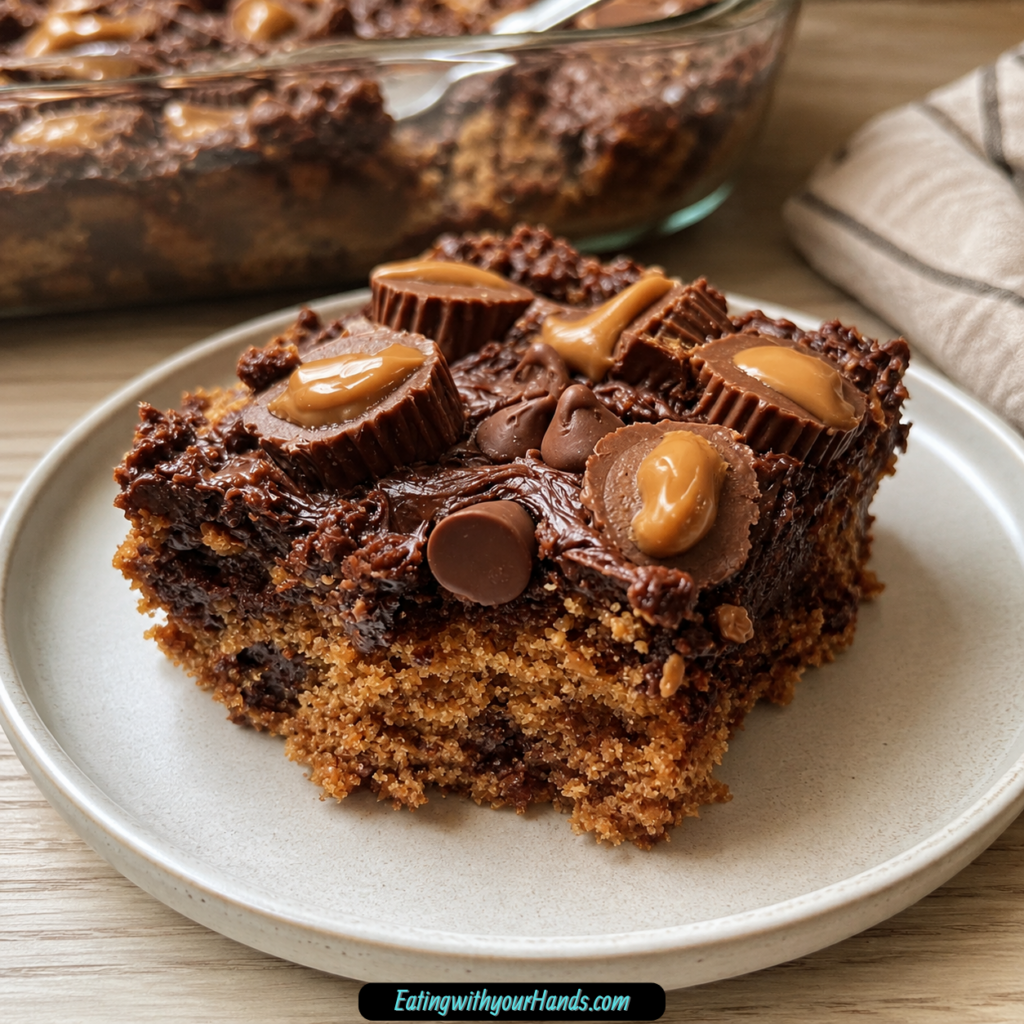
This Decadent Peanut Butter Cup Dump Cake is at its best when served warm. The chocolate chips are soft, the peanut butter cups are gooey, and the cake has that fresh-from-the-oven fudgy texture.
Vanilla ice cream is one of the best toppings for a warm slice. The cold ice cream melts into the cake and creates a creamy contrast with the chocolate and peanut butter.
Whipped cream also works well, especially if you want a lighter topping. It gives each serving a soft finish without competing with the strong chocolate peanut butter flavor.
For extra flair, add a drizzle of chocolate syrup. You can also sprinkle crushed peanuts over the top for more crunch.
This cake is also delicious at room temperature. If you bring it to a party, potluck, or birthday gathering, you do not need to worry if it cools before serving.
Storage
Cover the pan tightly with plastic wrap if you are storing leftovers in the baking dish. You can also move individual slices into an airtight container.
Store the cake in the refrigerator for 3–4 days. The pudding mix helps the cake stay moist even after it has chilled.
The texture changes slightly as the cake cools. It becomes denser and fudgier, which is actually one of the best things about this dessert.
If you prefer a softer texture, let a refrigerated slice sit at room temperature for 20 minutes before serving. That short rest takes off the chill and makes the cake feel more tender again.
Reheating
To reheat a refrigerated slice, microwave it for 10–15 seconds. This brings back the warm, melty texture without drying out the cake.
The chocolate chips and peanut butter cups soften quickly in the microwave. Keep the reheating time short so the slice stays moist.
If the cake is frozen, thaw it first or use the freezer reheating guidance from the FAQ. A frozen slice can be microwaved for 30 seconds when the craving hits.
Freezing
This cake freezes well in individual slices. Wrap each slice in plastic wrap and store the wrapped slices in a freezer bag for up to 2 months.
Another freezer method is to wrap slices tightly in plastic wrap, then foil, and freeze them for up to 2 months. This helps protect the texture and keeps the slices ready for later.
When you want a slice, thaw it and reheat as desired. You can thaw at room temperature or microwave for 30 seconds when you want a quick dessert.
Make-Ahead
This Peanut Butter Cup Dump Cake is a good make-ahead dessert because it stays moist after baking. In fact, it becomes denser and fudgier as it cools.
You can bake the cake earlier in the day, let it cool, and serve it at room temperature. You can also refrigerate it and warm slices later.
For a party, the cake can be made ahead and stored covered in the refrigerator. Let slices sit at room temperature for 20 minutes if you want them softer before serving.
For longer storage, freeze individual slices for up to 2 months. This makes it easy to keep a rich chocolate peanut butter dessert ready for future cravings.
Helpful Notes for Best Results
Do not overmix the batter. Stir only until the ingredients are combined, because overworking the batter can make the cake tough.
A few lumps are completely fine. This is a thick, fudgy dump cake batter, not a delicate cake batter that needs to be perfectly smooth.
Use creamy peanut butter for the best texture. The recipe needs that smooth, sticky consistency to blend well with the chocolate batter.
Do not use natural peanut butter here. It does not give the same smooth texture and may not blend into the batter the way this cake needs.
Spread the toppings evenly. Take an extra minute to distribute the chopped mini peanut butter cups, milk chocolate chips, and optional chopped peanuts so every bite has something delicious.
Start checking the cake at 30 minutes. The baking window is 30–35 minutes, but ovens vary, and the goal is a fudgy center that is not wet.
Use the toothpick cue carefully. A few moist crumbs are right, while wet batter means the cake needs more time.
Let the cake cool for about 10 minutes before serving. This keeps it warm and gooey while giving it enough time to settle.
Remember that the cake gets denser and fudgier as it cools. Even straight from the refrigerator, it stays moist because of the pudding mix.
If you prefer a softer chilled slice, let it sit at room temperature for 20 minutes. That small wait helps bring back a more tender texture.
Variations
Reese’s Pieces Party
Swap the peanut butter cups for 1 cup of Reese’s Pieces. The candy pieces bake into colorful little surprises with a slight crackle.
This version is especially fun for birthdays. It keeps the peanut butter candy feeling but gives the cake a brighter party look.
Salted Caramel Swirl
Drizzle ¼ cup of salted caramel sauce over the batter before baking. Use a knife to swirl it into the top.
Warm the caramel slightly before swirling so it moves more easily. The sweet-salty caramel works beautifully with the chocolate and peanut butter.
Cookies and Cream
Use vanilla cake mix instead of chocolate. Keep the peanut butter, then replace the chocolate chips with crushed Oreos.
This variation creates a peanut butter cookies-and-cream flavor. It is still rich and fun, but it has a different feel from the original chocolate version.
White Chocolate Chip Variation
Use white chocolate chips instead of milk chocolate chips. This gives the cake a sweeter, creamier chocolate note.
The white chocolate also changes the look of the topping. It stands out against the darker cake and makes the surface look extra loaded.
Sweet-Salty Bacon Variation
Mix in a handful of crumbled bacon for a sweet-salty-crunchy twist. The bacon adds contrast to the soft cake and melty chocolate.
This variation is bold and rich. It works best if you enjoy desserts that balance sweetness with salty crunch.
Dairy-Free Variation
Use almond milk and vegan butter. Keep the method the same and bake at 350°F (175°C) for 30–35 minutes.
The cake will still be delicious with this dairy-free direction. The texture may vary slightly, but the dessert remains rich and chocolatey.
Almond Butter and Chocolate Bar Variation
For peanut allergies, use almond butter and chopped chocolate bars instead of peanut butter cups. This keeps the dessert filled with chocolate while changing the peanut butter element.
The flavor will be more almond-forward. It is still a rich dessert with a creamy nut butter base.
Sunflower Seed Butter Nut-Free Variation
For a nut-free direction, use sunflower seed butter instead of peanut butter. Skip the peanut butter cups and use more chocolate chips instead.
This keeps the dessert sweet and chocolate-heavy. It is a helpful option when peanut butter and nut ingredients need to be avoided.
Troubleshooting
Why Is My Cake Dry?
The cake may be dry if it was baked too long. Start checking at 30 minutes so you can catch it while the center still has moist crumbs.
Another possible reason is using low-fat milk. Whole milk gives the best texture, and if you must use 2%, add an extra tablespoon of peanut butter to compensate.
Why Is My Cake Too Wet in the Center?
The cake may need more baking time if the toothpick comes out with wet batter. Keep baking until the center gives just a few moist crumbs.
This cake is meant to be fudgy, so moist crumbs are good. Wet batter is different and means the center has not finished baking.
Why Did My Cake Turn Tough?
The batter may have been overmixed. Stir only until the ingredients are just combined.
A few lumps are fine and should not be chased with extra mixing. Gentle stirring helps keep the finished cake from becoming tough.
Why Did the Toppings Bake Unevenly?
The toppings may not have been spread evenly over the batter. Take time to scatter the chopped peanut butter cups and chocolate chips across the whole pan.
Even topping coverage matters because the toppings become part of the texture. Every slice should have some candy, chocolate, and optional peanut crunch.
Why Does the Cake Get Denser After Cooling?
That is normal for this cake. It becomes denser and fudgier as it cools, which makes leftovers especially rich.
If you want the texture softer, let a chilled slice sit at room temperature for 20 minutes. You can also microwave it for 10–15 seconds.
Why Is My Cake Less Fudgy Than Expected?
The instant chocolate pudding mix may have been skipped. The cake can still be tasty without it, but it will be less fudgy.
Whole milk also helps create the best texture. Using lower-fat milk can make the result a little less rich.
Frequently Asked Questions
Can I Use a Different Cake Mix Flavor?
Yes, you can use a different cake mix flavor. Devil’s food cake mix gives extra richness, while yellow cake mix gives a more subtle chocolate flavor.
Keep the instant chocolate pudding mix chocolate if you want the fudgy texture. That pudding mix is key to the rich, moist finish.
Can I Use 2% Milk Instead of Whole Milk?
Yes, 2% milk works in a pinch. Whole milk gives the best texture because it helps make the cake more tender.
If you use 2% milk and are worried about dryness, add an extra tablespoon of peanut butter. This helps compensate for the lower fat content.
Can I Skip the Pudding Mix?
Yes, you can skip the pudding mix if you are out. The cake will still be tasty.
However, it will be less fudgy without the instant chocolate pudding mix. The pudding mix is the ingredient that helps create the extra moist texture.
Can I Make This Cake Dairy-Free?
Yes, use almond milk and vegan butter. The cake will still be delicious with those swaps.
Keep the rest of the method the same. Bake at 350°F (175°C) and follow the same 30–35 minute baking window.
How Do I Make This Nut-Free?
Use sunflower seed butter instead of peanut butter. Skip the peanut butter cups and use more chocolate chips instead.
This gives you a rich chocolate dessert without the peanut butter cups. The taste is surprisingly similar enough that it still feels like a complete treat.
What Can I Use for Peanut Allergies?
Use almond butter and chopped chocolate bars instead of peanut butter cups. This swap keeps the dessert rich and chocolatey while moving away from peanut butter cups.
This option is different from the nut-free sunflower seed butter direction. Choose the swap that fits the needs of the people eating the cake.
Can I Freeze Leftovers?
Yes, you can freeze leftovers. Wrap slices tightly in plastic wrap, then foil, and freeze them for up to 2 months.
You can also wrap individual slices in plastic wrap and store them in a freezer bag for up to 2 months. Thaw and reheat whenever the craving hits.
How Should I Reheat This Cake?
Microwave a refrigerated slice for 10–15 seconds. This brings back the warm, melty texture.
For a frozen slice, thaw it or microwave it for 30 seconds when the craving hits. The goal is to warm it enough to soften the chocolate and peanut butter pieces.
Can I Serve It Cold?
Yes, the cake is good cold, warm, or at room temperature. When cold, it becomes denser and fudgier.
If you want a softer chilled slice, let it sit at room temperature for 20 minutes. You can also microwave it briefly.
What Should the Toothpick Look Like?
The toothpick should come out with just a few moist crumbs. It should not come out with wet batter.
A dry toothpick is not the goal for this cake. Since it is meant to be fudgy, moist crumbs are the perfect doneness cue.
Should I Use Natural Peanut Butter?
No, natural peanut butter is not recommended. This cake needs smooth, sticky creamy peanut butter.
That texture blends better into the batter. It also helps create the rich peanut butter flavor throughout the cake.
Why This Recipe Works So Well
This Decadent Peanut Butter Cup Dump Cake works so well because it turns simple pantry-style ingredients into a dessert that tastes layered and indulgent. The method is easy, but the finished cake has the kind of rich texture people remember.
The chocolate cake mix creates a dependable base, while the instant chocolate pudding mix makes the texture moist and fudgy. Together, they keep the cake from feeling plain or dry.
The creamy peanut butter adds flavor throughout the batter. It makes the chocolate taste warmer and gives every bite that classic peanut butter cup feeling.
The melted butter and whole milk help the batter bake into something tender and rich. They also support the thick texture that makes this cake feel more like a decadent dessert than a simple boxed cake.
The chopped mini peanut butter cups and milk chocolate chips create the top layer of candy-like goodness. As they bake, they soften and melt into pockets that make every slice feel loaded.
The optional chopped peanuts add crunch when you want contrast. The serving toppings, especially vanilla ice cream or whipped cream, bring creaminess that balances the rich cake.
This recipe also works because it is forgiving. The batter can have a few lumps, the toppings do not need to be perfect, and the cake tastes good warm, chilled, or at room temperature.
Final Thoughts
Decadent Peanut Butter Cup Dump Cake is the kind of dessert that makes people happy before they even take a bite. It smells like chocolate and peanut butter while it bakes, looks wonderfully loaded when it comes out of the oven, and tastes like a warm candy-filled cake made for sharing.
It is simple enough for a weeknight craving, but special enough for birthdays, potlucks, family gatherings, and celebrations. That balance is what makes it such a dependable recipe to keep in your dessert rotation.
The best part is how little effort it takes to create something so rich. Stir the batter just until combined, spread it into a greased 9×13-inch baking dish, cover the top with chopped peanut butter cups and chocolate chips, bake until fudgy, and let it cool for about 10 minutes.
Serve it warm with vanilla ice cream when you want the full melty dessert experience. Save the leftovers for the refrigerator or freezer, and you will have a chocolate peanut butter treat ready whenever the craving comes back.
Peanut Butter Cup Dump Cake
This Peanut Butter Cup Dump Cake is rich, gooey, and loaded with chocolate peanut butter flavor from the soft cake base to the candy-studded topping. It is an easy American dessert made with chocolate cake mix, instant pudding, creamy peanut butter, mini peanut butter cups, and milk chocolate chips, making it perfect for potlucks, family gatherings, or a quick sweet treat.
Recipe Details
- Prep Time: 10 minutes
- Cook Time: 35 minutes
- Total Time: 45 minutes
- Course: Dessert
- Cuisine: American
- Servings: 12 servings
Equipment
- 9×13-inch baking dish
- Mixing bowl
Ingredients
For the Cake
- 2 cups whole milk
- ½ cup creamy peanut butter
- ½ cup butter melted
- 1 box instant chocolate pudding mix 3.9 oz
- 1 box chocolate cake mix
- 1 cup mini peanut butter cups chopped
- ½ cup chopped peanuts optional for crunch
- 1 cup milk chocolate chips
- whipped cream or vanilla ice cream for serving
Instructions
Step 1: Prepare the Baking Dish
Preheat the oven to 350°F (175°C). Grease a 9×13-inch baking dish so the cake releases easily after baking.
Step 2: Make the Chocolate Peanut Butter Batter
In a mixing bowl, combine the cake mix, pudding mix, milk, peanut butter, and melted butter. Stir until everything is well mixed and the batter is evenly blended.
Step 3: Fill the Pan
Pour the batter into the prepared 9×13-inch baking dish and spread it into an even layer.
Step 4: Add the Candy and Chocolate Topping
Sprinkle the chopped mini peanut butter cups, milk chocolate chips, and chopped peanuts over the top of the batter.
Step 5: Bake the Cake
Bake for 30-35 minutes, or until a toothpick inserted into the center comes out clean.
Step 6: Cool and Serve
Let the cake cool slightly before serving. Top with whipped cream or vanilla ice cream if desired.
Notes
For extra peanut butter flavor, swirl in an additional ¼ cup of peanut butter before baking.
Serving Suggestions
- Serve warm with whipped cream for a soft, creamy finish.
- Add vanilla ice cream while the cake is still slightly warm for a melty dessert.
- Cut into squares and serve for potlucks, parties, or casual family desserts.
- Pair with cold milk to balance the rich chocolate peanut butter flavor.
- Serve with coffee after dinner for a simple bakery-style treat.
Storage
How to Store
Once cooled, cover the dump cake tightly or place leftovers in an airtight container. Keep it at room temperature for short-term serving, or refrigerate it if storing longer.
How to Reheat
Warm individual portions gently until the cake softens and the chocolate pieces become slightly melty again. Add whipped cream or vanilla ice cream after reheating if desired.
Best Texture Tip
This dump cake tastes especially good slightly warm because the peanut butter cups and chocolate chips stay soft, rich, and gooey.

Fernando is the creator and writer behind the food blog Eating with your Hands. Living and working in cities like Paris, Barcelona, and Berlin, and being married to a Canadian foodie, has given Fernando a passion and interest in food and inspired him to run EWYH.