
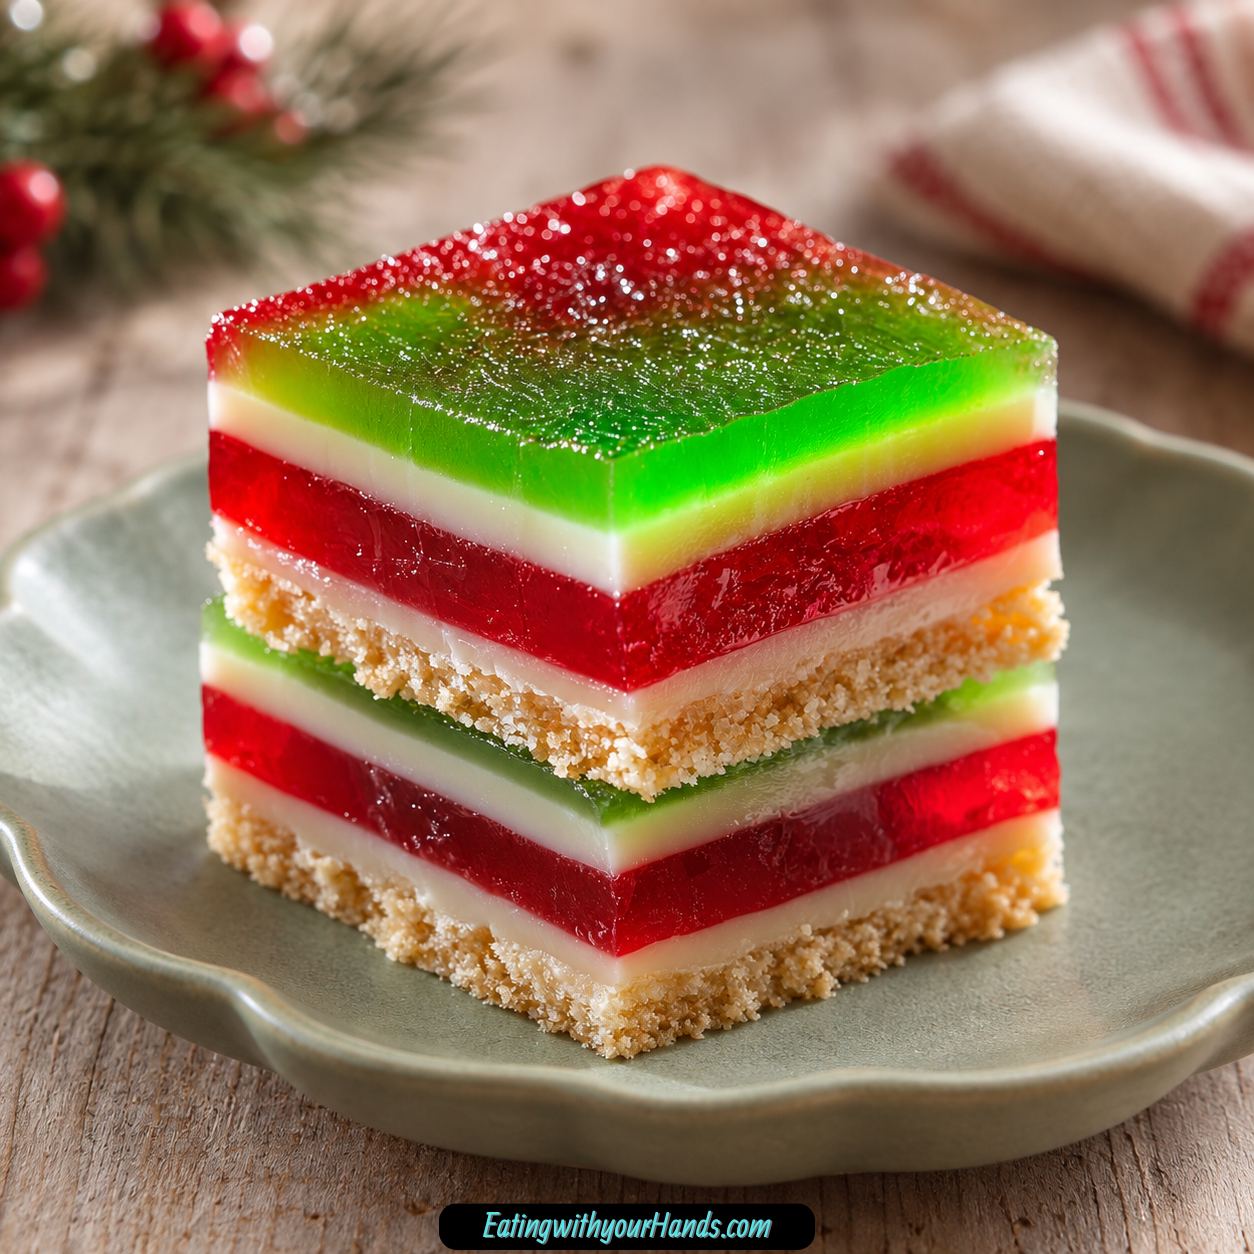
Festive Green & Red Christmas Jelly Recipe is the kind of no-bake holiday dessert that instantly brings color, nostalgia, and cheerful sweetness to the table. It has a buttery biscuit base, a smooth lemony condensed milk layer, and bright red and green jelly layers that make every slice look like Christmas.
This dessert feels wonderfully old-fashioned in the best way. It is simple, cool, creamy, sweet, and refreshing, with enough festive color to make guests pause before taking the first bite.
The biscuit base gives the dessert a sturdy foundation. Crushed Arnott’s Marie or Nice biscuits mix with melted butter to create a sweet, slightly crunchy layer that holds everything together.
The creamy middle is soft, silky, and lightly tangy. Sweetened condensed milk, lemon juice, gelatine, cold water, and boiling water create a set layer that balances the sweetness of the jelly.
Then come the red and green jelly layers. Raspberry or strawberry jelly brings the red, while lime jelly brings the green, creating that bright holiday look that makes this dessert perfect for Christmas gatherings.
This recipe is especially helpful when the oven is already busy. There is no baking required, just mixing, layering, chilling, and waiting.
The waiting is the hardest part. Each layer needs time to set properly so the finished dessert slices cleanly and shows off those pretty layers.
Once chilled, it becomes light, refreshing, and just indulgent enough after a big holiday meal. Serve it straight from the fridge, cut into squares, and watch the colors do all the decorating for you.
Table of Contents
- Why You’ll Love This Green & Red Christmas Jelly
- Recipe Details
- Ingredients
- Ingredient Notes
- Optional Swaps, Variations, Add-Ins, and Serving Ideas
- Classic Green & Red Christmas Jelly
- Graham Cracker Christmas Jelly
- Digestive Biscuit Jelly Slice
- Gingersnap Christmas Jelly
- Cherry and Lime Jelly
- Cranberry and Lime Jelly
- Apple Green Jelly
- Kiwi Green Jelly
- Fruity Christmas Jelly
- Adults-Only Jelly Slice
- Coconut Christmas Jelly
- Dairy-Free-Style Option
- One-Color Christmas Jelly
- Winter Wonderland Jelly
- Fresh Mint and Berry Platter
- Why This Recipe Works
- Directions
- Step 1: Prepare the Tin
- Step 2: Crush the Biscuits
- Step 3: Mix the Biscuit Base
- Step 4: Press the Base Into the Tin
- Step 5: Chill the Base
- Step 6: Bloom the Gelatine
- Step 7: Dissolve the Gelatine
- Step 8: Mix the Creamy Layer
- Step 9: Pour Over the Biscuit Base
- Step 10: Chill the Creamy Layer
- Step 11: Prepare the Red Jelly
- Step 12: Pour the Red Jelly Layer
- Step 13: Prepare the Green Jelly
- Step 14: Pour the Green Jelly Layer
- Step 15: Check the Set
- Step 16: Slice Cleanly
- Step 17: Serve Chilled
- Step 18: Store Leftovers
- Serving Ideas
- Storage
- Freezing
- Make-Ahead
- Helpful Notes for Best Results
- Variations
- Classic Green & Red Christmas Jelly
- Raspberry Lime Christmas Jelly
- Strawberry Lime Christmas Jelly
- Cherry Green Jelly Slice
- Cranberry Green Jelly Slice
- Apple Green Jelly Layer
- Kiwi Green Jelly Layer
- Berry Christmas Jelly
- Mango Christmas Jelly
- Adults-Only Christmas Jelly
- Coconut Christmas Jelly
- Dairy-Free-Style Christmas Jelly
- One-Color Jelly Slice
- Gingersnap Base Christmas Jelly
- Troubleshooting
- Frequently Asked Questions
- Why This Recipe Works So Well
- Final Thoughts
- Green and Red Christmas Jelly
Why You’ll Love This Green & Red Christmas Jelly
This dessert is a holiday showstopper. The biscuit base, creamy middle, and red and green jelly layers look beautiful when sliced.
It is completely no-bake. That makes it perfect for Christmas when the oven is already full.
It is make-ahead friendly. You can prepare it the day before and slice it when ready to serve.
It is light but still sweet and creamy. After a rich holiday meal, it feels refreshing without being boring.
It is crowd-friendly. Kids love the jelly, adults love the creamy layer, and everyone enjoys the buttery biscuit base.
It is easy to customize. You can change the jelly flavors, add fruit, make an adults-only version, or give it a coconut twist.
Recipe Details
This recipe is made in a 20cm square tin. The tin does not need to be greased because the biscuit base contains butter, but parchment can be used if desired for easier lifting.
The biscuit base uses 250g Arnott’s Marie or Nice biscuits and 125g melted unsalted butter. Graham crackers, digestives, or gingersnaps can also work.
The biscuit base must chill for at least 20 minutes. This helps it firm up before the creamy layer is added.
The creamy middle uses 395g sweetened condensed milk, ½ cup lemon juice, 3 teaspoons gelatine, ¼ cup cold water, and 1 cup boiling water. The gelatine is bloomed in cold water first, then dissolved with boiling water.
The creamy layer needs at least 2 hours in the refrigerator. It must be completely set before jelly is poured on top.
The red jelly layer uses 85g red jelly crystals and 1 cup boiling water plus 1 cup cold water. Raspberry or strawberry flavor works well, and cherry or cranberry can also fit the holiday theme.
The green jelly layer uses 85g green jelly crystals and 1 cup boiling water plus 1 cup cold water. Lime is traditional, while apple or kiwi can be fun alternatives.
Each jelly mixture must cool to room temperature before pouring. Hot jelly can melt the creamy layer.
The red jelly layer chills for about 1 hour, or until set. Then the green jelly layer is made, cooled, poured, and chilled.
For the cleanest slices, chill the dessert until fully set, ideally overnight. Use a sharp knife dipped in hot water and wiped dry between cuts.
Ingredients
For the Biscuit Base
- 250g Arnott’s Marie or Nice biscuits, crushed
- 125g unsalted butter, melted
For the Creamy Middle Layer
- 395g sweetened condensed milk
- 1 cup boiling water
- ½ cup lemon juice
- 3 teaspoons gelatine
- ¼ cup cold water
For the Jelly Layers
- 85g red jelly crystals, raspberry or strawberry flavor
- 85g green jelly crystals, lime flavor
- 2 cups boiling water, 1 cup per jelly packet
- 2 cups cold water, 1 cup per jelly packet
Optional Swaps, Add-Ins, and Variations
- Plain sweet biscuits
- Graham crackers
- Digestives
- Gingersnaps
- Cherry jelly
- Cranberry jelly
- Apple jelly
- Kiwi jelly
- Fresh berries
- Diced mango
- Vodka
- Fruity liqueur
- Coconut-flavored condensed milk
- Shredded coconut
- Light coconut milk
- ¼ cup honey
- Extra ½ teaspoon gelatine
- Fresh mint
- Extra berries
Ingredient Notes
Arnott’s Marie or Nice biscuits create a light, sweet base. Crush them finely so the base presses together evenly.
Plain sweet biscuits can be used if Marie or Nice biscuits are unavailable. Graham crackers, digestives, and gingersnaps can also work.
Unsalted butter binds the biscuit crumbs. Melt it gently and mix until every crumb is coated.
Sweetened condensed milk gives the creamy layer its smooth sweetness. One 395g can is used.
Lemon juice balances the condensed milk. It adds tang and keeps the creamy layer from tasting too sweet.
Gelatine sets the middle layer. Blooming it in cold water first helps it dissolve properly.
Cold water is used for blooming the gelatine. The mixture will look wrinkly or thick after sitting.
Boiling water dissolves the bloomed gelatine. Whisk until there are no lumps.
Red jelly crystals create the festive red layer. Raspberry or strawberry works beautifully.
Green jelly crystals create the festive green layer. Lime is the classic choice.
Cold water cools each jelly mixture after the crystals dissolve. The jelly still needs to cool further before pouring.
Fresh berries or diced mango can add texture. Pat them dry first so they do not bleed into the layers.
Vodka or fruity liqueur can replace ¼ cup of the jelly’s cold water for an adults-only version. Guests should be told if alcohol is included.
Optional Swaps, Variations, Add-Ins, and Serving Ideas
Classic Green & Red Christmas Jelly
Make the dessert with a Marie or Nice biscuit base, creamy condensed milk layer, red jelly, and green jelly. This gives the classic festive layered look.
Chill each layer properly before adding the next. Patience creates clean layers.
Graham Cracker Christmas Jelly
Use graham crackers instead of Marie or Nice biscuits. The base will still be sweet and sturdy.
Crush them finely before mixing with butter. Press firmly into the tin.
Digestive Biscuit Jelly Slice
Use digestive biscuits for the base. They give a slightly different flavor and texture.
The rest of the recipe stays the same. Chill the base before adding the creamy layer.
Gingersnap Christmas Jelly
Use gingersnaps for a spiced base. This gives the dessert a warmer holiday flavor.
The ginger flavor pairs nicely with the cool creamy layer and jelly. Crush the biscuits finely.
Cherry and Lime Jelly
Use cherry jelly for the red layer and lime for the green layer. This keeps the Christmas color theme.
Cherry brings a deeper red flavor. Lime keeps the dessert fresh.
Cranberry and Lime Jelly
Use cranberry jelly for the red layer if available. It gives the dessert a holiday-style fruit flavor.
Pair it with lime jelly for the green layer. The color contrast remains festive.
Apple Green Jelly
Use apple jelly instead of lime. This gives the green layer a different fruity taste.
It is a fun variation if you want something less traditional. Keep the same water amounts.
Kiwi Green Jelly
Use kiwi jelly for the green layer. It gives a playful twist.
Make it the same way as the lime jelly. Cool before pouring.
Fruity Christmas Jelly
Add fresh berries or diced mango between the creamy and jelly layers. Pat the fruit dry first.
Drying the fruit helps prevent bleeding and extra moisture. Use small pieces so the layers slice cleanly.
Adults-Only Jelly Slice
Replace ¼ cup of the jelly’s cold water with vodka or fruity liqueur. Use this only for an adults-only dessert.
Make sure guests know the dessert contains alcohol. Chill thoroughly before serving.
Coconut Christmas Jelly
Use coconut-flavored condensed milk in the creamy layer. Add shredded coconut to the biscuit base.
This gives the dessert a tropical Christmas feel. The texture changes slightly but stays festive.
Dairy-Free-Style Option
Swap the condensed milk for light coconut milk plus ¼ cup honey. The texture changes slightly but can still be delicious.
Use the same careful chilling method. The creamy layer may feel different from the classic version.
One-Color Christmas Jelly
Use only one color of jelly if desired. Double the red for a monochrome red dessert, or use only green.
Adjust the water amounts accordingly. Keep the total jelly layer balanced.
Winter Wonderland Jelly
Use blue and white colors for a winter-style version. This changes the look while keeping the layered dessert idea.
Keep the creamy layer in the middle. Chill each layer fully.
Fresh Mint and Berry Platter
Serve the squares on a festive platter with fresh mint or berries. This adds color and makes the dessert table look brighter.
Keep the slices chilled until serving. Jelly holds its shape best cold.
Why This Recipe Works
This recipe works because each layer has a clear job. The biscuit base gives structure, the creamy layer adds richness, and the jelly layers bring color and freshness.
The biscuit base must be pressed firmly. A loose base can crumble when sliced.
The gelatine in the creamy layer helps it set. Blooming it first prevents clumps and helps the layer become smooth.
The lemon juice balances the condensed milk. It makes the creamy layer taste bright instead of overly sweet.
The jelly must cool before being poured. Hot jelly can melt the creamy layer and blur the colors.
Each layer needs enough time to set. Rushing creates messy layers and uneven slices.
The dessert is best made ahead because chilling time improves the structure. Overnight chilling gives the cleanest squares.
A hot knife helps with slicing. Wiping the blade between cuts keeps the layers neat.
Directions
Step 1: Prepare the Tin
Set out a 20cm square tin. You do not need to grease it, but you can line it if you want easier lifting later.
Make sure the tin is clean and dry. The layers will look best when the base is pressed evenly.
Step 2: Crush the Biscuits
Crush 250g Arnott’s Marie or Nice biscuits into fine crumbs. You can use a zip-top bag and rolling pin or a food processor.
Avoid leaving large chunks. The texture should be fine enough to press into a firm base.
Step 3: Mix the Biscuit Base
Place the biscuit crumbs in a bowl and add 125g melted unsalted butter. Stir until every crumb is coated.
The mixture should look like damp sand and clump when squeezed. If it seems too dry, mix a little longer before adding anything else.
Step 4: Press the Base Into the Tin
Transfer the biscuit mixture into the 20cm square tin. Press it firmly into an even layer.
Use the back of a spoon or clean fingers to compact it. A firm base helps the finished slices hold together.
Step 5: Chill the Base
Place the tin in the refrigerator for at least 20 minutes. The base needs time to set before the creamy layer is added.
This step creates a solid foundation. Do not rush it.
Step 6: Bloom the Gelatine
Sprinkle 3 teaspoons gelatine over ¼ cup cold water in a small bowl. Let it sit for 5 minutes.
The mixture will look wrinkled and thickened. That means the gelatine has bloomed properly.
Step 7: Dissolve the Gelatine
Pour 1 cup boiling water over the bloomed gelatine. Whisk until completely dissolved.
There should be no lumps. If needed, microwave briefly for 10 seconds to help it dissolve.
Step 8: Mix the Creamy Layer
In a separate bowl, whisk together 395g sweetened condensed milk and ½ cup lemon juice. Slowly pour in the dissolved gelatine mixture while whisking.
The mixture may thicken slightly. Keep whisking until smooth and combined.
Step 9: Pour Over the Biscuit Base
Pour the creamy mixture over the chilled biscuit base. Smooth the top gently.
Try to create an even layer from edge to edge. This helps the jelly sit neatly on top.
Step 10: Chill the Creamy Layer
Refrigerate for at least 2 hours, or until the creamy layer is completely set. It should not wobble loosely in the center.
Test gently before adding jelly. If it is not set, chill longer.
Step 11: Prepare the Red Jelly
Dissolve 85g red jelly crystals in 1 cup boiling water. Stir until clear and fully dissolved.
Add 1 cup cold water and stir again. Let the jelly cool to room temperature, about 20 minutes.
Step 12: Pour the Red Jelly Layer
Gently pour the cooled red jelly over the set creamy layer. Tilt the tin slightly if needed to spread it evenly.
Pour slowly so you do not disturb the creamy layer. Refrigerate for about 1 hour, or until the red jelly is set.
Step 13: Prepare the Green Jelly
Dissolve 85g green jelly crystals in 1 cup boiling water. Stir until fully dissolved.
Add 1 cup cold water and let it cool to room temperature. Do not pour it hot.
Step 14: Pour the Green Jelly Layer
Gently pour the cooled green jelly over the set red jelly layer. Pour slowly and evenly.
Return the tin to the refrigerator. Let the dessert chill until fully set, preferably overnight.
Step 15: Check the Set
Before slicing, make sure all layers are firm. The jelly should not be liquid or loose when the tin is gently nudged.
If any layer still seems soft, keep chilling. Clean slices need a fully set dessert.
Step 16: Slice Cleanly
Run a sharp knife under hot water, then wipe it dry. Cut straight down into squares without sawing.
Wipe the knife between cuts. This keeps the layers neat and pretty.
Step 17: Serve Chilled
Serve the squares straight from the refrigerator. The jelly holds its shape best when cold.
Place on a festive platter if desired. Fresh mint or berries can add extra color.
Step 18: Store Leftovers
Cover leftovers and refrigerate for 3 to 4 days. Press cling film directly onto the jelly surface to help prevent weeping.
Do not freeze this dessert. Jelly does not freeze well and can become weepy when thawed.
Serving Ideas
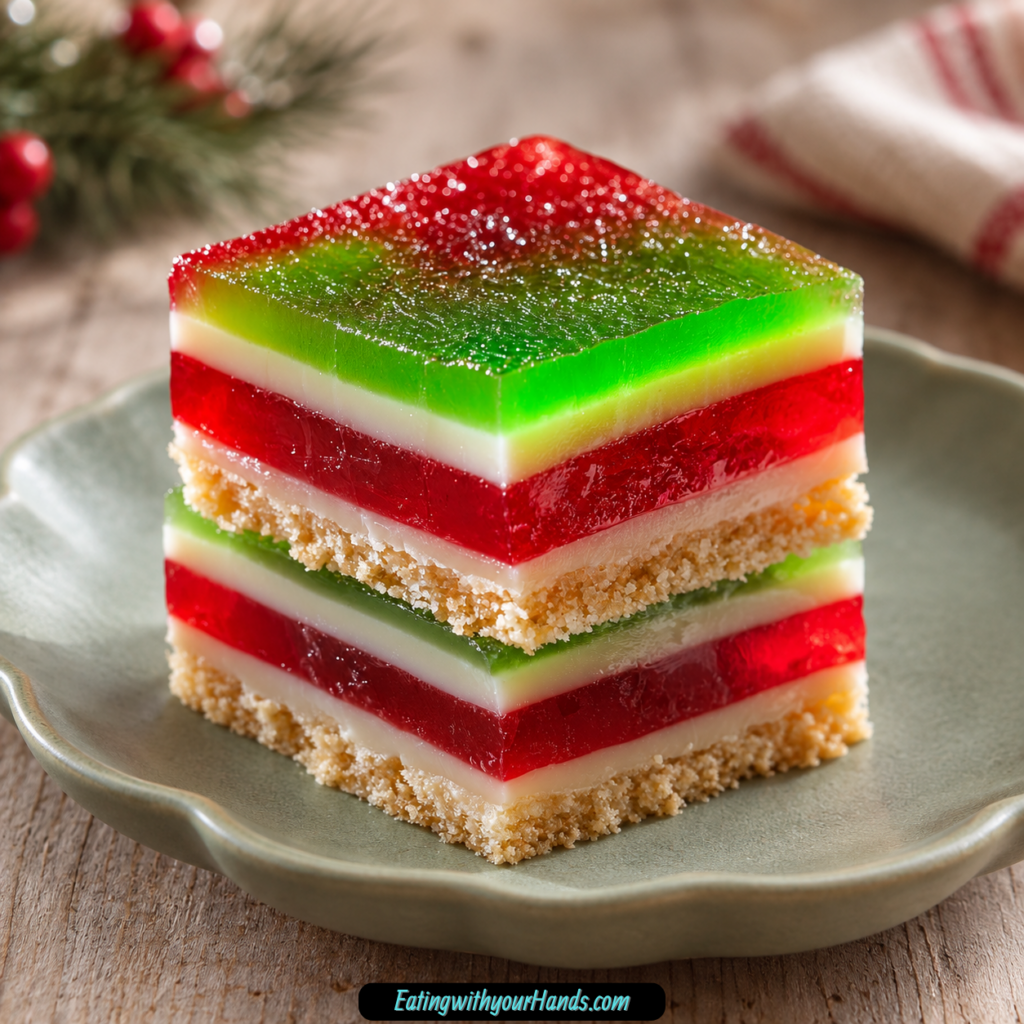
Serve Festive Green & Red Christmas Jelly chilled. The cold texture keeps the jelly firm and the creamy layer smooth.
Cut the dessert into squares for easy serving. Smaller pieces work well for dessert platters.
Use a hot, dry knife for the cleanest edges. Wipe between slices so the layers stay sharp.
Arrange the squares on a festive platter. Add fresh mint or berries for extra holiday color.
Serve after a rich Christmas meal. The dessert is light, cool, sweet, and refreshing.
It is also wonderful for family gatherings. Kids enjoy the bright jelly layers, and adults appreciate the creamy center.
Make it the day before serving. This frees up time on Christmas Day and gives the layers plenty of time to set.
Keep it in the refrigerator until just before serving. Warm rooms can soften the dessert.
Storage
Store the dessert covered in the refrigerator. It keeps well for 3 to 4 days.
Press cling film directly onto the jelly surface to help prevent weeping. This helps protect the top layer.
The jelly may begin to weep slightly after day two. It will still taste good, but the texture and appearance are best earlier.
Keep the dessert cold. The jelly layers hold their shape better when chilled.
Do not leave the dessert sitting out for a long time. It is meant to be served cold.
Store slices in a covered container if already cut. Keep layers protected from drying out.
Do not stack slices unless separated carefully. The jelly tops can stick.
For best presentation, slice close to serving time. This keeps the edges clean.
Freezing
Freezing is not recommended for this dessert. Jelly does not freeze well.
When thawed, jelly can become watery or weepy. The layers may lose their clean texture.
The creamy layer may also change. The dessert is best made fresh and refrigerated.
Since it keeps for 3 to 4 days in the fridge, make it ahead instead of freezing. Overnight chilling is especially helpful.
If planning for Christmas Day, prepare it the day before. This gives you the best texture and easiest serving.
Keep it tightly covered in the refrigerator. Serve chilled.
Make-Ahead
This dessert is very make-ahead friendly. In fact, it is often best when made the day before serving.
The biscuit base, creamy layer, and jelly layers all need time to set. Overnight chilling gives the neatest slices.
You can make the base first, chill it, add the creamy layer, then finish with the jelly layers. Work slowly and let each layer fully set.
Do not rush the creamy layer before adding jelly. A soft creamy layer can blur or melt when jelly is poured over it.
Make the dessert in a 20cm square tin and keep it covered in the refrigerator. Slice right before serving for the cleanest look.
If adding fruit between layers, pat it dry first. Excess moisture can affect the set and appearance.
For a busy holiday, this dessert is ideal because it removes one task from the day-of cooking list. Just slice and serve chilled.
Helpful Notes for Best Results
Patience is the most important part of this recipe. The layers need enough chilling time.
Cool the jelly before pouring it over the creamy layer. Hot jelly can melt the layer underneath.
Make sure the creamy layer is completely set before adding jelly. A soft center can turn the layers cloudy.
Press the biscuit base firmly. A loose base can crumble when sliced.
Use fine biscuit crumbs. Large chunks make the base uneven.
If the creamy layer does not set well, the gelatine may have been under-measured. Next time, add an extra ½ teaspoon for insurance.
Wipe the knife between cuts. This keeps the red, green, and creamy layers clean.
Serve straight from the fridge. The jelly looks and tastes best cold.
Variations
Classic Green & Red Christmas Jelly
Use a biscuit base, condensed milk lemon layer, red jelly, and green jelly. This gives the festive layered dessert its traditional look.
Chill each layer fully. The layers should stay clean and bright.
Raspberry Lime Christmas Jelly
Use raspberry jelly for the red layer and lime jelly for the green layer. This is a classic flavor pairing.
The colors are bold and festive. Serve chilled.
Strawberry Lime Christmas Jelly
Use strawberry jelly for the red layer. Keep lime for the green layer.
This version is sweet, familiar, and kid-friendly. Chill until fully set.
Cherry Green Jelly Slice
Use cherry jelly instead of raspberry or strawberry. The red layer becomes deeper in flavor.
Pair with lime, apple, or kiwi jelly. Keep the same water amounts.
Cranberry Green Jelly Slice
Use cranberry jelly for a holiday-style red layer. It fits the Christmas theme beautifully.
Pair it with lime for a bright contrast. Chill carefully.
Apple Green Jelly Layer
Use apple jelly instead of lime. This gives the green layer a sweeter fruit flavor.
The dessert still keeps its green and red Christmas look. Cool before pouring.
Kiwi Green Jelly Layer
Use kiwi jelly for a fun green variation. It gives the dessert a slightly different fruit personality.
The method stays the same. Let it cool before layering.
Berry Christmas Jelly
Add fresh berries between the creamy and jelly layers. Pat them dry first.
Use small amounts so the jelly can still set cleanly. The berries add texture and color.
Mango Christmas Jelly
Add diced mango between layers for a fruitier version. Pat the pieces dry before using.
Mango gives the dessert a bright summer-holiday feeling. Keep pieces small.
Adults-Only Christmas Jelly
Replace ¼ cup of the jelly’s cold water with vodka or fruity liqueur. This creates a boozy version.
Let guests know it contains alcohol. Chill thoroughly before serving.
Coconut Christmas Jelly
Use coconut-flavored condensed milk in the creamy layer. Add shredded coconut to the biscuit base.
This gives a tropical twist. The dessert still looks festive with red and green jelly.
Dairy-Free-Style Christmas Jelly
Use light coconut milk plus ¼ cup honey instead of condensed milk. The texture will change slightly.
Chill carefully and give it enough time to set. The flavor will be lighter and coconut-forward.
One-Color Jelly Slice
Use only red or only green jelly. Adjust the water amounts accordingly.
This is useful if you want a simpler look. The creamy layer and biscuit base still make it festive.
Gingersnap Base Christmas Jelly
Use gingersnaps instead of Marie or Nice biscuits. The base becomes spiced and holiday-like.
This variation tastes warmer. Crush the biscuits finely before mixing with butter.
Troubleshooting
The Creamy Layer Did Not Set
The gelatine may not have dissolved fully or may have been under-measured. Make sure it blooms in cold water, then dissolves completely in boiling water.
Next time, add an extra ½ teaspoon gelatine for insurance. Chill the layer longer before adding jelly.
The Jelly Melted the Creamy Layer
The jelly was likely too hot when poured. Let the jelly cool to room temperature before layering.
It should be barely warm to the touch. Patience keeps the layers clean.
The Layers Look Cloudy
A lower layer may not have been fully set before the next layer was added. Chill each layer until firm.
Pour gently and slowly. Rushing can disturb the layer underneath.
The Biscuit Base Crumbles
The base may not have been pressed firmly enough. Press it tightly into the tin.
It may also need more chilling time. Chill at least 20 minutes before adding the creamy layer.
The Base Is Too Dry
The crumbs may not be fully coated with butter. Stir longer before adding anything extra.
If needed, add a tiny bit more melted butter. The mixture should clump when squeezed.
The Jelly Is Weeping
Jelly can begin to weep after a couple of days. Press cling film directly onto the surface to help prevent it.
Store covered in the refrigerator. Serve within 3 to 4 days.
The Slices Are Messy
Use a sharp knife dipped in hot water and wiped dry. Cut straight down without sawing.
Wipe between cuts. This keeps the layers neat.
The Jelly Layer Slid Off
The layer beneath may not have been set or the surface may have been too wet. Chill longer before pouring.
Keep the dessert cold before slicing. Warm layers can shift.
The Dessert Tastes Too Sweet
Serve smaller squares. The lemon juice and creamy layer help balance the jelly sweetness.
You can also use a tangier red jelly flavor like cranberry if desired. Keep the layering method the same.
The Dessert Is Too Soft at Serving
It may not have chilled long enough. Return it to the fridge until fully set.
Serve straight from the refrigerator. This dessert needs cold temperature to hold its shape.
Frequently Asked Questions
Can I use other biscuits for the base?
Yes, Arnott’s Marie or Nice biscuits are classic, but other plain sweet biscuits can work. Graham crackers, digestives, and gingersnaps are all options.
Crush them finely before mixing with butter. A fine crumb makes a firmer base.
How long does it keep in the fridge?
It keeps for about 3 to 4 days when covered in the refrigerator. The jelly may begin to weep slightly after day two.
Press cling film directly onto the surface to help prevent weeping. Serve chilled.
Can I make just one color of jelly?
Yes, you can use only red or only green jelly. Adjust the water amounts accordingly.
This creates a simpler look. The creamy layer and biscuit base still make it special.
Can I make it ahead?
Yes, this dessert is excellent for making ahead. Preparing it the day before gives the layers plenty of time to set.
Slice just before serving for the cleanest edges. Keep it refrigerated.
Can I freeze Green & Red Christmas Jelly?
No, freezing is not recommended. Jelly does not freeze well and can become weepy when thawed.
Store it in the refrigerator instead. It keeps for 3 to 4 days.
Can I add fruit to the layers?
Yes, fresh berries or diced mango can be added between the creamy and jelly layers. Pat the fruit dry first.
Moist fruit can affect the layers. Use small pieces for cleaner slicing.
Can I make an adults-only version?
Yes, replace ¼ cup of the jelly’s cold water with vodka or fruity liqueur. Use this version only for adults.
Tell guests that the dessert contains alcohol. Chill thoroughly before serving.
What should I do if the creamy layer is too soft?
Chill it longer before adding jelly. It must be completely set.
If it repeatedly does not set well, use an extra ½ teaspoon gelatine next time. Make sure the gelatine fully dissolves.
Why This Recipe Works So Well
Festive Green & Red Christmas Jelly Recipe works so well because it combines texture, color, and temperature in a simple no-bake dessert. The biscuit base is buttery and sturdy, the creamy middle is smooth and tangy, and the jelly layers are cool, bright, and refreshing.
The base works because melted butter binds the crushed biscuits. Chilling helps it become firm enough to support the layers.
The creamy layer works because gelatine gives structure while condensed milk and lemon juice create flavor. The sweetness and tang balance each other.
The jelly layers work because they are cooled before pouring and chilled fully after layering. This protects the creamy layer and keeps the colors clear.
The dessert is also practical because it can be made ahead. Holiday cooking becomes easier when dessert is already chilling in the refrigerator.
Each layer brings something different. The base gives crunch, the middle gives creaminess, and the jelly gives a refreshing finish.
The red and green colors make the dessert instantly festive. It looks decorated without extra piping, frosting, or baking.
Most of all, this dessert works because it feels nostalgic and joyful. It is simple, bright, cool, sweet, and made for sharing.
Final Thoughts
Festive Green & Red Christmas Jelly Recipe is made with a crushed biscuit and butter base, a creamy condensed milk lemon layer set with gelatine, and bright red and green jelly layers made from jelly crystals, boiling water, and cold water. Each layer is chilled before the next is added, creating a colorful no-bake dessert that slices into festive squares.
Serve it chilled on a holiday platter with fresh mint or berries, and store leftovers covered in the refrigerator for 3 to 4 days. With its buttery base, silky middle, vibrant jelly layers, make-ahead ease, no-bake method, and cheerful Christmas colors, this dessert brings a bright, nostalgic sweetness to any holiday table.
Green and Red Christmas Jelly
Bright, creamy, festive, and beautifully layered, this Green & Red Christmas Jelly is an Australian-style dessert made with a buttery biscuit base, a sweet condensed milk middle layer, and colorful red and green jelly layers. With crushed Arnott’s Marie or Nice biscuits, lemon juice, gelatine, sweetened condensed milk, raspberry or strawberry jelly, and lime jelly, it slices into cheerful holiday squares.
Recipe Details
- Prep Time: 30 minutes
- Total Time: 30 minutes
- Course: Dessert
- Cuisine: Australian
- Servings: 12 slices
Equipment
- 20 cm square cake tin
- Mixing bowl
Ingredients
Jelly Layers
- 2 cups cold water 1 cup per jelly packet
- 2 cups boiling water 1 cup per jelly packet
- 85 g green jelly crystals (lime flavour)
- 85 g red jelly crystals (raspberry or strawberry flavour)
Creamy Middle Layer
- 0.25 cup cold water
- 3 teaspoon gelatine
- 0.5 cup lemon juice
- 1 cup boiling water
- 395 g sweetened condensed milk
Biscuit Base
- 125 g unsalted butter, melted
- 250 g Arnott’s Marie or Nice biscuits, crushed
Instructions
Step 1: Make the Biscuit Base
Mix the crushed Arnott’s Marie or Nice biscuits with the melted unsalted butter. Stir until the biscuit crumbs are evenly moistened.
Press the mixture firmly into the base of a 20 cm square cake tin. Chill the base so it can hold together before the creamy middle layer is added.
Step 2: Prepare the Creamy Layer
Dissolve the gelatine in the boiling water. Once dissolved, add the sweetened condensed milk, lemon juice, and cold water.
Stir until the mixture is smooth and fully combined. The condensed milk gives the layer its creamy sweetness, while the lemon juice adds a bright flavor.
Step 3: Pour Over the Base
Pour the creamy middle layer over the chilled biscuit base. Spread it evenly so the surface is level.
Chill until set before adding the jelly. The layer needs to be firm enough to support the colored jelly without blending into it.
Step 4: Make the Red and Green Jelly
Prepare the red and green jelly separately. For each packet, dissolve the jelly crystals in 1 cup boiling water, then add 1 cup cold water.
Let each jelly cool slightly before pouring. This helps protect the creamy layer and keeps the dessert layers cleaner.
Step 5: Add the Red Jelly Layer
Pour the red jelly over the set creamy layer. Chill until the red layer is fully set.
Use raspberry or strawberry flavour as listed. Let this layer firm completely before adding the green jelly.
Step 6: Add the Green Jelly Layer
Pour the green lime jelly over the set red layer. Chill again until the green jelly is fully set.
Each layer should be fully set before the next one is added. This keeps the red, creamy, and green layers distinct.
Step 7: Slice and Serve
Cut the finished dessert into squares. Serve as 12 festive slices.
Use a clean knife for neater pieces. The biscuit base, creamy middle, and red and green jelly should show in layered squares.
Notes
- For best results, allow each layer to set fully before adding the next.
Serving Suggestions
Serve Green & Red Christmas Jelly chilled, after all layers have fully set. The buttery biscuit base, creamy condensed milk layer, and red and green jelly make it a festive dessert for Christmas tables, holiday parties, or Australian-style summer celebrations.
Cut the dessert into 12 slices or squares once the top layer is firm. The red jelly can be raspberry or strawberry flavour, while the green layer uses lime jelly crystals for a bright Christmas color contrast.
For the cleanest presentation, let every layer set completely before adding the next one. This helps the biscuit, creamy filling, and jelly layers stay neat when sliced.
Storage
How to Store
The recipe does not provide a specific storage duration, so no exact storage time is added here.
Layering Tip
Allow each layer to set fully before adding the next. This is the most important step for clean red, creamy, and green layers.
Biscuit Base Tip
Press the crushed biscuit and melted butter mixture firmly into the 20 cm square cake tin. A compact base helps the slices hold together better.
Gelatine Tip
Dissolve the gelatine in boiling water before adding the condensed milk, lemon juice, and cold water. This helps the creamy layer set properly.
Jelly Tip
Prepare the red and green jelly separately. Each packet uses 1 cup boiling water and 1 cup cold water.
Slicing Tip
Cut into squares only after the final jelly layer has fully set. This gives the dessert cleaner edges and more defined layers.

Fernando is the creator and writer behind the food blog Eating with your Hands. Living and working in cities like Paris, Barcelona, and Berlin, and being married to a Canadian foodie, has given Fernando a passion and interest in food and inspired him to run EWYH.