
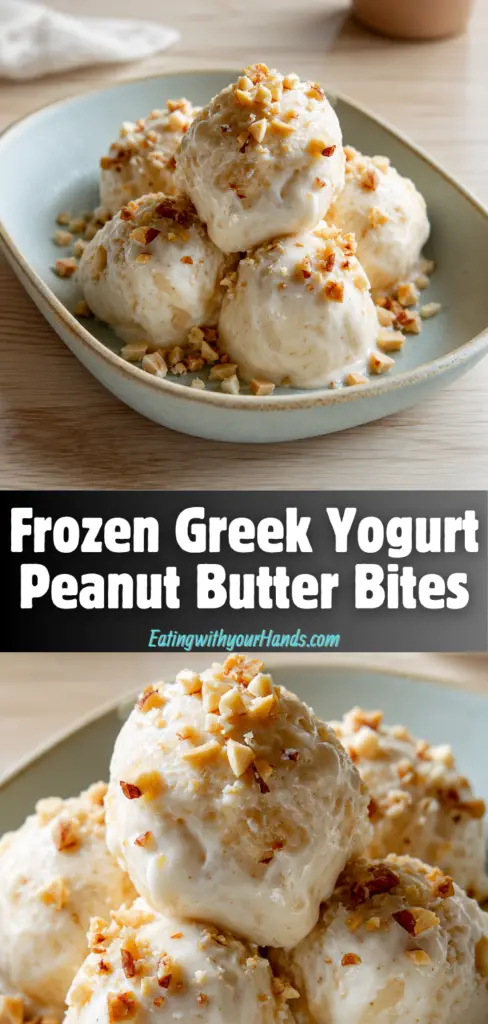
Some snacks feel like they were made for long summer afternoons, when the day is warm, the kitchen is quiet, and you want something cool, creamy, and simple. Frozen Greek Yogurt Peanut Butter Bites are exactly that kind of treat.
They are smooth, nutty, refreshing, and incredibly easy to make. With just Greek yogurt and peanut butter as the base, these little frozen bites come together quickly and turn into a satisfying snack you can keep ready in the freezer.
What I love most about this recipe is how effortless it feels. There is no baking, no complicated preparation, and no long list of ingredients.
You simply mix Greek yogurt with peanut butter, spoon the mixture into an ice cube tray, add optional toppings if you like, and freeze until firm. The result is a creamy, cool bite that feels like a tiny dessert but still works beautifully as a light snack.
Table of Contents
- What Are Frozen Greek Yogurt Peanut Butter Bites?
- Why This Recipe Feels So Comforting
- Recipe Overview
- Why You’ll Love Frozen Greek Yogurt Peanut Butter Bites
- Ingredients You’ll Need
- Ingredient Notes
- Directions
- Step 1: Gather Your Ingredients
- Step 2: Measure the Greek Yogurt
- Step 3: Measure the Peanut Butter
- Step 4: Add Peanut Butter to the Yogurt
- Step 5: Mix Until Smooth
- Step 6: Adjust the Texture If Needed
- Step 7: Add Optional Sweetness
- Step 8: Prepare the Ice Cube Tray
- Step 9: Fill the Tray
- Step 10: Add Optional Toppings
- Step 11: Check the Tray Before Freezing
- Step 12: Freeze Until Firm
- Step 13: Loosen the Bites
- Step 14: Remove From the Tray
- Step 15: Serve Straight From the Freezer
- Step 16: Store the Extras
- Pro Tips for the Best Frozen Greek Yogurt Peanut Butter Bites
- Variations
- Serving Suggestions
- Storage Tips
- Make-Ahead Instructions
- Common Mistakes to Avoid
- Helpful Notes
- Frequently Asked Questions
- Final Thoughts
- Frozen Greek Yogurt Peanut Butter Bites
What Are Frozen Greek Yogurt Peanut Butter Bites?
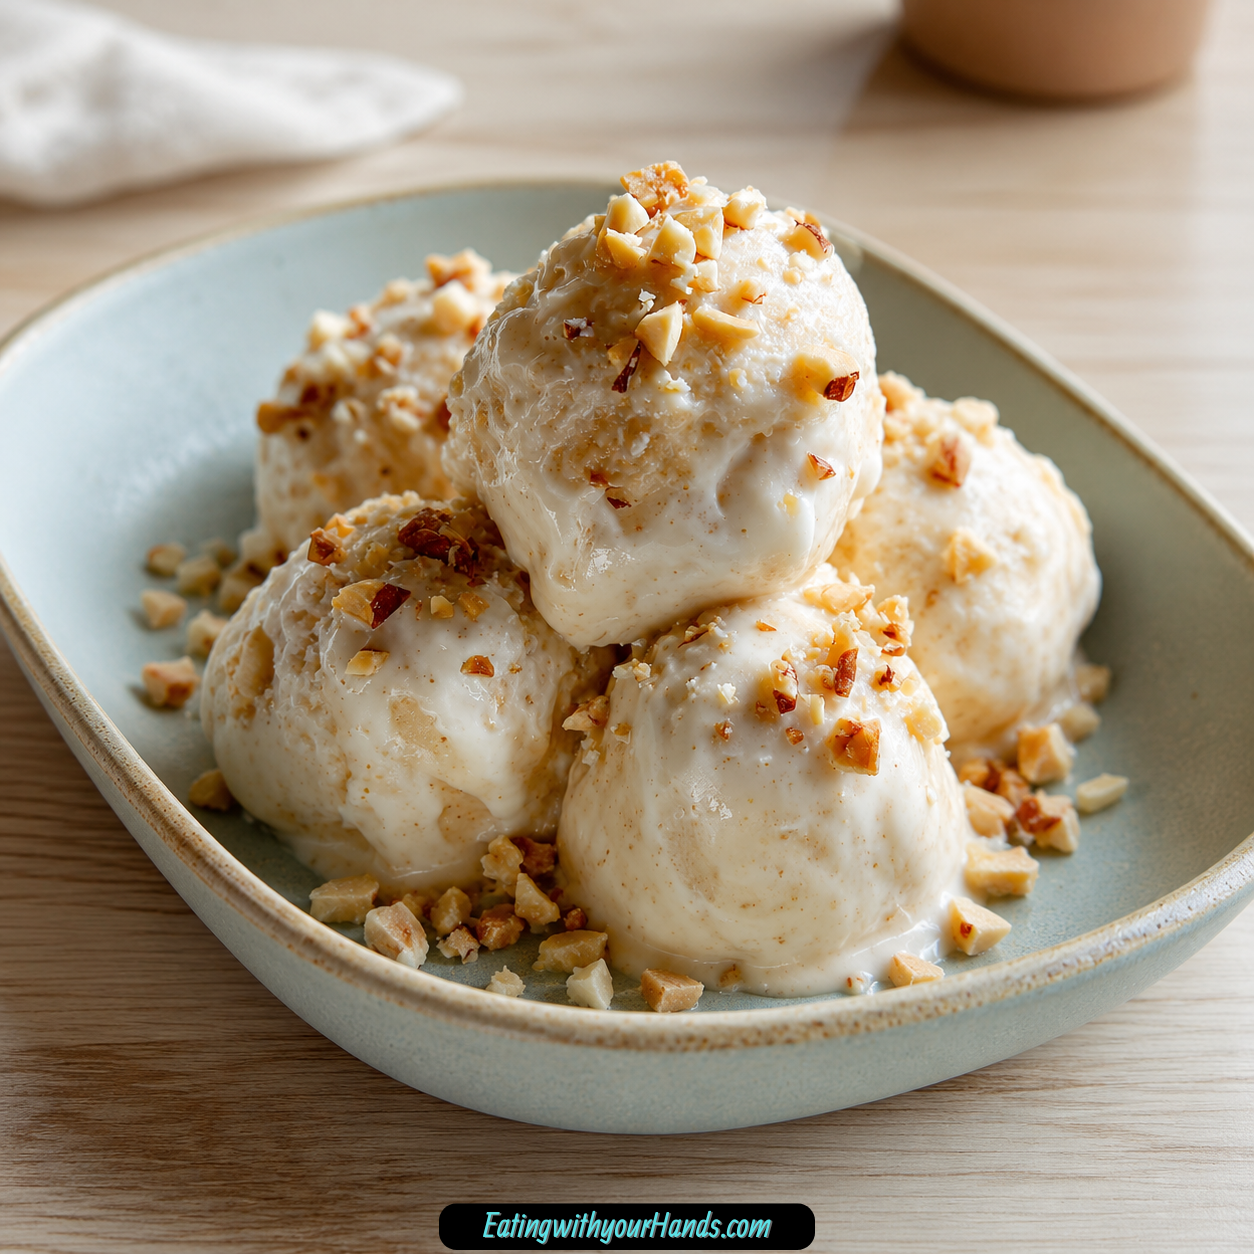
Frozen Greek Yogurt Peanut Butter Bites are bite-sized frozen snacks made by combining Greek yogurt and peanut butter. The mixture is portioned into an ice cube tray, topped with chopped nuts if desired, and frozen until solid.
They are creamy from the yogurt, rich from the peanut butter, and refreshing because they are served straight from the freezer. Their small size makes them easy to grab whenever you want a quick sweet snack.
This recipe is also wonderfully flexible. You can use plain or flavored Greek yogurt, creamy or chunky peanut butter, and optional toppings like chopped nuts or seeds.
Because there is no baking involved, these bites are perfect for beginners. They are also a fun recipe to make with family because the steps are simple and hands-on.
Why This Recipe Feels So Comforting
There is something comforting about the combination of peanut butter and yogurt. The peanut butter brings richness and nutty warmth, while the yogurt adds cool creaminess.
On warm days, these frozen bites feel refreshing without being heavy. They are sweet enough to feel like a treat but simple enough to enjoy as a quick snack.
They also have that make-ahead magic. Once they are frozen, you can open the freezer and have a little bite of something creamy waiting for you.
This recipe feels especially lovely for family gatherings, afternoon snacks, or post-workout moments. It is easy, practical, and quietly satisfying.
Recipe Overview
Prep Time: 15 minutes
Cook Time: 0 minutes
Total Time: 15 minutes
Servings: 12 bites
This recipe takes only 15 minutes of preparation. The bites need at least 4 hours in the freezer to become firm, but the hands-on work is very quick.
The recipe makes 12 frozen bites, which makes it easy to portion and store. You can enjoy one or two at a time and keep the rest frozen for later.
Why You’ll Love Frozen Greek Yogurt Peanut Butter Bites
You will love this recipe because it is quick. With only 15 minutes of prep time, you can make a batch without much effort.
The ingredients are simple. Greek yogurt and peanut butter form the base, while chopped nuts are optional for extra crunch.
This recipe is beginner-friendly. You do not need baking skills, special tools, or complicated steps.
It is perfect for gatherings because the bites are small, refreshing, and easy to serve. They offer a lighter alternative to heavier snacks.
It is also make-ahead friendly. You can prepare a batch, store it in the freezer, and enjoy the bites anytime you want something cool and creamy.
Ingredients You’ll Need
1 cup Greek yogurt: Use plain or flavored yogurt for a twist on taste. Full-fat yogurt creates creamier bites.
½ cup peanut butter: Choose creamy or chunky based on your preference. Natural peanut butter adds rich flavor.
For Topping, Optional
¼ cup chopped nuts: Almonds or peanuts work wonderfully for added crunch. Seeds can be used for a nut-free option.
Ingredient Notes
Greek yogurt creates the creamy base of the bites. Plain yogurt keeps the flavor simple, while flavored yogurt can add a sweeter or fruitier twist.
Full-fat Greek yogurt gives the bites the creamiest texture. If you use a lighter yogurt, the bites may still be delicious but slightly less rich.
Peanut butter gives the recipe its nutty flavor and smooth body. Creamy peanut butter blends more easily, while chunky peanut butter adds texture.
Natural peanut butter can add a deeper peanut flavor. Just stir it well before using, especially if the oil has separated.
Chopped nuts are optional, but they add crunch. Almonds or peanuts work well, and seeds are a good option if you want a nut-free topping.
For best results, choose yogurt without added sugars if you prefer a lighter treat. A peanut butter with minimal ingredients also keeps the flavor clean and rich.
Directions
Step 1: Gather Your Ingredients
Start by gathering the Greek yogurt, peanut butter, and optional chopped nuts. Place everything on the counter so the recipe is easy to assemble.
You will also need a mixing bowl, spoon or spatula, measuring cups, and a clean ice cube tray. A freezer-safe tray with flexible bottoms can make removal easier later.
Having everything ready before you begin keeps the process simple. Since this is a no-bake recipe, most of the work is just mixing, portioning, and freezing.
Step 2: Measure the Greek Yogurt
Measure 1 cup of Greek yogurt and place it in a mixing bowl. Use plain or flavored yogurt depending on the taste you want.
Plain Greek yogurt gives the bites a simple, tangy base. Flavored yogurt can add sweetness and make the recipe feel more like dessert.
For the creamiest texture, use full-fat Greek yogurt. It freezes into a smoother bite than lower-fat options.
Step 3: Measure the Peanut Butter
Measure ½ cup peanut butter. Choose creamy peanut butter for a smoother mixture or chunky peanut butter for more texture.
If the peanut butter is very thick, stir it before adding. This makes it easier to blend with the yogurt.
Natural peanut butter should be mixed well before measuring. You want the oil and peanut solids fully combined.
Step 4: Add Peanut Butter to the Yogurt
Add the peanut butter to the bowl with the Greek yogurt. Place it directly on top so it is ready to mix.
At first, the yogurt and peanut butter may look like they will not blend easily. With steady stirring, they will come together.
Use a sturdy spoon or spatula. The mixture can be thick, especially if your peanut butter is dense.
Step 5: Mix Until Smooth
Stir the Greek yogurt and peanut butter together until the mixture is smooth and well combined. Keep scraping the sides of the bowl as you mix.
The texture should become creamy and scoopable. You do not want streaks of plain yogurt or peanut butter left unmixed.
This step creates the base of the frozen bites. A well-mixed base gives each bite the same creamy peanut butter flavor.
Step 6: Adjust the Texture If Needed
If the mixture feels too thick to spoon easily, keep stirring for another minute. The warmth from the room and motion of stirring can help soften it.
If your peanut butter is especially firm, you can let the mixture sit for a few minutes and stir again. This helps it loosen slightly.
The final mixture should be thick but manageable. It should hold its shape when spooned into the tray.
Step 7: Add Optional Sweetness
If you prefer a sweeter bite, add a drizzle of honey or maple syrup. This step is optional.
The original recipe works with just yogurt and peanut butter, but a little sweetness can make the bites taste more dessert-like.
Stir well after adding any sweetener. Make sure it blends evenly through the mixture.
Step 8: Prepare the Ice Cube Tray
Take a clean, dry ice cube tray and place it on a stable surface. Make sure there is no water inside the sections.
A dry tray helps the yogurt mixture freeze properly. Water in the tray can create icy spots.
If you want easier removal, use a flexible silicone tray. It makes popping out the frozen bites much simpler.
Step 9: Fill the Tray
Carefully spoon or pour the yogurt and peanut butter mixture into each section of the ice cube tray. Divide the mixture evenly.
Try not to overfill each compartment. Filling just to the top keeps the bites neat and easier to remove.
Use the back of a spoon to smooth the tops if needed. This gives the bites a cleaner shape once frozen.
Step 10: Add Optional Toppings
If using chopped nuts, sprinkle them over the mixture in each section of the tray. Almonds or peanuts add a nice crunch.
Press the nuts lightly into the top so they stick as the bites freeze. Do not press too hard or the mixture may overflow.
For a nut-free option, use seeds instead. They still add texture and make the bites feel more complete.
Step 11: Check the Tray Before Freezing
Before placing the tray in the freezer, make sure each section is evenly filled. Wipe away any spills around the edges.
A neat tray is easier to handle later. It also keeps the bites from freezing together in messy shapes.
Place the tray flat in the freezer. Keeping it level helps the bites freeze evenly.
Step 12: Freeze Until Firm
Place the ice cube tray in the freezer. Let the bites freeze for at least 4 hours, or until they are solid and firm to the touch.
The freezing time is important. If the bites are not frozen long enough, they may be too soft and mushy when removed.
For best results, leave them in the freezer until completely set. They should pop out as firm little bites.
Step 13: Loosen the Bites
Once frozen, remove the tray from the freezer. If the bites do not pop out easily, run warm water over the bottom of the tray for a few seconds.
Do not use too much warm water. You only want to loosen the bottoms slightly, not melt the bites.
After warming the tray briefly, gently twist or press the tray to release the bites. Work slowly so they keep their shape.
Step 14: Remove From the Tray
Gently pop each frozen bite out of the tray. Place them on a plate or transfer them directly into a freezer bag.
If a bite sticks, give the tray a few more seconds of warmth underneath. Avoid forcing it too hard.
The bites should be firm, creamy-looking, and easy to portion. Once removed, they are ready to eat or store.
Step 15: Serve Straight From the Freezer
Serve the bites directly from the freezer for the coolest texture. They will be firm at first, then soften slightly as you eat them.
They make a refreshing snack on warm days. They also work well as a simple dessert after dinner.
If you prefer a softer bite, let them sit for a few minutes before eating. Just do not leave them out too long, or they may melt.
Step 16: Store the Extras
Place any extra bites in a freezer bag. Keep them in a single layer if possible to prevent sticking.
If stacking, place parchment paper between layers. This makes it easier to take out only what you need.
Return the bag to the freezer right away. Keeping them frozen preserves the best texture.

Pro Tips for the Best Frozen Greek Yogurt Peanut Butter Bites
Use full-fat Greek yogurt for a creamier bite. It gives the frozen texture a richer feel.
Stir natural peanut butter well before using. This prevents oily or dry spots in the mixture.
Do not overfill the ice cube tray. Neater portions are easier to remove and serve.
Freeze the bites for at least 4 hours. They need to be fully firm before serving.
Run warm water under the tray briefly if the bites stick. This makes removal much easier.
Variations
Add 1 tablespoon cocoa powder for a chocolatey twist. It gives the bites a deeper flavor.
Incorporate seasonal fruits like mashed bananas or berries for a fresh taste. These add natural sweetness and color.
Substitute almond butter or sunflower seed butter for peanut butter. Sunflower seed butter is a good nut-free option.
Add a sprinkle of cinnamon or a splash of vanilla extract for extra warmth. These simple additions make the flavor more layered.
Mix in a scoop of your favorite protein powder for a protein boost. Stir well so the texture stays smooth.
You can also add chopped dried fruit like cranberries or raisins. They give the bites a chewy surprise.
Serving Suggestions
Serve Frozen Greek Yogurt Peanut Butter Bites straight from the freezer. They are best when cold, firm, and refreshing.
Pair them with fresh fruit for a light snack. Berries, banana slices, or apple slices work beautifully with the peanut butter flavor.
You can drizzle a little honey over the bites for extra sweetness. This makes them feel more like dessert.
They are also a nice post-workout snack. The combination of yogurt and peanut butter feels satisfying without being heavy.
For gatherings, arrange the bites on a chilled plate and serve quickly. Because they soften as they sit, bring them out right before eating.
Storage Tips
Store the bites in a freezer bag for up to 1 month. Keep them sealed well to protect their flavor and texture.
For best results, store them in a single layer. This helps prevent them from sticking together.
If you need to stack them, use parchment paper between layers. This makes grabbing one or two easier.
Take out only as many as you plan to eat. Return the rest to the freezer right away.
Make-Ahead Instructions
This recipe is perfect for making ahead. You can prepare a full batch and keep it frozen for quick snacks throughout the month.
Because the bites need time to freeze, making them in advance is the best approach. Prepare them earlier in the day or the night before.
Once frozen, transfer them from the ice cube tray to a freezer bag. This frees up the tray and keeps the bites easy to access.
They are convenient for busy days because they require no reheating. Just grab and enjoy.
Common Mistakes to Avoid
Using overly thick peanut butter can make the mixture difficult to combine. Choose a smoother variety or stir it well first.
Not freezing the bites long enough can leave them mushy. Make sure they are solid before serving.
Overfilling the ice cube tray can make the bites messy. Fill each section just to the top.
Skipping optional toppings can make the bites less textured. Nuts or seeds add a nice crunch.
Leaving the bites out too long can make them melt. Serve them directly from the freezer for the best result.
Helpful Notes
For a dairy-free version, use coconut yogurt instead of Greek yogurt. This changes the flavor but keeps the creamy frozen idea.
To enhance sweetness, add a splash of vanilla extract. Honey or maple syrup can also be used if you want a sweeter bite.
Chopped dried fruits like cranberries or raisins can be added for more flavor. They give the bites a chewy texture.
If you are avoiding sugar, choose unsweetened yogurt and natural nut butter. This keeps the recipe simple and lighter.
For a nut-free version, use sunflower seed butter and seeds as the topping. This keeps the texture while avoiding nuts.
Frequently Asked Questions
Can Frozen Greek Yogurt Peanut Butter Bites Be Frozen?
Yes, these bites are designed to be frozen. They should be stored in the freezer until ready to eat.
They can be kept in a freezer bag for up to 1 month. Take out only the amount you need and return the rest to the freezer.
Can Ingredients Be Substituted?
Yes, this recipe is flexible. Greek yogurt can be replaced with coconut yogurt for a dairy-free option.
Peanut butter can be swapped with almond butter or sunflower seed butter. Sunflower seed butter is a good choice for a nut-free version.
How Should I Store Leftovers?
Store leftover bites in a freezer bag. Keep them in a single layer to prevent sticking.
They will stay fresh in the freezer for up to 1 month. Make sure the bag is sealed well.
Can This Recipe Be Made Ahead?
Yes, this recipe is ideal for making ahead. Prepare a batch, freeze until solid, and store the bites for whenever you want a quick snack.
They are convenient because they can be eaten straight from the freezer. No reheating or extra preparation is needed.
How Long Do They Need to Freeze?
The bites need at least 4 hours in the freezer. They should be solid and firm to the touch before serving.
If they still feel soft, freeze them longer. A fully frozen bite has the best texture.
What Can I Add for More Flavor?
You can add cocoa powder, mashed banana, berries, cinnamon, vanilla extract, or protein powder. These additions help customize the recipe.
You can also add chopped nuts, seeds, or dried fruit for more texture. Keep add-ins moderate so the bites still freeze well.
How Do I Remove Them From the Tray?
Run warm water over the bottom of the tray for a few seconds. This helps loosen the frozen bites.
Then gently twist or press the tray to release them. A silicone tray makes this even easier.
Final Thoughts
Frozen Greek Yogurt Peanut Butter Bites are the kind of recipe that proves a simple snack can still feel special. With Greek yogurt, peanut butter, and optional chopped nuts, you can create a creamy, cool treat that is easy to make and easy to love.
They are perfect for warm afternoons, quick snacks, light desserts, or make-ahead freezer treats. Their creamy texture and nutty flavor make them satisfying, while their frozen finish keeps them refreshing.
What makes this recipe so charming is its simplicity. There are only a few ingredients, no baking, and very little effort, yet the result feels thoughtful and comforting.
Make a batch, tuck them into the freezer, and enjoy them whenever you want a cool little bite of sweetness. These frozen Greek yogurt peanut butter bites are simple, creamy, refreshing, and made for sharing with the people you love.
Frozen Greek Yogurt Peanut Butter Bites

These Frozen Greek Yogurt Peanut Butter Bites are a creamy, refreshing snack made with Greek yogurt and peanut butter. They are easy to prepare, freezer-friendly, and perfect when you want a simple chilled treat with optional crunchy toppings.
Recipe Information
- Prep Time: 15 minutes
- Total Time: 15 minutes
- Course: Snack
- Cuisine: American
- Servings: 12 bites
- Calories: 90 kcal
Equipment
- Mixing bowl
- Ice cube tray
Ingredients
For the Bites
- ½ cup peanut butter
Use creamy or chunky peanut butter depending on the texture you prefer. - 1 cup Greek yogurt
Plain or flavored yogurt can be used for the creamy base.
For Topping, Optional
- ¼ cup chopped nuts
Almonds or peanuts work well for a crunchy topping.
Instructions
- Add the Greek yogurt and peanut butter to a mixing bowl.
- Stir until the mixture is smooth and fully combined.
- Spoon or pour the mixture into an ice cube tray.
- Sprinkle chopped nuts on top if desired.
- Freeze for at least 4 hours, or until the bites are completely solid.
- Remove the frozen bites from the tray and enjoy.
Notes
- Store the bites in a freezer bag for up to one month.
- Use flavored Greek yogurt if you want a sweeter version.
- Let the bites sit for a minute or two before eating if they are too firm straight from the freezer.

Fernando is the creator and writer behind the food blog Eating with your Hands. Living and working in cities like Paris, Barcelona, and Berlin, and being married to a Canadian foodie, has given Fernando a passion and interest in food and inspired him to run EWYH.