
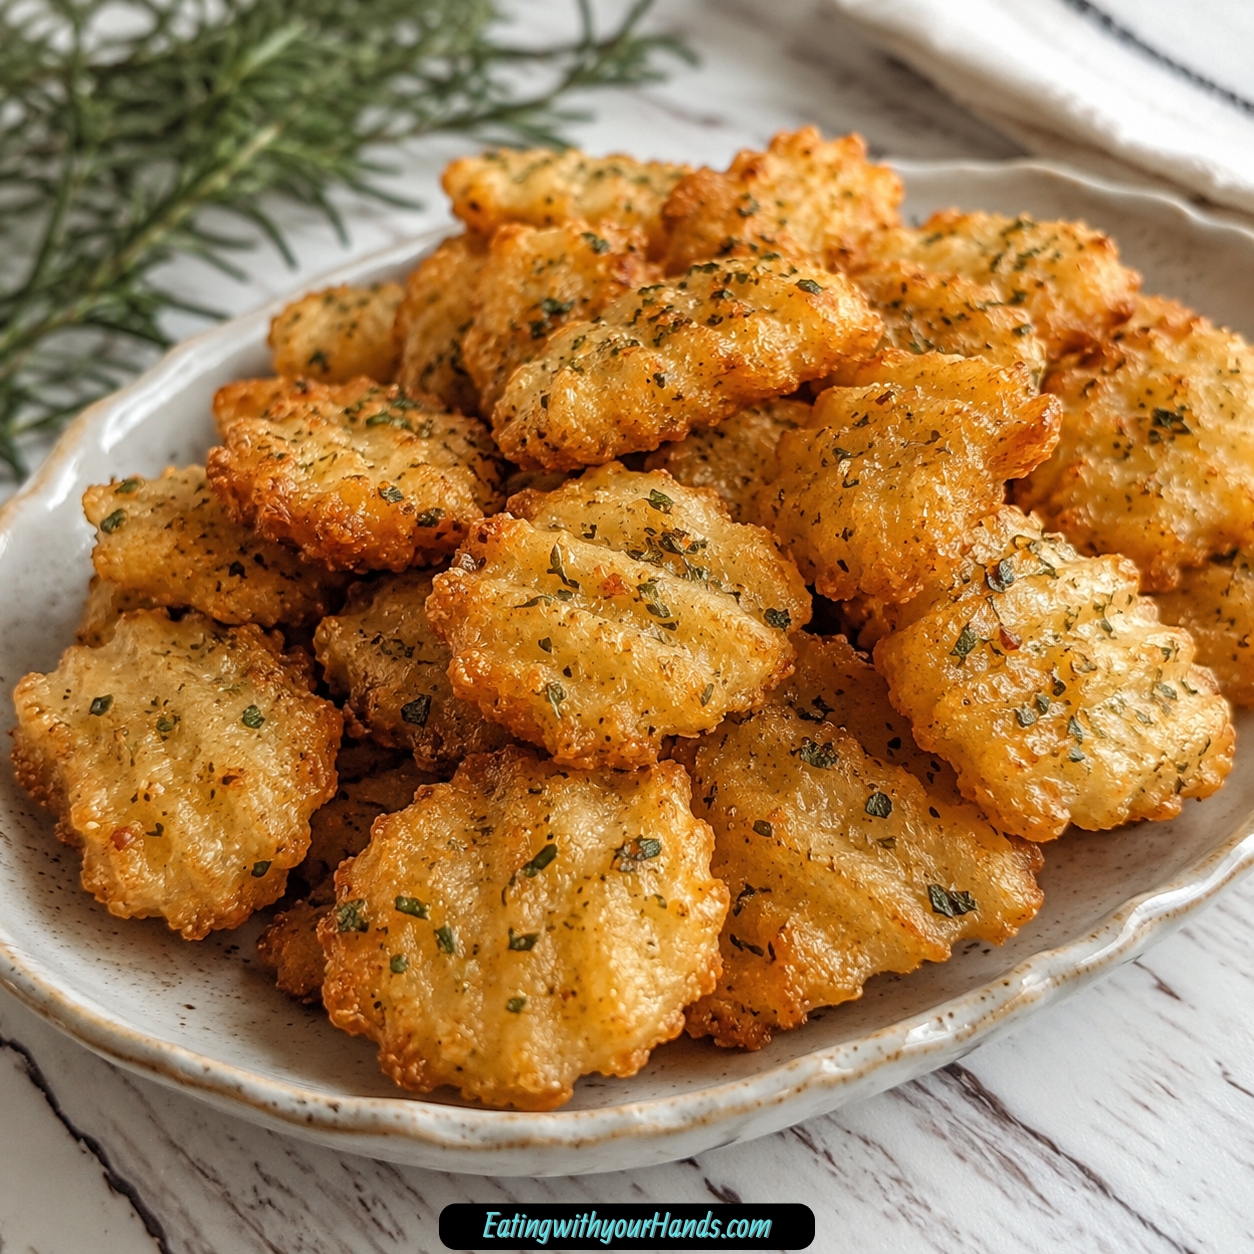

Some snacks do not need to be complicated to feel special. Garlic Ritz Bits Snacks are exactly that kind of recipe.
They are buttery, cheesy, garlicky, crisp, and deeply nostalgic in the way only a simple homemade snack can be. The kind of snack you can make in minutes, pour into a bowl, and watch disappear before the movie even starts.
There is something about the smell of garlic and melted butter that instantly makes a kitchen feel warmer. It has that familiar pull, the kind that reminds you of family gatherings, casual afternoons, and someone setting out a little bowl of something crunchy before everyone even sits down.
These Garlic Ritz Bits Snacks are inspired by that feeling. They take a box of classic Ritz Bits Crackers and coat them in a savory mixture of melted butter, garlic powder, onion powder, parsley, salt, pepper, Parmesan, cheddar, and optional spices.
Then they bake just long enough to become golden, crisp, and full of flavor. The result is a snack that feels homemade, playful, and incredibly easy to share.
They are perfect for movie nights, lunch boxes, family gatherings, game days, casual parties, or last-minute guests. They take only about 10 minutes from start to finish, which makes them one of those recipes you can make almost anytime.
Table of Contents
- Why You’ll Love These Garlic Ritz Bits Snacks
- Recipe Details
- Ingredients You’ll Need
- A Closer Look at the Ingredients
- The Nostalgic Flavor Behind This Snack
- Directions
- Step 1: Preheat the Oven
- Step 2: Prepare the Baking Sheet
- Step 3: Melt the Butter
- Step 4: Add the Garlic Powder
- Step 5: Add the Onion Powder
- Step 6: Add Parsley, Salt, and Pepper
- Step 7: Add the Parmesan Cheese
- Step 8: Add the Sharp Cheddar Cheese
- Step 9: Add Optional Smoked Paprika
- Step 10: Add Optional Cayenne Pepper
- Step 11: Mix the Seasoning Until Even
- Step 12: Add the Ritz Bits Crackers
- Step 13: Coat the Crackers Gently
- Step 14: Check for Even Coating
- Step 15: Spread the Crackers on the Baking Sheet
- Step 16: Bake the Snacks
- Step 17: Watch the Color Carefully
- Step 18: Remove from the Oven
- Step 19: Cool Before Serving
- Step 20: Serve and Enjoy
- Helpful Tips for the Best Garlic Ritz Bits Snacks
- Variations
- Serving Suggestions
- Storage Tips
- Freezing Instructions
- Make-Ahead Notes
- Frequently Asked Questions
- Final Thoughts
- Garlic Ritz Bits Snacks
Why You’ll Love These Garlic Ritz Bits Snacks
Garlic Ritz Bits Snacks are quick and easy to prepare. From mixing to baking, the whole recipe takes about 10 minutes.
They use minimal ingredients, and many of them are pantry staples. If you already have crackers, butter, garlic powder, onion powder, dried parsley, salt, pepper, and cheese, you are almost there.
They are perfect for sharing. A bowl of warm, garlicky crackers fits right into family gatherings, movie nights, snack tables, and casual get-togethers.
They are also easy to customize. You can change the cheese, adjust the garlic, add smoky paprika, include cayenne, or use a different spice blend to make the flavor your own.
They can be stored for later, which makes them a useful make-ahead snack. If you have leftovers, they can stay at room temperature for a few days or be frozen for longer storage.
Most of all, they are fun. They take a familiar cracker and turn it into something that tastes like it came from a cozy kitchen memory.
Recipe Details
- Recipe name: Garlic Ritz Bits Snacks
- Main ingredient: Ritz Bits Crackers
- Flavor profile: Buttery, garlicky, cheesy, savory, lightly peppery, and optionally smoky or spicy
- Prep and cook time: About 10 minutes total
- Oven temperature: 350°F (175°C)
- Bake time: 8-10 minutes
- Best served: Warm or cooled after crisping
- Texture: Crisp, crunchy, cheesy, and coated with savory seasoning
- Storage: Airtight container at room temperature for up to 3 days
- Freezer-friendly: Yes, up to 1 month
- Serving ideas: Movie nights, appetizers, lunch boxes, parties, ranch dip, hummus, or snack bowls
Ingredients You’ll Need
For the Garlic Ritz Bits Snacks
- 1 box Ritz Bits Crackers, Original, 12.5 oz
- ½ cup unsalted butter, melted
- 2 tablespoon garlic powder
- 1 tablespoon onion powder
- 1 teaspoon dried parsley flakes
- ½ teaspoon fine sea salt
- ¼ teaspoon freshly ground black pepper
- ½ cup finely grated Parmesan cheese
- ½ cup finely shredded sharp cheddar cheese
- ¼ teaspoon smoked paprika, optional
- Pinch of cayenne pepper, optional
A Closer Look at the Ingredients
Ritz Bits Crackers are the star of this recipe. Their small size, buttery flavor, and crisp texture make them perfect for coating with a savory garlic mixture.
Melted unsalted butter helps carry all the seasoning. It coats the crackers and gives them that rich, warm flavor that makes the snack feel homemade.
Garlic powder gives the recipe its bold garlic punch. You can adjust the amount if you love a stronger garlic flavor or prefer something milder.
Onion powder adds subtle sweetness and depth. It works quietly in the background, making the garlic flavor taste fuller.
Dried parsley flakes add color and a little freshness. They also make the finished crackers look more inviting.
Fine sea salt enhances every flavor in the bowl. Even though the crackers and cheese already have savoriness, this small amount helps the seasoning taste complete.
Freshly ground black pepper adds warmth. You can use a little more if you want the snack to have a stronger peppery bite.
Parmesan cheese gives the coating a rich, nutty flavor. Finely grated Parmesan works best because it clings to the crackers more evenly.
Sharp cheddar cheese adds bold cheesy flavor. The sharper the cheddar, the more noticeable the cheese taste will be.
Smoked paprika is optional, but it adds a subtle smoky twist. It is a small addition that can make the snack feel a little deeper.
Cayenne pepper is also optional. A small pinch gives the crackers a gentle heat without turning them into a fully spicy snack.
The Nostalgic Flavor Behind This Snack
Garlic Ritz Bits Snacks feel special because they take something familiar and make it feel new again. Ritz Bits are already a beloved snack, but the buttery garlic coating turns them into something warm and shareable.
This recipe has the feeling of a grandmother’s snack bowl on a summer afternoon. It is simple, generous, and made for people to reach in by the handful.
The melted butter makes the seasoning cling to every cracker. The garlic and onion powder bring bold savory flavor, while the cheeses add richness.
The oven does the final work. In just a few minutes, the coating settles onto the crackers, the edges crisp, and the whole tray becomes golden and fragrant.
The cooling step matters, too. As the crackers rest after baking, they continue to crisp, giving you that satisfying crunch in every bite.
Directions
Step 1: Preheat the Oven
Preheat your oven to 350°F (175°C). This temperature is warm enough to crisp the crackers and melt the coating into them without burning the cheese too quickly.
Starting with a preheated oven helps the crackers bake evenly. Since the baking time is short, the oven needs to be ready before the tray goes in.
While the oven heats, prepare your mixing bowl and baking sheet. This recipe moves quickly, so it helps to have everything nearby.
Step 2: Prepare the Baking Sheet
Take out a baking sheet and set it near your workspace. You will use it to spread the coated crackers in a single layer.
A single layer is important because it helps the crackers crisp evenly. If they are piled on top of each other, some may stay softer while others brown too quickly.
You do not need to make this step complicated. Just have the baking sheet ready before you coat the crackers.
Step 3: Melt the Butter
Melt ½ cup unsalted butter. The butter should be fully melted so it can mix smoothly with the seasonings and cheese.
Use unsalted butter so you can better control the salt level. The crackers and cheeses already bring plenty of savory flavor.
Let the butter cool for a brief moment if it is extremely hot. It should still be liquid, but not so hot that it clumps the cheese instantly.
Step 4: Add the Garlic Powder
Pour the melted butter into a mixing bowl. Add 2 tablespoon garlic powder.
Garlic powder is the boldest seasoning in this recipe. It gives the crackers that strong, savory garlic flavor that makes them hard to stop eating.
Stir it into the butter so it begins to dissolve and spread evenly. This helps prevent one bite from tasting too strong while another tastes plain.
Step 5: Add the Onion Powder
Add 1 tablespoon onion powder to the butter mixture. Stir it together with the garlic powder.
Onion powder adds a softer savory flavor. It gives the snack more depth and balances the stronger garlic.
Make sure it is evenly mixed. A smooth seasoning base helps coat the crackers more consistently.
Step 6: Add Parsley, Salt, and Pepper
Add 1 teaspoon dried parsley flakes, ½ teaspoon fine sea salt, and ¼ teaspoon freshly ground black pepper. Stir well.
The parsley adds color, while the salt and pepper sharpen the overall flavor. These small ingredients make the seasoning taste more complete.
If you prefer a more peppery snack, you can use a little extra black pepper. Keep in mind that the cheese and crackers will add their own flavor, too.
Step 7: Add the Parmesan Cheese
Add ½ cup finely grated Parmesan cheese to the butter mixture. Stir until it is evenly distributed.
Parmesan brings a nutty, savory flavor that works beautifully with garlic. Finely grated cheese coats the crackers better than larger pieces.
The mixture may begin to look thick and textured. That is exactly what you want because the coating should cling to the crackers.
Step 8: Add the Sharp Cheddar Cheese
Add ½ cup finely shredded sharp cheddar cheese. Stir it into the buttery mixture.
Sharp cheddar gives the snack a bold cheesy bite. The stronger flavor helps it stand out against the garlic and crackers.
Make sure the cheddar is mixed throughout the bowl. This helps every handful taste cheesy and savory.
Step 9: Add Optional Smoked Paprika
If using it, add ¼ teaspoon smoked paprika. Stir it into the mixture.
Smoked paprika gives the crackers a subtle smoky flavor. It is not required, but it adds a nice twist if you like deeper savory notes.
Because smoked paprika can be noticeable, a small amount is enough. It should support the garlic and cheese rather than take over.
Step 10: Add Optional Cayenne Pepper
If you want a little heat, add a pinch of cayenne pepper. Stir well so the spice is evenly mixed.
Cayenne adds warmth without needing much. A small pinch can make the snack taste more exciting.
If you are serving kids or people who prefer mild snacks, you can leave it out. The recipe is still full of flavor without it.
Step 11: Mix the Seasoning Until Even
Stir the butter, seasonings, and cheeses until everything is well combined. The mixture should look thick, buttery, and speckled with herbs and spices.
This is the flavor coating for the crackers, so even mixing matters. You want the garlic, onion, cheese, parsley, salt, and pepper to be spread throughout.
Scrape the sides of the bowl if needed. Seasoning can cling to the edges, and you want all of it in the final snack.
Step 12: Add the Ritz Bits Crackers
Add the 12.5 oz box of Original Ritz Bits Crackers to the bowl. Pour them in gently so they do not break too much.
The crackers are delicate enough that rough stirring can crush them. You want them coated but still whole.
Use a large bowl if possible. It gives the crackers room to move while you toss them.
Step 13: Coat the Crackers Gently
Gently stir the crackers into the buttery mixture. Use a spatula or large spoon and fold from the bottom upward.
The goal is to coat every cracker without breaking them apart. Take your time and turn the mixture carefully.
The crackers may look a little messy, but that is part of the charm. Once baked, the coating will become crisp and flavorful.
Step 14: Check for Even Coating
Look through the bowl and check that the crackers are evenly coated. You should see seasoning and cheese on most of the pieces.
If you notice dry spots, keep gently tossing. Any extra coating at the bottom of the bowl should be brought back over the crackers.
Even coating gives the final snack better flavor. Every handful should taste buttery, garlicky, and cheesy.
Step 15: Spread the Crackers on the Baking Sheet
Transfer the coated crackers to the baking sheet. Spread them out into a single layer.
Try not to leave large piles. A flat layer helps the crackers crisp up instead of steaming together.
Use a spatula to spread them gently. If some cheese mixture remains in the bowl, scrape it over the top.
Step 16: Bake the Snacks
Place the baking sheet in the preheated oven. Bake for about 8-10 minutes.
Keep an eye on them as they bake. You want them golden brown and crispy, not burnt.
Because the crackers are small and already crisp, they do not need much time. The short bake helps the coating set and the flavors deepen.
Step 17: Watch the Color Carefully
Near the 8-minute mark, check the crackers. They should look lightly golden and smell buttery and garlicky.
If they need more time, continue baking for another minute or two. Watch closely because they can darken quickly.
The cheeses and seasonings should look set onto the crackers. The snack should smell savory and toasted.
Step 18: Remove from the Oven
Carefully remove the baking sheet from the oven. The crackers will be hot, and the coating may still seem slightly soft at first.
Set the baking sheet on a safe surface. Let the crackers rest before serving.
Do not rush to move them immediately. The cooling time helps them crisp more.
Step 19: Cool Before Serving
Allow the Garlic Ritz Bits Snacks to cool for a few minutes. This step is important because they continue to crisp as they cool.
The texture becomes better after a short rest. The coating settles onto the crackers, and the crunch becomes more satisfying.
The wait may be hard because the garlic smell is so tempting. Still, those few minutes make the first bite even better.
Step 20: Serve and Enjoy
Once slightly cooled, transfer the crackers to a serving bowl. Serve them warm as an appetizer or snack.
They are perfect for sharing, so place them somewhere everyone can reach. They fit beautifully on a snack table, movie-night tray, or casual appetizer spread.
You can also pair them with a dip like ranch or hummus. The dip adds another layer of flavor and makes the snack feel even more fun.
Helpful Tips for the Best Garlic Ritz Bits Snacks
Use a large mixing bowl so the crackers have room to be coated gently. A small bowl can make tossing harder and may cause more crackers to break.
Stir gently when coating. Ritz Bits Crackers are crisp and can crumble if handled too roughly.
Spread the crackers in a single layer before baking. This helps them crisp evenly.
Watch the oven closely during the last few minutes. The crackers should turn golden, not dark or burnt.
Let them cool before storing. If they are stored while warm, trapped steam can make them lose their crunch.
Adjust the garlic and onion powder to your taste. If you love strong garlic flavor, you can lean into it, and if you prefer a milder snack, reduce it slightly.
Variations
Swap the cheddar for pepper jack cheese if you want a spicy kick. This gives the crackers a bolder flavor.
Use gluten-free Ritz Crackers for a gluten-free version. Make sure the other ingredients are gluten-free as needed.
Add 1 tablespoon Italian seasoning for an herby twist. This gives the snack a more seasoned, savory flavor.
Try flavored butter, such as garlic herb butter or chili butter, for added depth. It can change the personality of the whole batch.
Add seasonal ingredients like fresh basil or chives when available. These bring a fresh note to the buttery snack.
For a dairy-free option, substitute the butter with a plant-based alternative and use nutritional yeast instead of cheese. This keeps the savory flavor while avoiding dairy.
Add a tablespoon of crushed nuts or seeds for a nutty flavor. This gives the snack more texture.
Experiment with different spice blends to create your own signature flavor. This recipe is easy to personalize.
Serving Suggestions
Serve Garlic Ritz Bits Snacks warm for the best flavor. The garlic, butter, and cheese taste especially good right after baking.
They make a delightful appetizer for casual gatherings. Place them in a bowl and let everyone snack while the main meal is being prepared.
They are also perfect for movie nights. The crunchy texture and bold flavor make them easy to enjoy by the handful.
For a fun twist, serve them with ranch dip. The creamy dip pairs well with the garlic and cheese.
Hummus is another good option if you want something a little different. It adds creaminess and makes the snack feel more filling.
You can also pack them into lunch boxes once cooled. They make a tasty little treat for the next day.
Storage Tips
Store leftover Garlic Ritz Bits Snacks in an airtight container at room temperature for up to 3 days. Make sure they are fully cooled before storing.
Cooling is important because warm crackers can create steam inside the container. That steam can soften the crackers and reduce the crunch.
These snacks are best enjoyed fresh, but they can still be tasty the next day. If they lose a little crispness, a quick re-crisp in the oven can help.
Keep them away from moisture. A dry, sealed container will help preserve the texture.
Do not refrigerate unless needed for a specific ingredient change. Room temperature storage works best for keeping them crunchy.
Freezing Instructions
Garlic Ritz Bits Snacks can be frozen for up to 1 month. Let them cool completely before freezing.
Place them in an airtight container or a resealable freezer bag. Remove as much extra air as possible before sealing.
When ready to enjoy, let them thaw at room temperature. This helps protect the texture.
To bring back the crunch, re-crisp them in the oven for a few minutes. Watch carefully so they do not overbake.
Freezing is helpful if you want to make them ahead for a gathering. Just refresh them before serving for the best texture.
Make-Ahead Notes
These snacks are easy to make ahead because they store well once cooled. You can prepare them earlier in the day and serve them later.
For the best crunch, bake them fresh when possible. Since the recipe takes only about 10 minutes, it is easy to make close to serving time.
If making them for a party, store them in an airtight container after they cool. Then transfer them to a serving bowl when guests arrive.
You can also measure the seasonings and cheese ahead of time. That makes the final mixing and baking step even faster.
Frequently Asked Questions
Can I Freeze Garlic Ritz Bits Snacks?
Yes, you can freeze Garlic Ritz Bits Snacks. Let them cool completely before placing them in an airtight container or resealable freezer bag.
They can be stored in the freezer for up to 1 month. When ready to enjoy, thaw them at room temperature and re-crisp them in the oven for a few minutes.
What Can I Substitute for Unsalted Butter?
You can use coconut oil or a plant-based butter alternative instead of unsalted butter. Both options can still give the crackers a rich coating.
Make sure the substitute is melted before mixing it with the seasonings. This helps everything combine evenly.
How Can I Make These Snacks Spicier?
To make them spicier, increase the cayenne pepper or add a pinch of red pepper flakes. You can also swap the cheddar for pepper jack cheese.
Another option is to drizzle a little hot sauce over the coated crackers before baking. Use a small amount so the crackers do not become too wet.
Can I Make These Dairy-Free?
Yes, you can make a dairy-free version. Use plant-based butter instead of regular butter and nutritional yeast instead of cheese.
You can also use dairy-free cheese if you prefer. Choose one with a flavor and texture you enjoy.
Can I Make These Gluten-Free?
Yes, use gluten-free Ritz Crackers or another gluten-free corn or cracker option that works for you. Make sure all other ingredients are gluten-free as well.
Always check labels if you are serving someone with a gluten sensitivity. Packaged snacks and seasonings can vary.
Can I Use a Different Cheese?
Yes, you can change the cheese. Pepper jack gives a spicy kick, while sharp cheddar gives a bold flavor.
Parmesan adds a nutty taste, so keeping some Parmesan in the mix helps the snack stay savory. You can experiment based on what you like.
Can I Add More Garlic?
Yes, you can adjust the garlic powder based on your taste. If you love garlic, add a little more.
Start small when increasing it. Garlic powder is strong, and too much can overpower the cheese and crackers.
What Dips Go Well with These Snacks?
Ranch dip works beautifully with the garlic and cheese flavors. Hummus is also a great option for something creamy and savory.
You can serve them without dip as well. They are flavorful enough to stand on their own.
Final Thoughts
Garlic Ritz Bits Snacks are proof that a simple snack can still feel memorable. With crackers, melted butter, garlic, onion powder, herbs, cheese, and a few optional spices, you can make something warm, crisp, and full of flavor in just minutes.
They are perfect for movie nights, family gatherings, lunch boxes, unexpected guests, or any moment when you want a quick savory treat. They are easy to serve, easy to customize, and even easier to love.
What makes this recipe special is the nostalgic feeling behind it. It has that grandmother’s-kitchen comfort, where a few simple ingredients become something everyone gathers around.
Whether you keep them classic, make them spicy, add herbs, or serve them with dip, these Garlic Ritz Bits Snacks are the kind of crunchy, garlicky little bites that can quickly become a family favorite.
Garlic Ritz Bits Snacks

These Garlic Ritz Bits Snacks are buttery, cheesy, and packed with savory garlic flavor. Ritz Bits Crackers are coated in melted butter, Parmesan, sharp cheddar, and a simple blend of seasonings, then baked until golden and crisp. They make an easy snack for parties, game days, movie nights, lunchboxes, or anytime you want something crunchy and full of flavor.
Recipe Details
- Prep Time: 10 minutes
- Total Time: 10 minutes
- Course: Snack
- Cuisine: American
- Servings: 4 people
Equipment
- Mixing bowl
- Baking sheet
Ingredients
For the Snacks
- ½ cup Finely Shredded Sharp Cheddar Cheese
- ¼ teaspoon Freshly Ground Black Pepper
- 2 tablespoon Garlic Powder
- ½ cup Unsalted Butter, melted
- Pinch Cayenne Pepper (optional) Optional for heat
- 1 box (12.5 oz) Ritz Bits Crackers, Original
- 1 teaspoon Dried Parsley Flakes
- ½ teaspoon Fine Sea Salt
- ½ cup Finely Grated Parmesan Cheese
- 1 tablespoon Onion Powder
- ¼ teaspoon Smoked Paprika (optional) Optional for added flavor
Instructions
Step 1: Preheat the Oven
Preheat your oven to 350°F (175°C).
Step 2: Make the Seasoned Butter Mixture
In a mixing bowl, combine the melted unsalted butter, garlic powder, onion powder, dried parsley flakes, fine sea salt, freshly ground black pepper, finely grated Parmesan cheese, finely shredded sharp cheddar cheese, smoked paprika, and cayenne pepper.
Mix until everything is well combined.
Step 3: Coat the Crackers
Add the Ritz Bits Crackers to the bowl.
Toss gently until the crackers are evenly coated with the buttery cheese seasoning.
Step 4: Arrange on the Baking Sheet
Spread the coated crackers onto a baking sheet in a single layer.
This helps them bake evenly and turn crisp.
Step 5: Bake Until Crisp
Bake for 8-10 minutes, or until the crackers are golden and crispy.
Step 6: Cool and Serve
Allow the crackers to cool before serving so they can firm up and become extra crunchy.
Notes
You can adjust the seasonings according to your taste. Store leftovers in an airtight container.
Serving Suggestions
These garlic Ritz Bits snacks are great with:
- Party snack boards
- Game day appetizers
- Sandwiches
- Soup
- Movie night snacks
- Lunchbox sides
- Creamy dips
Storage
How to Store
Store cooled leftovers in an airtight container at room temperature.
Best Texture Tip
Let the crackers cool completely before sealing the container so they stay crisp.

Fernando is the creator and writer behind the food blog Eating with your Hands. Living and working in cities like Paris, Barcelona, and Berlin, and being married to a Canadian foodie, has given Fernando a passion and interest in food and inspired him to run EWYH.