
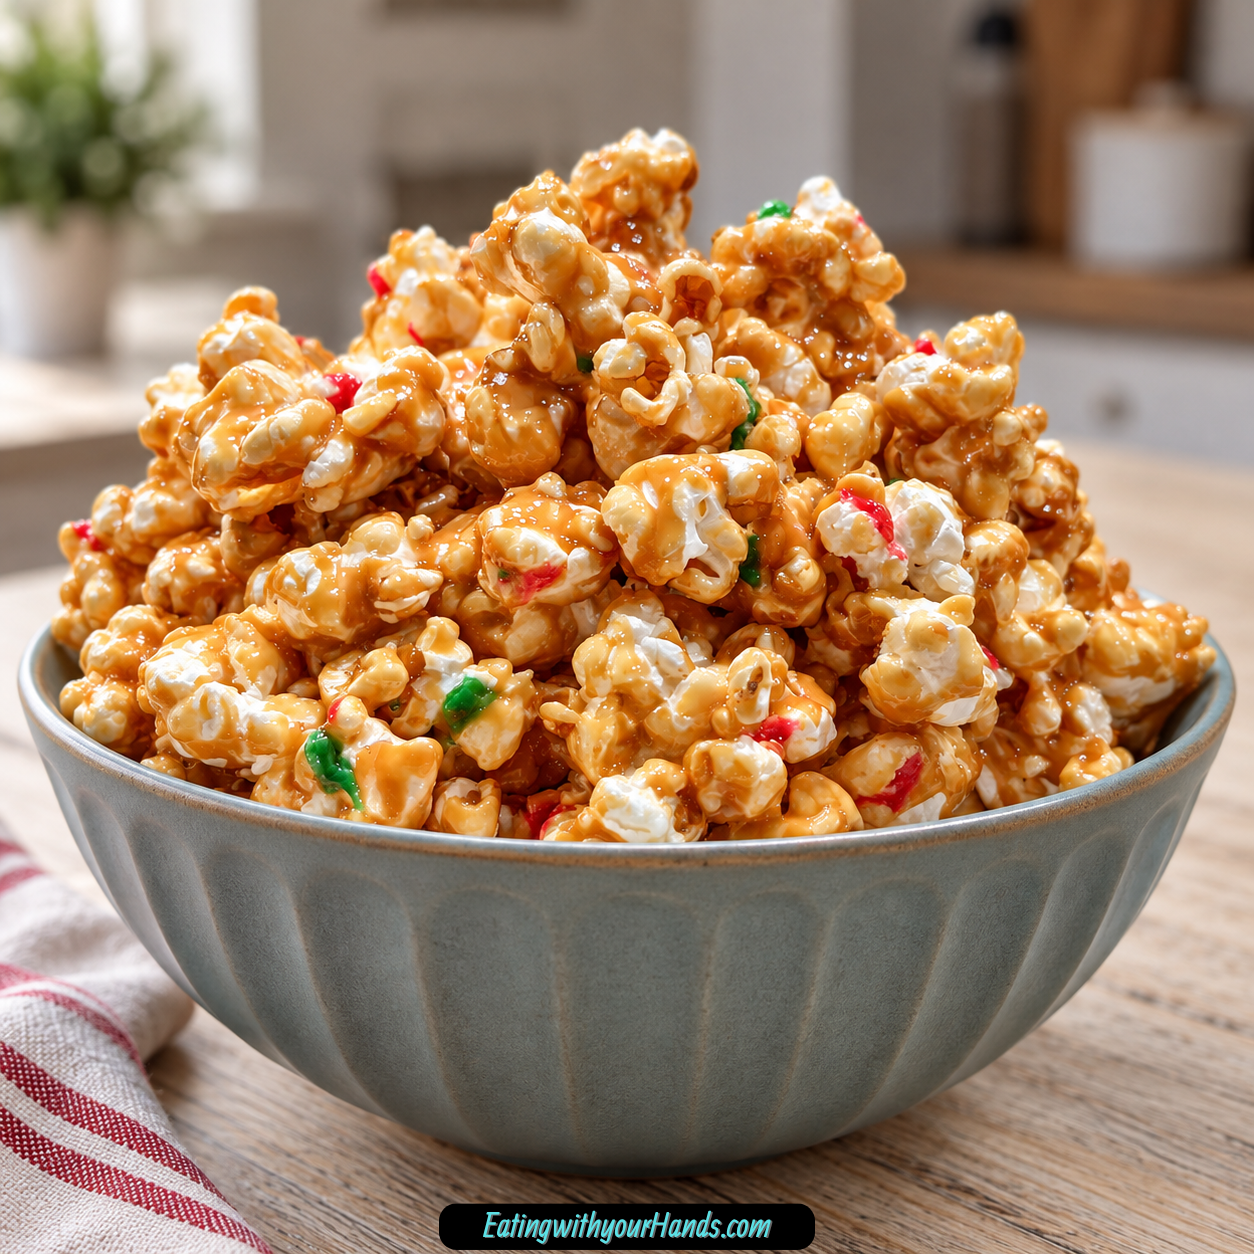

There is a certain moment during the holidays when a kitchen stops feeling like an ordinary room and starts feeling like part of the celebration itself. For me, that moment often arrives when a tray of homemade caramel popcorn comes out of the oven and the sweet, buttery aroma begins drifting through the house.
The finished popcorn looks just as festive as it smells, especially when those caramel-coated clusters are dressed in red and green for Christmas. Some pieces catch a heavier layer of caramel, others are covered with a thinner, almost lacy coating, and those little differences are exactly what make a homemade batch feel special.
I have made and tasted more versions of caramel popcorn over the years than I could possibly count. The one I keep coming back to has the balance I want most: plenty of crunch without becoming painfully hard, enough sweetness to feel indulgent, and just enough contrast to keep every handful interesting.
This Caramel Popcorn has also been part of my holiday gifting since my college days. It is the kind of treat that looks beautiful piled onto a favorite platter, but it works just as well tucked into a package for neighbors or coworkers.
What I love is that it never looks manufactured or overly perfect. Homemade caramel popcorn has personality, with larger clusters beside delicate pieces and slightly different amounts of glossy caramel clinging to every kernel.
That character is part of the pleasure of making it yourself. You get to begin with freshly popped popcorn, build the caramel from butter and brown sugar, choose the colors for the occasion, and watch the mixture turn crisp during a slow hour in the oven.
The caramel itself relies on a handful of familiar ingredients. Light corn syrup helps keep it smooth, while baking soda creates that sudden foaming reaction that leads to a lighter, airier coating rather than a dense layer of hardened sugar.
Vanilla brings warmth to the mixture, and red and green food coloring transforms the finished popcorn into a holiday centerpiece. Gel coloring is especially useful when you want vivid color without thinning the caramel.
The process asks for attention, particularly once the caramel begins boiling, but it does not require specialized equipment. A saucepan, wooden spoon, baking sheet, parchment paper, and heatproof spatula are enough to turn a bowl of popcorn into something that feels worthy of a celebration.
Table of Contents
- Why This Homemade Caramel Popcorn Is Worth Making
- Ingredients for Homemade Caramel Popcorn
- Understanding the Ingredients
- Equipment You’ll Need
- How to Make Homemade Caramel Popcorn
- Step 1: Pop the Fresh Popcorn
- Step 2: Remove Every Unpopped Kernel
- Step 3: Prepare the Baking Sheet and Add-Ins
- Step 4: Melt the Butter
- Step 5: Add Brown Sugar and Corn Syrup
- Step 6: Boil the Caramel for Exactly 5 Minutes
- Step 7: Add Baking Soda, Vanilla, and Food Coloring
- Step 8: Pour the Caramel Over the Popcorn
- Step 9: Spread the Coated Popcorn
- Step 10: Bake at 200°F
- Step 11: Stir Every 15 Minutes
- Step 12: Add Warm Finishes if Desired
- Step 13: Cool Completely
- Step 14: Break Into Clusters
- Tips for the Best Caramel Popcorn
- Festive Caramel Popcorn Variations
- What to Do If Your Caramel Popcorn Is Sticky
- Can You Make Caramel Popcorn Without Corn Syrup?
- Serving Homemade Caramel Popcorn
- How to Store Caramel Popcorn
- Homemade Caramel Popcorn FAQs
- Can I use microwave popcorn instead of stovetop popcorn?
- Why did my caramel popcorn turn out sticky?
- Can I replace the light corn syrup?
- How long does caramel popcorn stay fresh?
- Why is baking soda added to caramel?
- Do I really need to stir the popcorn every 15 minutes?
- When should I break the caramel popcorn apart?
- Nutrition Information
- The Kind of Homemade Treat That Feels Like the Holidays
- Irresistible Homemade Caramel Popcorn Recipe
Why This Homemade Caramel Popcorn Is Worth Making
Homemade caramel popcorn occupies a wonderful middle ground between a candy and a snack. It has the deep sweetness of brown sugar and butter, but underneath that coating is still the light crunch of freshly popped corn.
The recipe also gives you control over the finished texture. The caramel is boiled for a precise 5 minutes, then the coated popcorn spends 1 hour in a low 200°F oven, with stirring every 15 minutes to help it dry evenly.
That low-and-slow finish is what transforms the mixture. Before baking, the popcorn is sticky and glossy; after baking and cooling completely, the clusters develop the crisp snap that makes them so satisfying to break apart.
The flavor is equally balanced. Packed light brown sugar brings sweetness and its characteristic molasses notes, butter adds richness, vanilla rounds everything out, and the popcorn itself keeps the candy-like coating from feeling overwhelming.
Another reason to love this recipe is how easily the appearance can change. Red and green are perfect for Christmas, but the same popcorn can wear pink and red for Valentine’s Day, orange and purple for Halloween, pastel shades for Easter, or school colors for game day.
The possibilities continue after baking. Crushed candy canes can be added while the popcorn is still slightly warm, and rainbow sprinkles can go on immediately after baking so they adhere to the caramel.
The result can be as simple or as festive as you want it to be. The underlying caramel popcorn stays familiar while the colors and finishing touches shift with the occasion.
Ingredients for Homemade Caramel Popcorn
The ingredient list is straightforward, but accuracy matters because the caramel depends on a specific balance. Measure everything before you begin so the baking soda, vanilla, and food coloring are ready when the hot caramel reaches the stage where they need to be added quickly.
- 14 cups freshly popped stovetop popcorn, unpopped kernels removed
- ¾ cup unsalted butter, or 1.5 sticks
- 1 ½ cups packed light brown sugar
- ⅓ cup light corn syrup
- ½ teaspoon baking soda
- 1 teaspoon pure vanilla extract
- Red and green food coloring
For popping the popcorn, the stovetop method described uses:
- 3 tablespoons oil
- ½ cup popcorn kernels
These simple ingredients move through several distinct stages before becoming caramel popcorn. First comes the fresh popcorn, then the bubbling caramel, followed by coating, low-temperature baking, and finally cooling until everything becomes crisp.
Understanding the Ingredients
Freshly Popped Stovetop Popcorn
The recipe calls for 14 cups freshly popped stovetop popcorn with all unpopped kernels removed. Starting with fresh popcorn gives the caramel a crisp base and avoids the flavors and coatings that come with microwave popcorn.
Yellow popcorn kernels are preferred for their classic flavor and larger bloom. The popcorn is more than filler here; its freshness directly shapes the texture of every finished cluster.
Removing the hard unpopped kernels is essential before caramel is added. Once everything is coated and baked, those kernels can be difficult to see among the caramelized pieces.
Unsalted Butter
Use ¾ cup unsalted butter, which equals 1.5 sticks. The butter forms the rich foundation of the caramel and should be melted gently over medium heat without allowing it to brown.
Because the caramel already has several strong flavors, the butter contributes richness without competing with the brown sugar or vanilla. It also helps create the smooth consistency needed to coat a large volume of popcorn.
Light Brown Sugar
The recipe uses 1 ½ cups packed light brown sugar. Packing it firmly when measuring matters because the caramel depends on that exact amount.
Light brown sugar gives the coating its sweetness and characteristic caramel depth. Those molasses notes are part of what separates this coating from a simple melted-sugar glaze.
Light Corn Syrup
Add ⅓ cup light corn syrup to the butter and brown sugar. Its role is to keep the caramel smooth and discourage the sugar from becoming grainy as it cooks.
This small amount has a large effect on the finished coating. It helps the caramel stay fluid enough to spread across the popcorn before the baking stage turns it crisp.
Baking Soda
Only ½ teaspoon baking soda is needed, but it creates one of the most dramatic moments in the recipe. Once stirred into the hot caramel, the mixture foams and expands.
That foaming action introduces tiny air pockets into the caramel. The finished coating becomes lighter and crisp rather than turning into a dense, tooth-breaking shell.
Pure Vanilla Extract
The caramel gets 1 teaspoon pure vanilla extract after it comes off the heat. Vanilla softens the sharper sweetness of the sugar and gives the finished coating a warmer flavor.
Because it is added after boiling, have it measured before the caramel reaches that stage. The transition from boiling caramel to coating the popcorn moves quickly.
Red and Green Food Coloring
Red and green food coloring creates the Christmas look. Gel coloring is preferred because it produces vivid shades without adding as much liquid to the caramel.
The color can also be changed completely for other celebrations. Pastels, school colors, pink and red, or orange and purple all follow the same basic idea.
Equipment You’ll Need
No specialized candy-making tools are required for this caramel popcorn. The equipment list stays comfortably within the range of basic kitchen tools.
- Large saucepan, at least 3 quarts
- Wooden spoon
- Rimmed baking sheet
- Parchment paper
- Heatproof spatula
The saucepan needs enough room for the caramel to bubble without threatening to overflow. This becomes especially important after the baking soda is added and the mixture foams.
A wooden spoon is the preferred tool for stirring the caramel. The heatproof spatula is better suited for folding the hot coating through the popcorn once the caramel leaves the saucepan.
The rimmed baking sheet holds the popcorn while it dries in the oven. Lining it with parchment keeps the sticky caramel from bonding to the pan and makes cleanup much easier.
How to Make Homemade Caramel Popcorn
Caramel popcorn becomes much easier when each phase is treated separately. Prepare the popcorn first, cook the caramel carefully, coat everything quickly, and then let the low oven finish the transformation.
Step 1: Pop the Fresh Popcorn
Heat 3 tablespoons oil in a large pot with a tight-fitting lid over medium-high heat. When the oil begins to shimmer, add ½ cup popcorn kernels and cover the pot immediately.
Shake the pot occasionally as the kernels begin popping. Continue listening carefully, and when there are about 2–3 seconds between pops, remove the pot from the heat.
The finished recipe calls for 14 cups freshly popped stovetop popcorn. Keep the popcorn plain so there are no additional coatings competing with the caramel.
Microwave popcorn is not recommended for this recipe. The oils and flavorings already present in microwave bags can interfere with the clean caramel flavor and coating.
Step 2: Remove Every Unpopped Kernel
Before making the caramel, go through the popcorn and remove any kernels that did not pop. It may feel tedious, but this is an important part of preparing the popcorn base.
Once caramel surrounds everything, an unpopped kernel can hide among the crunchy clusters. Removing them now protects the texture and makes the finished popcorn much more pleasant to eat.
Transfer the cleaned popcorn to a container large enough for mixing. You will need enough room to turn it gently once the hot caramel is poured over the top.
Step 3: Prepare the Baking Sheet and Add-Ins
Line the rimmed baking sheet with parchment paper before beginning the caramel. Once the sugar mixture reaches the correct stage, there will not be time to stop and prepare the pan.
Measure the ½ teaspoon baking soda, 1 teaspoon pure vanilla extract, and red and green food coloring now as well. Keeping those ingredients within reach allows you to stir them into the caramel immediately after it comes off the heat.
Preparation makes this part of the recipe far less stressful. Hot caramel begins setting quickly, so every saved moment helps when it is time to coat the popcorn.
Step 4: Melt the Butter
Place ¾ cup unsalted butter in the large saucepan and melt it over medium heat. Let it liquefy gently without allowing it to brown.
The butter forms the base for the caramel, so keep your attention on the saucepan. You want smooth melted butter before introducing the brown sugar and corn syrup.
Once all of the butter has melted, you are ready to move directly into building the caramel. Keep the heat steady at medium.
Step 5: Add Brown Sugar and Corn Syrup
Whisk 1 ½ cups packed light brown sugar and ⅓ cup light corn syrup into the melted butter. Continue mixing until the ingredients combine into a smooth, bubbling mixture.
At first, the components may look separate, but they become increasingly unified as the sugar heats. The goal is an even caramel base without dry pockets of brown sugar.
Keep watching the mixture as it approaches a stronger boil. This is the point where accurate timing becomes especially important.
Step 6: Boil the Caramel for Exactly 5 Minutes
Bring the mixture to a rolling boil. Once it reaches that stage, set a timer for exactly 5 minutes.
Do not shorten the boiling time simply because the caramel already looks thick. The full 5 minutes is important for developing the texture needed for crisp caramel popcorn.
By the end of this stage, the caramel should look beautifully golden and coat the back of a spoon. Keep your measured baking soda, vanilla, and coloring nearby because the next step happens immediately.
Step 7: Add Baking Soda, Vanilla, and Food Coloring
Remove the saucepan from the heat as soon as the 5-minute boil is complete. Immediately stir in ½ teaspoon baking soda, 1 teaspoon pure vanilla extract, and the red and green food coloring.
Expect the caramel to foam when the baking soda goes in. This reaction is desirable because it creates the tiny air pockets that contribute to the lighter, crisp coating.
Work carefully because the caramel is extremely hot. The mixture will expand and change texture quickly, which is why using a saucepan of at least 3 quarts gives it necessary room.
If you are creating separate colors, the popcorn can be divided into two bowls before different colored caramel is added to each. This technique is useful when making school-color versions or any design that uses two distinct shades.
Step 8: Pour the Caramel Over the Popcorn
Immediately pour the hot caramel over the prepared popcorn. Do not let it sit in the saucepan longer than necessary because caramel begins setting as it cools.
Use a heatproof spatula to fold the popcorn gently through the coating. Move quickly enough to distribute the caramel while it is still fluid, but avoid crushing the popcorn with aggressive stirring.
Some clusters will naturally receive more caramel than others. That uneven coating is not a flaw; it is one of the textures that makes a homemade batch so appealing.
Step 9: Spread the Coated Popcorn
Transfer the coated popcorn onto the parchment-lined rimmed baking sheet. Spread it into an even layer rather than leaving large, thick piles.
Separating the popcorn helps the heat reach the caramel more evenly during baking. Thick clumps can remain sticky while thinner areas become crisp sooner.
Do not worry about breaking apart every cluster at this stage. The popcorn will be stirred repeatedly as it bakes, and the final shaping happens after cooling.
Step 10: Bake at 200°F
Place the baking sheet in a 200°F oven and bake the caramel popcorn for 1 hour. This gentle heat dries the caramel gradually instead of cooking it aggressively.
The long, low bake is one of the most important differences between sticky caramel-coated popcorn and crisp caramel popcorn. Over the hour, the coating firms while the popcorn maintains its satisfying texture.
Set a timer so you remember to stir at regular intervals. The popcorn should not simply sit untouched for the entire baking time.
Step 11: Stir Every 15 Minutes
Every 15 minutes, carefully stir the caramel popcorn. This repeated movement helps prevent burning and redistributes the coating as it dries.
Use the spatula to turn the popcorn from different areas of the baking sheet. Pieces at the edges and center can heat differently, so stirring helps create a more consistent finish.
Continue this routine throughout the entire 1-hour baking time. By the end, the caramel should be much less sticky and the popcorn should be approaching its final crisp texture.
Step 12: Add Warm Finishes if Desired
If you are making one of the festive variations, some additions go on immediately after baking. Crushed candy canes can be tossed with the popcorn while it is still slightly warm, allowing the peppermint pieces to soften just enough to create little flavor pockets.
Rainbow sprinkles can also be mixed in right after baking. The warm caramel gives them enough tackiness to stick rather than falling immediately to the bottom.
These additions are entirely optional. The basic caramel popcorn is complete without them, so choose them only when they match the celebration or flavor you want.
Step 13: Cool Completely
Leave the popcorn on the baking sheet until it has cooled completely. This waiting period is essential because warm caramel has not yet developed its final crisp texture.
Avoid taste-testing the caramel while it is hot. Hot sugar can burn, and the popcorn will not yet have the crunchy texture you worked to create.
As the caramel cools, it becomes firmer. The finished clusters should give a satisfying snap when they are broken apart.
Step 14: Break Into Clusters
Once completely cool, use your hands to break the popcorn into the size of clusters you prefer. Leave some pieces larger and others smaller if you enjoy the rustic look of homemade caramel popcorn.
Those irregular pieces are part of the finished character. Some will have heavier caramel coverage while others will be lighter and more delicate.
From here, the popcorn is ready to serve, package as a gift, or transfer to an airtight container for storage.

Tips for the Best Caramel Popcorn
Caramel rewards preparation. The recipe is not complicated, but the hot sugar mixture moves quickly enough that having everything ready before you begin makes the experience much smoother.
Have Everything Ready Before the Caramel Boils
Measure the baking soda, vanilla, and coloring before starting the sugar mixture. The popcorn should already be popped, cleaned of hard kernels, and waiting nearby.
Once the caramel finishes its 5-minute boil, you want to move directly into the next steps. Pausing to search for ingredients can give the sugar mixture time to begin setting.
Use Gel Food Coloring
Gel coloring is the preferred option when making brightly colored holiday caramel popcorn. It delivers stronger color without adding as much liquid to the caramel.
This is especially useful when you want clearly defined red and green shades. The coating can stay thick and glossy while still taking on a festive color.
Do Not Taste the Caramel While It Is Hot
The temptation to sample a fresh piece is real, but waiting matters. Hot caramel can burn your mouth, and the coating has not reached its crisp final texture yet.
Let the popcorn cool completely before judging the crunch. The transformation continues even after the tray leaves the oven.
Use a Wooden Spoon for the Caramel
A wooden spoon is the preferred stirring tool for this recipe. Plastic can be vulnerable around very hot caramel, while metal transfers heat readily.
Wood gives you a sturdy tool for managing the thick, sticky mixture. Pair it with a heatproof spatula when it is time to coat the popcorn itself.
Pay Attention to the Full Boiling Time
Sticky caramel popcorn is often the result of caramel that did not boil long enough. The rolling boil should continue for the complete 5 minutes specified.
The baking stage matters just as much. A full hour at 200°F, with stirring every 15 minutes, gives the coating time to dry into the intended crunch.
Festive Caramel Popcorn Variations
One of the happiest things about this recipe is how easily the same basic popcorn can be adapted to a particular celebration. The caramel method remains consistent while the colors and decorations change.
Christmas Caramel Popcorn
Red and green food coloring creates the classic holiday version. Once baked, crushed candy canes can be tossed in while the popcorn remains slightly warm.
The peppermint begins to soften against the warmth of the caramel, creating small pockets of holiday flavor. It also adds another layer of color among the caramel clusters.
Valentine’s Day Caramel Popcorn
Swap the Christmas colors for pink and red gel food coloring. Once cool, the popcorn can be layered into a clear cellophane bag and finished with a ribbon.
The candy-like colors turn the familiar caramel popcorn into a treat that looks designed specifically for Valentine’s Day. No changes to the caramel itself are required.
Halloween Caramel Popcorn
Orange and purple food coloring transforms the popcorn into a Halloween snack. The method stays unchanged, making the variation primarily about visual presentation.
Because gel colors are especially vibrant, they work well when you want strongly defined seasonal shades. Just incorporate the colors once the caramel comes off the heat.
Birthday Caramel Popcorn
Rainbow sprinkles can be mixed in immediately after the caramel popcorn finishes baking. Adding them while the coating is still warm helps the sprinkles stick to the clusters.
The result has a more playful party appearance without changing the brown sugar caramel base. It is an easy way to take the same recipe beyond holiday gifting.
School-Color Caramel Popcorn
For game day, divide the popcorn into two bowls before adding differently colored caramel to each portion. That gives you two defined colors that can be combined after coating.
This technique makes the snack easy to coordinate with school colors. It is another example of how the recipe can change visually while keeping the same familiar caramel flavor.
What to Do If Your Caramel Popcorn Is Sticky
If the finished popcorn remains sticky, the caramel may not have boiled for the full 5 minutes or the popcorn may not have baked long enough. Both stages contribute to removing the sticky texture and establishing the final crunch.
For a batch that is already made, return it to a 200°F oven for another 20 minutes. That additional drying time may help improve the texture.
For a future batch, another option given is extending the baking time by an extra 10–15 minutes when needed. Keep the low 200°F temperature rather than trying to correct the texture with a much hotter oven.
Can You Make Caramel Popcorn Without Corn Syrup?
Honey or maple syrup can be tried as substitutes for light corn syrup, but the texture will not be exactly the same. Corn syrup is included because it helps prevent the sugar from crystallizing and becoming grainy.
If you choose to make that substitution, add ¼ teaspoon cream of tartar to help stabilize the sugar. This variation changes one of the ingredients responsible for the caramel’s texture, so a different result should be expected.
The standard version remains ⅓ cup light corn syrup. Use the alternative only when you specifically want or need to experiment with one of those substitutions.
Serving Homemade Caramel Popcorn
This is the kind of snack that can disappear surprisingly quickly once it reaches the table. It works equally well for movie night and holiday gatherings because everyone can simply grab a cluster as they pass.
For a seasonal presentation, pile the popcorn onto a favorite holiday platter. The caramel sheen and colorful clusters provide plenty of visual interest without needing a carefully arranged dessert display.
Homemade caramel popcorn is also especially suited to gifting. Its crisp texture, irregular clusters, and festive colors give it the handmade character that has made it a favorite gift for neighbors and coworkers since my college days.
How to Store Caramel Popcorn
Transfer completely cooled caramel popcorn to an airtight container and keep it at room temperature. A large cookie tin with a tight-fitting lid is a festive option that also helps maintain the crunch.
One storage note describes the texture beginning to shift from crisp toward chewier after about 3 days. That does not make the popcorn unusable, but the eating experience becomes different as it sits.
The FAQ also notes that properly stored caramel popcorn can remain crispy for about a week at room temperature. Humidity makes a difference, and in a muggy environment the recommendation is to enjoy it within about 3 days.
Keeping moisture away from the popcorn is particularly important. Humidity works against the crisp caramel surface, which is why a tightly sealed container matters.
Homemade Caramel Popcorn FAQs
Can I use microwave popcorn instead of stovetop popcorn?
Stovetop popcorn is strongly preferred. Microwave popcorn often comes with its own oils, flavorings, and coatings, which can change the taste and interfere with the caramel.
Fresh stovetop popcorn gives the recipe a cleaner base. The popping method described takes only a few minutes and allows the caramel itself to remain the dominant flavor.
Why did my caramel popcorn turn out sticky?
The caramel may not have boiled for the full 5 minutes, or the coated popcorn may not have baked long enough. Both timing stages matter for developing a dry, crisp finish.
You can return a sticky batch to a 200°F oven for another 20 minutes. On another batch, extending the original baking time by 10–15 minutes is also suggested when extra drying is needed.
Can I replace the light corn syrup?
Honey or maple syrup can be tried, but expect a different texture. Light corn syrup helps discourage crystallization, which is one reason the standard recipe produces a smoother caramel.
When substituting either honey or maple syrup, add ¼ teaspoon cream of tartar to help stabilize the sugar. Keep in mind that the finished caramel will not necessarily behave exactly like the version made with corn syrup.
How long does caramel popcorn stay fresh?
In an airtight container at room temperature, it can remain crispy for about a week. However, another storage observation notes that the texture may begin becoming chewier after roughly 3 days.
Humidity shortens the window for the crispiest texture. In a muggy house, enjoying the popcorn within about 3 days is recommended.
Why is baking soda added to caramel?
The ½ teaspoon baking soda makes the caramel foam after it comes off the heat. That foaming creates tiny air pockets within the coating.
Those pockets help make the caramel lighter and crisp rather than extremely hard. It is a small ingredient with an important effect on the final texture.
Do I really need to stir the popcorn every 15 minutes?
Yes, the caramel popcorn is stirred every 15 minutes during its 1-hour bake at 200°F. This helps redistribute the popcorn and keeps different areas from drying or browning unevenly.
The repeated stirring also breaks apart some of the larger areas as the caramel firms. You will still have plenty of natural clusters once everything cools.
When should I break the caramel popcorn apart?
Wait until the popcorn has cooled completely. Breaking it while the caramel is still warm means the coating has not reached its final crisp state.
Once fully cool, the clusters should snap apart easily. You can leave them rustic and irregular rather than trying to create identical pieces.
Nutrition Information
Any nutrition values for this caramel popcorn depend on the exact ingredients, brands, and measurements used. The intended nutrition context is a 1-cup serving, but no fixed calorie, fat, carbohydrate, protein, sugar, sodium, or other numerical values are specified.
Because festive additions and substitutions can also change the numbers, the nutrition profile will vary from batch to batch. The caramel popcorn is intended as a sweet treat to enjoy in the portion that suits you.
The Kind of Homemade Treat That Feels Like the Holidays
There is a reason I still associate caramel popcorn with that unmistakable feeling of holiday magic. It begins while the butter and brown sugar are bubbling on the stove, grows stronger as the caramel foams with baking soda and vanilla, and finally fills the kitchen once the coated popcorn settles into its slow bake.
Then comes the quiet part: waiting for everything to cool. Only after that does the transformation feel complete, when you can lift a cluster from the tray and hear that crisp snap that tells you the caramel has set just the way it should.
I love that every batch looks slightly different. One handful might contain heavily coated pieces with deep caramel crunch, while another has delicate threads of sugar running across the popcorn, and neither needs to look perfectly uniform to feel special.
Those little imperfections are exactly what I want from homemade holiday food. They make the popcorn feel like something that came from a real kitchen, made for real people, rather than something identical from one piece to the next.
The recipe can be bright red and green for Christmas, soft pastel for Easter, pink and red for Valentine’s Day, orange and purple for Halloween, or divided into team colors for game day. It can stay completely classic or pick up crushed candy canes, sprinkles, or another festive finish after baking.
But underneath every variation is the same thing that has kept this caramel popcorn in my holiday routine since my college days: fresh popcorn wrapped in buttery brown sugar caramel and baked patiently until crisp. It is simple enough to make with basic kitchen tools, festive enough to give away, and dangerously easy to keep reaching for once that first cluster disappears.
Irresistible Homemade Caramel Popcorn Recipe

Sweet, crisp, buttery, and dressed up with festive red and green color, this Irresistible Homemade Caramel Popcorn is an easy holiday-style treat with plenty of classic caramel flavor. Fresh stovetop popcorn gets coated in a warm brown sugar caramel, then bakes low and slow until the coating sets into a crunchy finish.
Recipe Details
- Prep Time: 15 minutes
- Cook Time: 1 hour
- Total Time: 1 hour 15 minutes
- Course: Dessert
- Cuisine: American
- Servings: 14 cups
- Calories: 210 kcal
Ingredients
For the Popcorn
- 14 cups stovetop popcorn
For the Caramel Coating
- red and green food coloring
- 1 teaspoon vanilla
- ½ teaspoon baking soda
- ⅓ cup light corn syrup
- 1 ½ cups light brown sugar
- ¾ cup unsalted butter
Instructions
Step 1: Prepare the Oven and Baking Sheet
Preheat the oven to 200°F (95°C).
Line a baking sheet with parchment paper and set it aside while you prepare the popcorn and caramel coating.
Step 2: Prepare the Popcorn
Pop the popcorn using the stovetop method.
Remove any unpopped kernels, then transfer the 14 cups of freshly popped popcorn to a large bowl.
Step 3: Start the Caramel
Melt the unsalted butter in a saucepan over medium heat.
Stir in the light brown sugar and light corn syrup until the ingredients are combined.
Step 4: Boil the Caramel
Bring the mixture to a boil while stirring constantly.
Once boiling, stop stirring and let the caramel boil for 5 minutes without stirring.
Step 5: Add the Finishing Ingredients
Remove the saucepan from the heat.
Working quickly, stir in the baking soda, vanilla, and red and green food coloring. Adjust the amount of food coloring according to the color intensity you want.
Step 6: Coat the Popcorn
Immediately pour the hot caramel mixture over the popcorn.
Stir gently until the popcorn is coated as evenly as possible without crushing it.
Step 7: Spread on the Baking Sheet
Transfer the caramel-coated popcorn to the prepared parchment-lined baking sheet.
Spread it into an even layer so the popcorn can bake consistently.
Step 8: Bake Slowly
Bake for 1 hour.
Stir the popcorn every 15 minutes during baking so the caramel coating stays evenly distributed and the pieces do not set into one large mass.
Step 9: Cool Completely
Remove the baking sheet from the oven and let the caramel popcorn cool completely.
Once cooled and set, break it into pieces before serving or storing.
Notes
- Store in an airtight container for up to 1 week.
- For best results, use freshly popped popcorn.
- Adjust food coloring amounts for desired color intensity.
Serving Suggestions
Serve Irresistible Homemade Caramel Popcorn once it has cooled completely and the caramel coating has become firm. The crisp popcorn, buttery brown sugar caramel, vanilla, and festive red and green coloring make it especially suited to holiday snacking and dessert spreads.
This recipe makes 14 cups, so there is plenty for a party bowl, seasonal snack table, or individual portions.
For the best texture, use freshly popped stovetop popcorn and make sure all unpopped kernels are removed before adding the hot caramel. Let the finished popcorn cool fully before breaking it into pieces.
Storage
How to Store
Store the finished caramel popcorn in an airtight container for up to 1 week.
Popcorn Tip
Use 14 cups stovetop popcorn. Remove all unpopped kernels before transferring the popcorn to the large bowl.
Butter Tip
Use ¾ cup unsalted butter and melt it over medium heat before adding the brown sugar and corn syrup.
Caramel Tip
Combine the melted butter with 1 ½ cups light brown sugar and ⅓ cup light corn syrup.
Bring the mixture to a boil while stirring, then boil for 5 minutes without stirring.
Baking Soda Tip
Use ½ teaspoon baking soda and stir it into the caramel immediately after removing the saucepan from the heat.
Vanilla Tip
Add 1 teaspoon vanilla to the hot caramel along with the baking soda and food coloring.
Food Coloring Tip
Use red and green food coloring according to your desired intensity. No exact amount is provided.
Baking Tip
Bake the coated popcorn at 200°F (95°C) for 1 hour, stirring every 15 minutes.
Cooling Tip
Let the popcorn cool completely before breaking it into pieces. This gives the caramel coating time to set properly.

Fernando is the creator and writer behind the food blog Eating with your Hands. Living and working in cities like Paris, Barcelona, and Berlin, and being married to a Canadian foodie, has given Fernando a passion and interest in food and inspired him to run EWYH.