
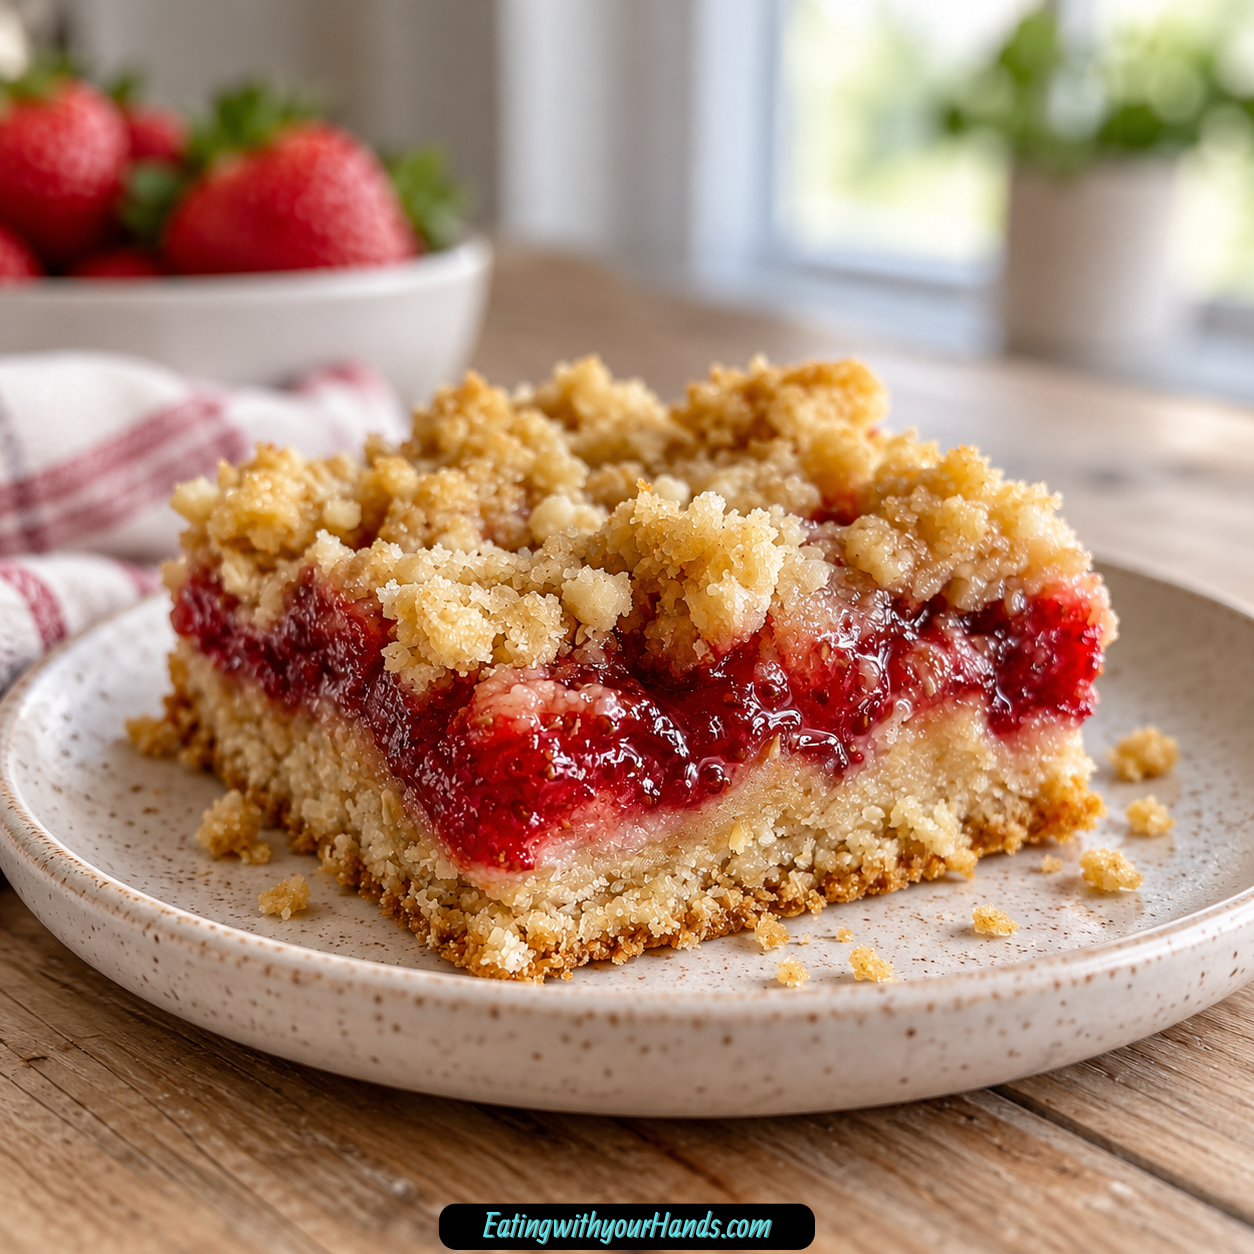

Some desserts belong to a particular season in a way that feels almost impossible to separate. For me, Juicy Strawberry Oatmeal Bars will always taste like summer, with bright berries, buttery oats, and that familiar moment when warm strawberry juices begin bubbling through a golden crumb topping.
I first made these bars for a picnic, thinking they would simply be an easy dessert I could cut into squares and carry along. Instead, they became one of those recipes I started looking forward to every time strawberries came into season.
The appeal is partly in how uncomplicated they are. There is no mixer to pull out, no pastry dough to roll, and no complicated filling that needs hours of preparation.
You mix one buttery oat mixture, use half for the base and half for the topping, then spoon a simple strawberry filling between the two layers. After about 30–35 minutes in the oven, the berries become glossy and jammy while the top turns golden.
That combination of textures is what makes the bars so hard to stop eating. The bottom is firm enough to support the fruit, the topping stays loose and crumbly, and the strawberry layer brings a juicy softness between them.
I also love that they fit into more than one part of the day. A square can sit beside morning coffee, become an afternoon snack, or turn into dessert with a scoop of vanilla ice cream.
And because the ingredient list is so familiar, these bars feel like the kind of baking project you can start without planning days ahead. Flour, oats, sugar, butter, cinnamon, strawberries, lemon juice, and vanilla do almost all the work.
The smell while they bake is its own reward. Warm strawberries, brown sugar, cinnamon, and butter fill the kitchen long before the pan is ready to leave the oven.
Table of Contents
- Why You’ll Love These Strawberry Oatmeal Bars
- Recipe Overview
- Ingredients for Juicy Strawberry Oatmeal Bars
- Why Quick Oats Work So Well
- The Role of Melted Butter
- Granulated and Brown Sugar
- Why Cinnamon Belongs in Strawberry Bars
- Fresh Strawberries Are the Star
- Why Lemon Juice and Vanilla Matter
- The Small Amount of Flour in the Filling
- Equipment You’ll Need
- How to Make Juicy Strawberry Oatmeal Bars
- Tips for the Best Strawberry Oatmeal Bars
- Using Frozen Strawberries
- Quick Oats Versus Rolled Oats
- Strawberry Oatmeal Bar Variations
- How to Serve Strawberry Oatmeal Bars
- How to Store Strawberry Oatmeal Bars
- Making Strawberry Oatmeal Bars Ahead
- Doubling the Recipe
- Common Problems and How to Fix Them
- Frequently Asked Questions
- Nutritional Information
- Why These Bars Feel Like Summer
- The Beauty of One Simple Oat Mixture
- Final Thoughts
- Juicy Strawberry Oatmeal Bars
Why You’ll Love These Strawberry Oatmeal Bars
These bars have the easygoing personality of a simple fruit crumble but the convenience of a dessert you can slice and serve by hand. They are especially useful when you want something homemade without committing to a complicated baking project.
- Simple preparation: About 15 minutes of active prep is all you need before baking.
- One oat mixture does two jobs: Half becomes the crust and half becomes the topping.
- Fresh strawberry flavor: Three cups of sliced berries create a generous fruit layer.
- Great texture contrast: The bars combine a firm bottom crust, juicy filling, and crumbly oat topping.
- Flexible serving options: Enjoy them for breakfast, snacks, or dessert.
- Easy substitutions: Frozen strawberries, rolled oats, nuts, cardamom, whole wheat flour, and brown sugar can all be used in variations.
- Make-ahead friendly: The bars can be baked in advance and stored at room temperature.
- Freezer-friendly: Finished bars can be frozen individually for up to 1 month.
The recipe is also forgiving enough to adapt without losing its identity. As long as the basic balance of oats, flour, butter, and fruit remains intact, there is room to experiment.
Recipe Overview
| Detail | Information |
|---|---|
| Recipe | Juicy Strawberry Oatmeal Bars |
| Oven Temperature | 350°F (175°C) |
| Pan Size | 8×8-inch |
| Active Prep | About 15 minutes |
| Strawberry Resting Time | About 5 minutes |
| Baking Time | 30–35 minutes |
| Cooling Time Before Cutting | About 1 hour |
| Yield | 9 squares |
| Room-Temperature Storage | Up to 2 days |
| Refrigerator Storage | Up to 5 days |
| Freezer Storage | Up to 1 month |
| Estimated Calories | 220 per bar |
The most important visual cues are a golden-brown topping and strawberry filling bubbling around the edges. Those signs tell you that the oat mixture has baked and the fruit has thickened enough to set after cooling.
Ingredients for Juicy Strawberry Oatmeal Bars
For the Oat Crust and Topping
- 5 tablespoons unsalted butter, melted
- 1 cup all-purpose flour, spooned and leveled
- 1 cup quick oats, not instant
- ½ cup granulated sugar
- ¼ cup packed brown sugar
- 1 teaspoon ground cinnamon
- Pinch of salt
For the Strawberry Filling
- 3 cups sliced fresh strawberries, about 1 pound
- 2 tablespoons granulated sugar
- 1 tablespoon fresh lemon juice
- 1 teaspoon vanilla extract
- 1 teaspoon all-purpose flour
The recipe uses only a handful of ingredients, but each one affects the final texture. Quick oats give the crust enough structure without making it overly coarse, while flour helps the berry juices thicken so the bars can be cut cleanly.
Why Quick Oats Work So Well
Quick oats are the preferred choice because they bring oat texture without making the crust excessively chewy. They absorb some of the melted butter while still leaving recognizable oat pieces throughout the base and topping.
Instant oats are not recommended because they can disappear too much into the mixture. The bars need some visible oat structure to create their signature texture.
Old-fashioned rolled oats can be substituted if necessary. The result will simply be chewier and more textured.
That variation can actually be appealing if you prefer a heartier oatmeal bar. The rest of the recipe can stay the same.
The Role of Melted Butter
Five tablespoons melted unsalted butter bind the flour, oats, and sugars into a mixture that resembles wet sand. Because the butter is melted, there is no creaming step and no mixer needed.
The butter needs to coat the oat mixture evenly. Using clean hands can help you feel whether dry pockets remain at the bottom of the bowl.
Unsalted butter is the preferred choice so the small pinch of salt remains controlled. The butter also contributes to the crispness of the golden topping.
Granulated and Brown Sugar
The crust uses both ½ cup granulated sugar and ¼ cup packed brown sugar. The combination provides sweetness while giving the oat mixture a little deeper flavor.
Dark brown sugar can be used when you want an even richer caramel-like note. Regular brown sugar still works well.
An additional 2 tablespoons granulated sugar go into the strawberries. That sugar is separate from the sugars used in the crust.
As the berries rest, the sugar begins drawing out their juices. Those juices become part of the glossy filling during baking.
Why Cinnamon Belongs in Strawberry Bars
One teaspoon ground cinnamon goes into the oat mixture. It does not turn the dessert into a heavily spiced bar, but it adds a warm note underneath the fresh fruit.
This subtle warmth is especially good with brown sugar and butter. The strawberry flavor still remains the main focus.
Cardamom can replace cinnamon when you want a more unusual variation. That substitution changes the personality of the bars while keeping the same general structure.
Fresh Strawberries Are the Star
The filling uses 3 cups sliced strawberries, which is about 1 pound. Fresh berries are the preferred option because they offer the best balance of flavor and texture.
The berries should be sliced so they distribute evenly across the crust. Very large pieces can make the bars more difficult to cut.
Strawberries naturally release liquid as they sit with sugar. That is exactly what you want because the juices combine with lemon, vanilla, and flour to create the soft fruit layer.
The important thing is giving the bars enough time to cool afterward. Hot strawberry filling remains loose, while cooled filling becomes more stable.
Why Lemon Juice and Vanilla Matter
One tablespoon fresh lemon juice brightens the strawberry flavor. It brings enough acidity to keep the filling from tasting flat or overly sweet.
One teaspoon vanilla extract adds warmth beneath the fruit. The combination of lemon and vanilla makes the filling taste more rounded without covering up the berries.
Neither ingredient needs a complicated technique. They are simply tossed directly with the strawberries before the short resting period.
The Small Amount of Flour in the Filling
Only 1 teaspoon all-purpose flour is added to the strawberries. It may look insignificant, but it helps manage the juices released during baking.
Without enough thickening, the fruit layer can remain too loose for clean slices. The flour gives the filling a better chance to set once cooled.
If using frozen strawberries, an additional teaspoon flour is suggested in the FAQ. Frozen berries often introduce more moisture even after draining.
Equipment You’ll Need
This recipe keeps equipment to a minimum.
- Large mixing bowl
- Bowl for the strawberry filling
- 8×8-inch baking pan
- Parchment paper
- Rubber spatula
- Measuring cups and spoons
- Measuring cup with a flat bottom, optional for pressing crust
- Wire cooling rack
- Sharp knife
No stand mixer or hand mixer is needed. A spoon, spatula, and clean hands are enough to prepare the oat mixture.
Parchment paper is especially useful because it allows you to lift the fully cooled bars from the pan before slicing. Leaving an overhang makes removal easier.
How to Make Juicy Strawberry Oatmeal Bars
The process has three simple parts: make the oat mixture, prepare the strawberries, and assemble everything in the pan. The recipe is straightforward, but pressing the crust firmly and allowing the finished bars to cool completely make a major difference.
Step 1: Preheat the Oven and Prepare the Pan
Preheat the oven to 350°F (175°C). Line an 8×8-inch baking pan with parchment paper, leaving enough overhang to lift the bars out later.
The 8×8-inch size matters because it creates the intended thickness. A significantly larger pan spreads the layers too thin.
Set the prepared pan aside while you make the oat mixture.
Step 2: Make the Oat Crumb Mixture
In a large bowl, combine 1 cup all-purpose flour, 1 cup quick oats, ½ cup granulated sugar, ¼ cup packed brown sugar, 1 teaspoon ground cinnamon, and a pinch of salt.
Pour in 5 tablespoons melted unsalted butter. Stir until the butter is evenly distributed and the mixture looks like damp or wet sand.
Use clean hands if necessary to work the mixture together. You want the butter coating the oats and flour rather than sitting in isolated wet spots.
Step 3: Press Half Into the Pan
Measure approximately half of the oat mixture and transfer it to the prepared baking pan. Spread it all the way into the corners.
Press firmly to create a compact, even bottom crust. The flat bottom of a measuring cup works particularly well for this.
Take your time during this step. The base needs to be firm enough to support the strawberry filling after baking.
Set the remaining oat mixture aside for the topping.
Step 4: Prepare the Strawberry Filling
Place 3 cups sliced fresh strawberries in a separate bowl. Add 2 tablespoons granulated sugar, 1 tablespoon fresh lemon juice, 1 teaspoon vanilla extract, and 1 teaspoon all-purpose flour.
Toss gently until the berries are evenly coated. The mixture will begin becoming glossy as the sugar draws out the strawberry juices.
Let the strawberries sit for about 5 minutes. This brief macerating period gives the filling time to develop before assembly.
Step 5: Add the Strawberry Layer
Spoon the strawberry mixture evenly over the pressed oat crust. Include the juices from the bowl rather than leaving them behind.
Use a rubber spatula to distribute the berries across the entire pan. Try to keep the fruit layer relatively even so every bar receives strawberries.
Do not press the berries into the crust. Simply spread them gently over the surface.
Step 6: Add the Remaining Oat Topping
Take the reserved half of the oat mixture and sprinkle it loosely over the strawberries. Cover the fruit as evenly as possible.
Do not press this layer down. Leaving it loose is what creates the crumbly topping and lets some strawberry filling bubble through as the bars bake.
A few visible patches of berries are perfectly fine. The uneven surface is part of the homemade texture.
Step 7: Bake Until Golden and Bubbling
Place the pan in the preheated oven and bake for 30–35 minutes. Watch for the top to turn golden brown.
The strawberry filling should also bubble around the edges. Those bubbling juices are a sign that the filling is hot and beginning to thicken.
If the topping starts browning too quickly before the center appears finished, tent the pan loosely with foil. This protects the surface while allowing the bars to continue baking.
Step 8: Cool Completely Before Cutting
Transfer the pan to a wire rack and let the bars cool completely. About 1 hour is the suggested cooling time.
This stage is essential if you want clean squares. Warm filling remains soft and can cause the bars to fall apart when sliced.
Once fully cooled, lift the entire slab out using the parchment overhang. Cut into 9 squares with a sharp knife, wiping the blade between cuts when you want especially neat edges.

Tips for the Best Strawberry Oatmeal Bars
Use Fresh, Ripe Strawberries When Available
Fresh berries give the filling the brightest flavor and most appealing texture. They are especially good when strawberries are naturally sweet and juicy.
Frozen strawberries can work, but the texture will be softer. Thaw and drain them thoroughly first.
Don’t Rush the Cooling Time
This may be the hardest part of the recipe because the pan smells so good when it leaves the oven. However, cooling is what transforms the warm crumble into bars that can actually be lifted and sliced.
Give them about an hour. If they are still too soft, additional chilling in the refrigerator can help.
Press the Bottom Crust Firmly
The lower layer is different from the crumb topping. It needs to be compact enough to form a foundation.
Use the bottom of a measuring cup to press evenly across the pan. Pay attention to the corners, where loose crumbs can lead to fragile pieces.
Leave the Top Crumbly
Do not treat the topping like the crust. Sprinkle it loosely over the strawberries and leave the pieces irregular.
Those irregular pieces become golden, crisp pockets during baking. Pressing them down would change the texture.
Watch the Edges
The edges often brown before the very center finishes baking. If they begin darkening too fast, foil can protect the surface.
Tent rather than pressing the foil onto the topping. You want to shield it without disturbing the crumb layer.
Use an 8×8-Inch Pan
The recipe is designed for this pan size. A larger pan creates thinner bars and can change the baking behavior.
If doubling the recipe, move up to a 9×13-inch pan as directed. Adjust baking time rather than simply using a larger pan for the standard batch.
Using Frozen Strawberries
Frozen strawberries are useful when fresh berries are unavailable. Thaw them completely before mixing the filling.
Drain away excess liquid so the bars do not become overly wet. The texture may still be softer than the fresh-strawberry version.
The FAQ suggests adding an extra teaspoon of flour when using frozen berries. That additional flour helps compensate for the extra moisture.
Keep the rest of the strawberry filling ingredients the same. Lemon juice, sugar, and vanilla still provide the same flavor balance.
Quick Oats Versus Rolled Oats
Quick oats give the bars their standard texture. They soften enough to bind into the crust while still remaining visible.
Old-fashioned rolled oats can be substituted. Expect a chewier, more pronounced oat texture.
Instant oats are the one option to avoid. Their finer texture can disappear too much into the mixture.
The oats are essential to the character of these bars. Leaving them out entirely would change the recipe into something very different.
Strawberry Oatmeal Bar Variations
Whole Wheat Variation
Replace half of the all-purpose flour with whole wheat flour. This creates a nuttier, heartier crust.
Keeping some all-purpose flour helps preserve tenderness. The strawberry filling can remain unchanged.
Nutty Strawberry Bars
Add chopped pecans or almonds to the topping. The nuts bring extra crunch and another layer of flavor.
Fold them into the reserved crumb mixture before sprinkling it over the berries. Keep the topping loose rather than pressing it down.
Cardamom Strawberry Bars
Replace the cinnamon with cardamom for a different spice profile. The floral warmth of cardamom changes the bars significantly while still complementing strawberries.
Use the variation when you want something less traditional. The baking method remains the same.
All-Brown-Sugar Version
If you are out of granulated sugar for the oat mixture, use brown sugar instead. This creates a deeper, more caramel-like flavor.
Remember that the strawberry filling also uses its own 2 tablespoons granulated sugar in the standard recipe. Adjust only according to the variation you intend to make.
How to Serve Strawberry Oatmeal Bars
Serve Them at Room Temperature
Room-temperature bars give you the cleanest handheld texture. The fruit layer is set, the crust holds together, and the topping remains pleasantly crumbly.
This is an ideal way to serve them at picnics or potlucks. They are easy to place on a tray without needing bowls or utensils.
Serve Warm With Vanilla Ice Cream
For dessert, serve a warm portion with vanilla ice cream. The cold ice cream melts into the strawberry juices and oat crumble.
Keep in mind that warm bars are softer and may not hold a perfectly clean square. If presentation matters, cool and cut first, then warm individual pieces gently.
Serve With Morning Coffee
The combination of fruit and oats also makes these bars appealing alongside coffee. Their texture sits somewhere between a fruit crumble and a portable snack bar.
This is one reason they work so naturally at breakfast or brunch. The same pan can easily move from dessert one evening to coffee the next morning.
How to Store Strawberry Oatmeal Bars
Room Temperature
Place cooled bars in an airtight container and keep them at room temperature for up to 2 days.
This works well when you know the bars will be eaten quickly. Keep the container sealed so the oat layers do not dry out.
Refrigerator
For longer storage, refrigerate the bars for up to 5 days. The cold temperature makes the filling firmer.
Allow a bar to come closer to room temperature before serving if you prefer a softer texture. You can also warm it gently.
Freezer
Wrap individual bars tightly in plastic wrap and transfer them to a freezer bag. Freeze for up to 1 month.
Individual wrapping lets you remove only what you need. Thaw overnight in the refrigerator or warm gently in the microwave when ready to eat.
Making Strawberry Oatmeal Bars Ahead
These bars can be baked up to 2 days ahead and stored in an airtight container at room temperature. The flavors have time to settle, and they remain convenient for parties or planned breakfasts.
Make sure the bars have cooled completely before covering them. Trapping warmth can create unwanted moisture inside the container.
The FAQ also provides an option for freezing unbaked bars for up to 1 month. When baking from that state, add approximately 5 minutes to the baking time.
Watch the color and bubbling filling rather than relying only on the clock. The topping should still become golden and the strawberry layer should visibly bubble.
Doubling the Recipe
For a larger batch, double all ingredients and use a 9×13-inch pan. This is especially useful for potlucks or when you want extra portions for freezing.
The larger batch may require 5–10 additional minutes of baking. Keep an eye on the topping rather than assuming the maximum time will always be needed.
Look for the same signs as the smaller batch: golden crumbs and bubbling strawberry filling. Cool completely before cutting.
Common Problems and How to Fix Them
Why Did My Bars Fall Apart?
The most common reason is slicing while the bars are still warm. The strawberry layer needs cooling time to become stable.
Allow the pan to cool completely for about 1 hour. If the bars remain too delicate, refrigerate them for another hour before slicing.
Why Is My Strawberry Filling Too Runny?
The berries may have released more moisture than usual, especially if frozen fruit was used. Make sure frozen strawberries are thawed and drained thoroughly.
The flour in the filling also matters. Do not omit the 1 teaspoon in the standard recipe.
For frozen strawberries, the suggested additional teaspoon of flour can help manage excess moisture.
Why Is the Top Browning Too Fast?
The oven may be browning the surface before the filling has finished bubbling. Tent the pan with foil and continue baking.
Do not seal the foil tightly. A loose tent is enough to protect the topping.
Why Is My Bottom Crust Crumbly?
The oat mixture may not have been pressed firmly enough. Remember that the lower half needs to function as a solid base.
Use a measuring cup to compact it into the pan. Save the loose treatment for the top layer only.
Why Are My Bars Too Thin?
The baking pan may be too large. An 8×8-inch pan creates the intended thickness.
For a doubled batch, use a 9×13-inch pan instead of spreading the standard recipe across a larger dish.
Frequently Asked Questions
Can I Use Frozen Strawberries Instead of Fresh?
Yes. Thaw the strawberries completely and drain off as much excess liquid as possible.
Frozen berries can make the bars softer than fresh berries. Adding an extra teaspoon flour to the filling can help compensate for that moisture.
Can I Make These Bars Ahead?
Yes. Bake them up to 2 days in advance and store them in an airtight container at room temperature.
They can also be frozen after baking. Individual wrapping makes later serving easier.
Can I Freeze the Unbaked Bars?
Yes, the unbaked bars can be frozen for up to 1 month according to the make-ahead option. Add about 5 minutes to the baking time when preparing them later.
Use the visual signs of doneness as your guide. Look for a golden topping and bubbling strawberry filling.
What Can I Use Instead of Quick Oats?
Old-fashioned rolled oats work well. The finished bars will simply have a chewier oat texture.
Avoid instant oats because they become too fine in the crust. Do not leave the oats out entirely.
Can I Double the Recipe?
Yes. Double every ingredient and bake in a 9×13-inch pan.
Plan on approximately 5–10 additional minutes of baking. Begin checking once the topping is golden and the filling is bubbling.
Why Do I Need to Cool the Bars Before Cutting?
Warm strawberry filling is still loose. Cutting immediately can cause the crust and topping to slide apart.
Cooling for about 1 hour gives the filling time to set. For especially firm pieces, an additional refrigerator chill can help.
Can I Add Nuts?
Yes. Pecans or almonds can be mixed into the crumb topping.
They add crunch without changing the basic strawberry filling. Chop them so they distribute evenly.
Can I Use Brown Sugar Instead of White Sugar?
An all-brown-sugar variation is suggested for the oat mixture. It gives the crust and topping a deeper caramel-like flavor.
Keep in mind that the standard filling separately uses 2 tablespoons granulated sugar. Follow the variation according to the ingredients you have available.
Nutritional Information
The following values are estimates per bar based on the recipe divided into 9 squares. Exact values can vary depending on brands, fruit, substitutions, and the size of each piece.
| Nutrient | Estimated Amount Per Bar |
|---|---|
| Calories | 220 |
| Fat | 8g |
| Saturated Fat | 5g |
| Carbohydrates | 35g |
| Fiber | 2g |
| Sugar | 14g |
| Protein | 3g |
The oats contribute part of the fiber, while strawberries and sugars make up much of the sweetness. Butter contributes most of the fat.
Adding nuts, changing the flour, using all brown sugar, or serving the bars with vanilla ice cream will change the nutritional values. For exact tracking, calculate with the specific ingredients and serving sizes used.
Why These Bars Feel Like Summer
I think strawberries have a way of making even simple desserts feel cheerful. Their color alone makes a pan of oatmeal bars look inviting before anyone knows how easy they were to make.
But what keeps me coming back is the way the fruit changes in the oven. Fresh slices become soft and glossy, and their juices bubble through the oat topping until parts of the surface look almost jammy.
That sight always reminds me of the first picnic batch. I had wanted something practical enough to carry but still homemade enough to feel special.
These bars managed both. They were easy to cut, easy to share, and just messy enough from the strawberries to make them feel like a real summer dessert rather than something overly polished.
Since then, I have stopped waiting for a picnic to make them. Sometimes a bowl of strawberries on the counter is reason enough.
And even outside strawberry season, the frozen-berry option means the recipe does not have to disappear completely. It simply becomes a slightly softer version of the same familiar treat.
The Beauty of One Simple Oat Mixture
One of my favorite details is that you do not have to make a separate crust and streusel. The exact same oat mixture becomes both.
Pressing half firmly creates structure underneath the fruit. Leaving the remaining half loose gives you a completely different texture on top.
That small difference in handling creates two distinct layers from one bowl. It is the kind of efficient baking trick that makes a recipe worth remembering.
The strawberries sit between those textures like a homemade jam layer, except they still retain enough individual fruit pieces to remind you exactly what is inside.
The result feels generous without being complicated. That is probably why the recipe works equally well for casual snacking and a dessert plate with melting ice cream.
Final Thoughts
Juicy Strawberry Oatmeal Bars combine 3 cups of fresh strawberries with a buttery mixture of flour, quick oats, granulated sugar, brown sugar, cinnamon, and melted butter. Half of that mixture becomes a firm base, while the other half bakes into loose golden crumbs over a strawberry filling brightened with lemon juice and vanilla.
Bake the bars at 350°F for 30–35 minutes, then give them the full cooling time they need before cutting into 9 squares. That patience is what turns a bubbling strawberry crumble into sturdy bars with a crisp-chewy oat texture and a soft fruit center.
Serve them at room temperature for neat slices, warm an individual piece for dessert with vanilla ice cream, or tuck a square beside your morning coffee. However you serve them, the combination of juicy strawberries and buttery oats has a way of bringing a little summer brightness to the table.
Juicy Strawberry Oatmeal Bars

Buttery, fruity, lightly spiced, and packed with juicy strawberries, these Juicy Strawberry Oatmeal Bars combine a crisp oat crumble with a bright strawberry filling flavored with lemon and vanilla. The same buttery oat mixture forms both the base and topping, making these easy American dessert bars simple to assemble and delicious once fully cooled.
Recipe Details
- Prep Time: 15 minutes
- Cook Time: 35 minutes
- Total Time: 50 minutes
- Course: Dessert
- Cuisine: American
- Servings: 9 bars
- Calories: 220 kcal
Ingredients
For the Oat Crust and Crumble
- Pinch of Salt
- 1 teaspoon Ground Cinnamon
- ¼ cup Brown Sugar
- ½ cup Sugar
- 1 cup Quick Oats
- 1 cup All Purpose Flour
- 5 tbsps Unsalted butter melted
For the Strawberry Filling
- 1 teaspoon All Purpose Flour
- 1 teaspoon Vanilla Extract
- 1 tablespoon Fresh Lemon Juice
- 2 tablespoon Sugar
- 3 cups Sliced Strawberries
Instructions
Step 1: Prepare the Oven and Pan
Preheat the oven to 350°F (175°C). Grease an 8×8-inch baking pan and set it aside.
The same oat mixture will be used for both the bottom crust and the crumble topping, so keep the prepared pan nearby while mixing.
Step 2: Make the Oat Crumble Mixture
In a bowl, combine the melted unsalted butter, all purpose flour, quick oats, sugar, brown sugar, ground cinnamon, and a pinch of salt.
Mix until the ingredients form a crumbly mixture. The butter should coat the oats and flour so the mixture can hold together when pressed.
Step 3: Form the Bottom Crust
Take half of the oat mixture and press it evenly into the bottom of the prepared 8×8-inch baking pan.
Press gently but firmly enough to create a consistent base for the strawberry filling. Reserve the remaining mixture for the topping.
Step 4: Prepare the Strawberry Filling
Combine the sliced strawberries, sugar, fresh lemon juice, vanilla extract, and all purpose flour.
Stir gently until the strawberries are evenly coated. The lemon and vanilla add brightness and sweetness, while the flour helps bring the filling together as it bakes.
Step 5: Add the Strawberry Layer
Spread the strawberry filling evenly over the pressed oat crust.
Distribute the fruit from edge to edge so each finished bar contains plenty of strawberry filling.
Step 6: Add the Crumble Topping
Sprinkle the remaining oat mixture over the strawberries.
Cover the fruit evenly while leaving the topping naturally crumbly rather than pressing it down into the filling.
Step 7: Bake Until Golden
Bake for 30–35 minutes, until the top is golden brown.
The recipe metadata lists a 35-minute cook time, while the baking instructions give a 30–35 minute range. Use the golden color of the crumble as the final visual cue.
Step 8: Cool Completely
Remove the pan from the oven and allow the bars to cool completely.
Do not cut while warm. Full cooling helps the strawberry filling and oat layers set so the bars hold together more cleanly.
Step 9: Slice and Serve
Once completely cooled, cut into 9 bars.
Serve after the crust, strawberry filling, and crumble topping have fully set.
Notes
- Use fresh strawberries for best flavor.
- Store in an airtight container for up to 3 days.
- Can be frozen for up to a month.
Serving Suggestions
Serve Juicy Strawberry Oatmeal Bars after they have cooled completely and can be cut into neat squares. The buttery oat crust, sweet strawberry center, cinnamon crumble, lemon juice, and vanilla create a fruity dessert with soft and crisp textures in every bite.
This recipe makes 9 bars, making it a convenient choice for dessert trays, afternoon snacks, lunchbox treats, brunch spreads, or casual family desserts.
For the best strawberry flavor, use fresh strawberries as noted. Letting the bars cool fully before slicing is especially important because the fruit filling needs time to settle between the oat layers.
Storage
How to Store
Store the Strawberry Oatmeal Bars in an airtight container for up to 3 days.
Freezer Tip
The bars can be frozen for up to a month.
Strawberry Tip
Use 3 cups sliced strawberries. Fresh strawberries are recommended for the best flavor.
Oat Tip
Use 1 cup Quick Oats in the crust and crumble mixture. Combine them with flour, sugars, cinnamon, salt, and melted butter.
Flour Tip
Use 1 cup All Purpose Flour for the oat mixture and a separate 1 teaspoon All Purpose Flour in the strawberry filling.
Sugar Tip
Use ½ cup Sugar and ¼ cup Brown Sugar in the oat mixture. Use a separate 2 tablespoon Sugar with the strawberries.
Filling Tip
Combine the sliced strawberries with sugar, fresh lemon juice, vanilla extract, and flour before spreading them over the crust.
Baking Tip
Bake at 350°F (175°C) for 30–35 minutes, until golden brown.
Cooling Tip
Cool completely before cutting into 9 bars. This helps the filling firm and the layers stay together.

Fernando is the creator and writer behind the food blog Eating with your Hands. Living and working in cities like Paris, Barcelona, and Berlin, and being married to a Canadian foodie, has given Fernando a passion and interest in food and inspired him to run EWYH.