
There are some desserts that feel tied to a very specific kind of comfort. Lunch Lady Peanut Butter Bars belong to that category, because they carry the kind of sweetness that feels warm, familiar, and deeply nostalgic from the very first bite.
These bars are the kind of treat that instantly brings to mind simple afternoons, busy kitchens, and the kind of homemade sweets that never needed to be fancy to become unforgettable. Their charm comes from the way they balance richness and softness so effortlessly.
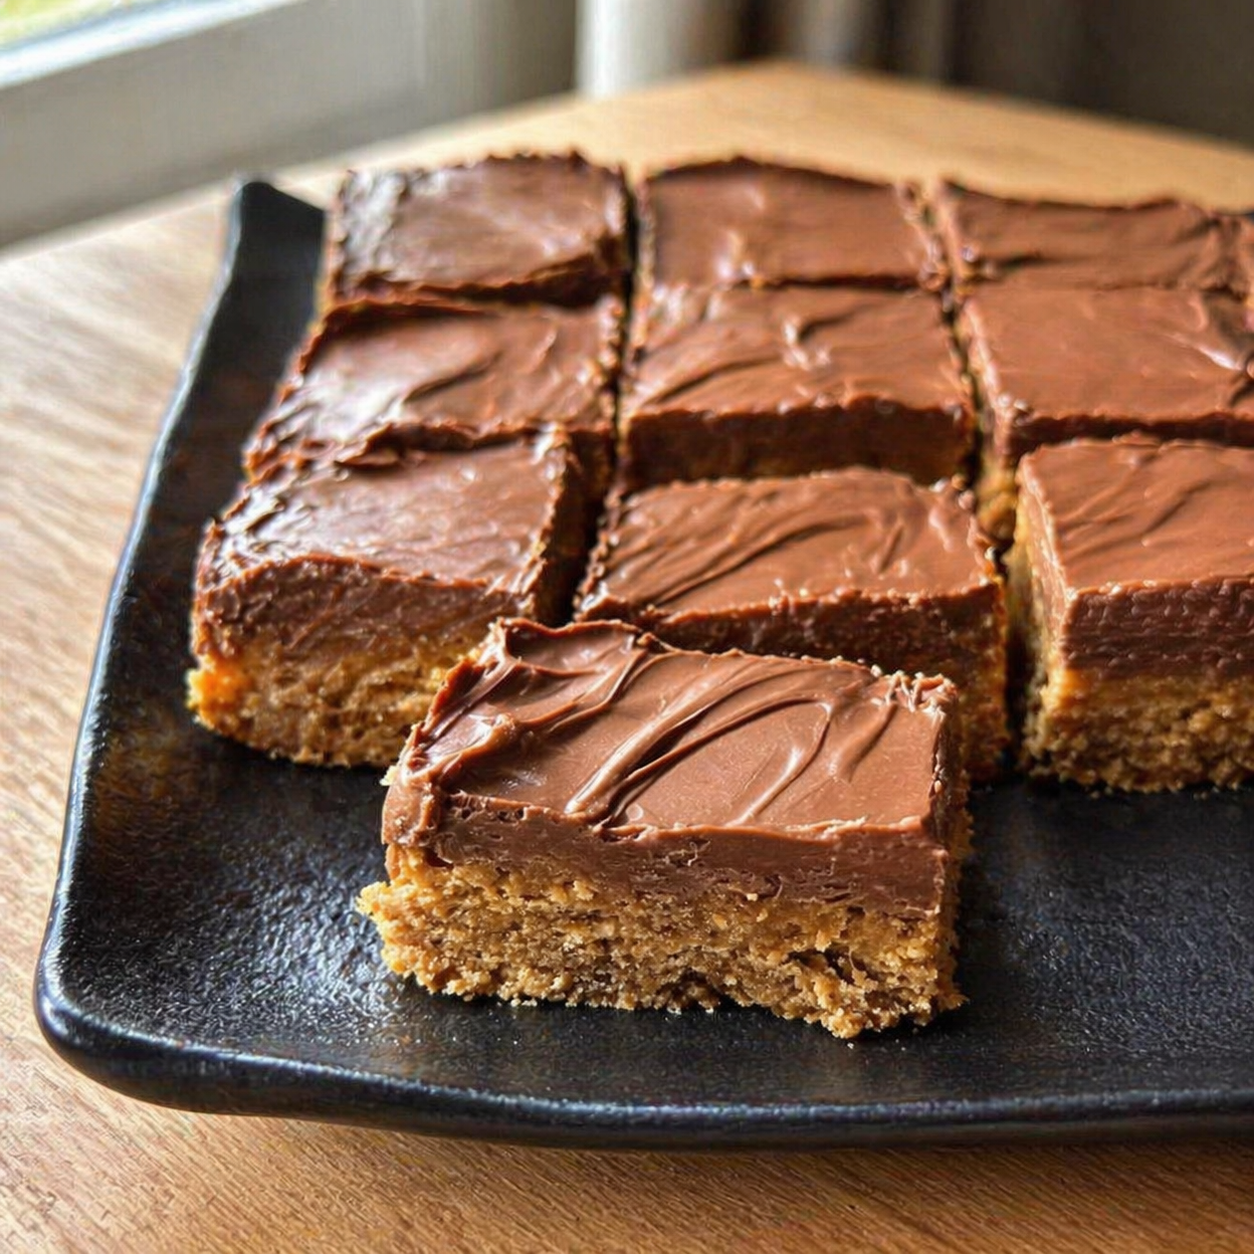
The base is chewy and hearty, with oats giving it texture and peanut butter giving it a deep, comforting flavor. Then comes the frosting, smooth and chocolatey, spread generously across the top like the finishing touch that makes everything feel complete.
That contrast is what makes these bars so lovable. You get the nutty, chewy depth of the base and the soft sweetness of the frosting in every bite, and together they create a dessert that feels both playful and deeply satisfying.
What I especially love about a recipe like this is how approachable it feels. It does not depend on complicated techniques or difficult ingredients, yet it still delivers something that feels special enough to bring to a gathering or share with people you love.
There is also something emotional about desserts that come in bars. They feel generous, easy to cut, easy to pass around, and easy to associate with family tables, bake sales, school treats, and cozy evenings at home.
That spirit is part of what makes Lunch Lady Peanut Butter Bars so memorable. They are not polished in a formal way, but they are exactly the sort of dessert people get excited to see waiting on the counter.
The peanut butter flavor is central here, and it is not shy. It comes through in a rich, creamy way that feels grounding and full, while the oats add texture that keeps the bars from feeling too soft or overly sweet.
Then the chocolate frosting steps in and gives the bars another layer of comfort. It is smooth, rich, and just sweet enough to complement the peanut butter without overwhelming it.
This is the kind of dessert that feels made for sharing. It works after school, at holiday gatherings, on a casual weekend, or simply when the kitchen needs the smell of something sweet and homemade.
If you love recipes that feel nostalgic, easy, and crowd-pleasing, Lunch Lady Peanut Butter Bars offer exactly that. They are chewy, rich, chocolatey, and filled with the kind of warmth that makes homemade desserts so easy to love.
Table of Contents
- What Are Lunch Lady Peanut Butter Bars?
- Why You’ll Love Lunch Lady Peanut Butter Bars
- Ingredients You’ll Need
- For the Bars
- For the Frosting
- Step-by-Step Directions for Lunch Lady Peanut Butter Bars
- Preparing the Ingredients
- Mixing the Batter
- Baking the Bars
- Preparing the Frosting
- Finishing the Bars
- Variations to Try
- Serving and Storage Tips
- Common Mistakes to Avoid
- Helpful Notes
- Frequently Asked Questions
- Why These Bars Feel So Special
- Final Thoughts on Lunch Lady Peanut Butter Bars
- Lunch Lady Peanut Butter Bars
- Equipment
- Ingredients
- Instructions
- Notes
What Are Lunch Lady Peanut Butter Bars?
Lunch Lady Peanut Butter Bars are dessert bars made with a chewy peanut butter and oat base, topped with a smooth chocolate frosting. They are simple to prepare, easy to slice, and especially well loved for their rich peanut butter flavor and soft, satisfying texture.
The base combines butter, sugars, peanut butter, eggs, vanilla, flour, oats, baking soda, and salt. This creates a sturdy but tender layer that bakes into something chewy, sweet, and full of nutty richness.
Once cooled, the bars are topped with a chocolate frosting made from butter, powdered sugar, cocoa powder, milk, and vanilla. That top layer gives the bars a soft, creamy finish and rounds out the peanut butter beautifully.
The result is a dessert that feels familiar and deeply comforting. It is rich, but still very approachable.
It is also practical. Prep time is 20 minutes, bake time is 30 minutes, and the total time is 50 minutes.
The recipe makes 12 bars. That makes it an excellent dessert for sharing, storing, or enjoying over several days.
Why You’ll Love Lunch Lady Peanut Butter Bars
One of the most obvious reasons to love this recipe is how easy it is to make. With only 20 minutes of prep, it fits into real life without much stress.
Another reason is the ingredient list. Most of what you need is likely already in the pantry or refrigerator, which makes the recipe especially convenient when the craving for something sweet arrives unexpectedly.
These bars are also beginner-friendly. The source recipe keeps the steps straightforward, making it easy for even novice bakers to get a satisfying result.
That matters because not every homemade dessert needs to feel technical. Some of the best ones are the ones that can be mixed, baked, frosted, and enjoyed without a lot of fuss.
They are also ideal for gatherings. The source notes that their chewy texture and rich flavor make them a hit at family events and holidays, and that feels exactly right.
The make-ahead potential is another big benefit. These bars keep well, which means they can be baked in advance and still feel special when served later.
Most of all, they feel comforting. Peanut butter, oats, butter, sugar, and chocolate come together in a way that feels warm, nostalgic, and immediately satisfying.
Ingredients You’ll Need
This recipe relies on simple ingredients, but each one has a purpose. Together, they create bars that feel chewy, rich, balanced, and very easy to enjoy.
For the Bars
Salted Butter
You will need 1 cup of salted butter, softened. This adds richness, softness, and a full buttery flavor to the base.
Softened butter is important here because it creams more easily with the sugars. That creates a smoother mixture and a better final texture.
Granulated Sugar
You will need 1 cup of granulated sugar. This sweetens the bars and helps create structure in the base.
It works together with the brown sugar to create a balanced sweetness. The combination is part of what makes the bars feel rich rather than flat.
Light Brown Sugar
You will need 1 cup of packed light brown sugar. This brings moisture and a gentle caramel-like warmth that suits peanut butter especially well.
Brown sugar is a big part of what gives the bars their chewy texture. It also adds depth to the flavor.
Creamy Peanut Butter
You will need 2 ½ cups of creamy peanut butter, divided. Peanut butter is the defining flavor of the bars, and it gives the base its soft richness and character.
The source also notes that natural peanut butter can be used for a healthier twist, while sunflower seed butter works well for a nut-free version. That makes the recipe more adaptable while keeping its essential spirit.
Eggs
You will need 2 large eggs. These help bind the batter and support the final texture of the bars.
They give the base structure while still allowing it to stay soft and chewy. That balance matters in a bar recipe like this.
Vanilla Extract
You will need 2 teaspoons of vanilla extract. This rounds out the sweetness and supports both the peanut butter and chocolate flavors.
Vanilla may seem subtle, but it helps make the bars taste fuller and warmer. It is a very important background note.
All-Purpose Flour
You will need 2 cups of all-purpose flour, scooped and leveled. This gives the bars structure and helps them hold together cleanly once sliced.
The source notes that gluten-free flour can be used if needed. That flexibility makes the recipe easier to adapt.
Old-Fashioned Oats
You will need 2 cups of old-fashioned oats. These give the bars their hearty chew and a comforting texture that sets them apart from simpler peanut butter bars.
The oats are part of what makes the dessert feel homey and substantial. They bring texture that makes each bite more interesting.
Baking Soda
You will need 1 teaspoon of baking soda. This supports the rise and texture of the bars.
It is a small ingredient, but it helps keep the base from feeling too dense. That little lift is important.
Salt
You will need 1 teaspoon of salt. This balances the sweetness and helps sharpen the peanut butter and chocolate flavors.
Salt is especially helpful in desserts with nut butter. It keeps the richness from feeling too heavy.
For the Frosting
Salted Butter
You will need ½ cup of salted butter, softened. This gives the frosting richness and helps create a creamy texture.
A smooth frosting starts with properly softened butter. That makes mixing much easier and prevents lumps.
Powdered Sugar
You will need 3 cups of powdered sugar. This provides sweetness and gives the frosting its structure.
Powdered sugar is what makes the frosting soft, fluffy, and spreadable. It turns the butter and cocoa into a proper topping rather than a glaze.
Cocoa Powder
You will need 4 tablespoons of cocoa powder. This brings the chocolate flavor that balances the peanut butter base so well.
Cocoa powder gives the bars their second major flavor identity. Without it, the dessert would feel much less complete.
Milk
You will need ¼ cup of milk. This loosens the frosting just enough to make it smooth and easy to spread.
The source does not complicate this step, and that simplicity works well here. The frosting only needs enough liquid to become creamy.
Vanilla Extract
You will need 2 teaspoons of vanilla extract for the frosting. This helps soften the cocoa and rounds out the sweetness.
That little bit of vanilla helps the frosting taste fuller and less one-dimensional. It makes the topping feel more finished.
Step-by-Step Directions for Lunch Lady Peanut Butter Bars
This recipe is easy to follow, but attention to a few details will help the bars come out chewy, evenly baked, and beautifully frosted. Each stage matters in building the final texture and flavor.
Preparing the Ingredients
Step 1: Preheat the Oven
Begin by preheating your oven to 350°F, or 175°C. This ensures the bars bake evenly from the start.
A preheated oven matters because it helps the base set properly. It keeps the bars from baking unevenly or taking on an inconsistent texture.
Step 2: Prepare the Baking Pan
Grease a 9×13-inch baking pan. This helps the bars release easily after baking and makes slicing much less frustrating later.
A properly prepared pan is especially important for chewy bars. It keeps the edges clean and prevents sticking.
Step 3: Measure and Set Out the Ingredients
Gather all your ingredients and measure them before mixing. This keeps the process smooth and makes it easier to focus on combining the ingredients properly.
This small bit of preparation is especially helpful for bar recipes. Once the mixing begins, everything tends to move quickly.
Mixing the Batter
Step 4: Cream the Butter and Sugars
In a large mixing bowl, cream together the softened butter, granulated sugar, and brown sugar until the mixture becomes smooth and fluffy. This creates the sweet, rich base for the bars.
This stage matters because it helps build the texture of the final bars. A properly creamed mixture gives the base a softer, more even feel.
Step 5: Add Peanut Butter, Eggs, and Vanilla
Add the peanut butter, eggs, and vanilla extract to the creamed butter and sugar mixture. Mix until everything is well combined and creamy.
At this stage, the batter begins to take on its defining flavor. The peanut butter makes the mixture rich and fragrant, while the eggs and vanilla help it feel smoother and more complete.
Step 6: Add the Dry Ingredients
Gradually add the flour, oats, baking soda, and salt. Stir until just combined, being careful not to overmix.
The source specifically warns against overmixing, and that is good advice. Overworking the batter can make the bars tougher than intended, and the goal here is a chewy, tender texture.
Step 7: Scrape the Bowl
Use a spatula to scrape down the sides of the bowl and make sure everything is mixed evenly. The source gives this as a helpful tip, and it is worth following.
This step helps ensure there are no dry pockets and that the peanut butter and oats are evenly distributed throughout the batter.
Baking the Bars
Step 8: Spread the Batter Into the Pan
Transfer the batter to the prepared baking pan and spread it evenly. Use a spatula to smooth the top so the bars bake consistently across the whole pan.
This matters because even thickness gives more even baking. It also helps the frosting sit more neatly later.
Step 9: Bake Until Golden Brown
Bake the bars for 30 minutes, or until they are golden brown and a toothpick inserted into the center comes out clean. This is the key moment for getting the texture right.
The source reminds you not to bake too long, and that is important. You want the bars set and golden, but still chewy rather than dry.
Preparing the Frosting
Step 10: Let the Bars Cool
Before frosting, let the bars cool completely. The source clearly says not to frost them while warm, because the frosting can melt and lose its texture.
Cooling fully is worth the wait. It keeps the chocolate frosting smooth and helps the finished bars look more polished.
Step 11: Combine the Frosting Ingredients
In a mixing bowl, beat together the softened butter, powdered sugar, cocoa powder, milk, and vanilla extract. Mix until smooth and creamy.
This frosting is simple, but it brings a lot to the recipe. It adds sweetness, softness, and that rich chocolate finish that makes the bars feel complete.
Step 12: Beat Until No Lumps Remain
Continue mixing until the frosting is fully smooth. The source mentions making sure there are no lumps, and that is especially important with cocoa powder and powdered sugar.
A smooth frosting spreads more beautifully and gives the bars a more even final texture. It also makes the dessert feel more satisfying overall.
Finishing the Bars
Step 13: Frost the Cooled Bars
Once the bars are completely cool, spread the chocolate frosting generously over the top. Use a spatula to create an even layer.
This is the moment when the bars fully become themselves. The chocolate topping sitting over that chewy peanut butter oat base is what gives them their classic appeal.
Step 14: Slice Into Bars
Cut the finished dessert into squares or rectangles. Try to use clean, even cuts so the bars look tidy when served.
The source does not overcomplicate this step, and it does not need to be. These bars are meant to feel homemade and generous, not overly formal.

Variations to Try
One of the nicest things about this recipe is how easy it is to adjust. The peanut butter-oat base is strong enough to support different flavors, textures, and swaps without losing its comforting appeal.
Chocolate Chip Variation
Add chocolate chips for extra texture and sweetness. This makes the bars even more indulgent while staying within the same warm, nostalgic flavor family.
Nut Butter Variation
Use almond butter or cashew butter instead of peanut butter. The source notes this as an easy change that gives the bars a different nutty flavor profile.
Fruit Variation
Top the bars with sliced bananas or strawberries for a fresh twist. This gives them a softer, brighter contrast against the rich base and frosting.
Gluten-Free Variation
Use gluten-free flour and oats if needed. The source includes this as an option, which makes the recipe easier to share with more people.
Frosting Variation
Use cream cheese frosting instead of chocolate frosting for a tangier finish. This changes the mood of the bars while keeping their soft, chewy structure.
Serving and Storage Tips
Serve Lunch Lady Peanut Butter Bars slightly chilled or at room temperature. The source suggests pairing them with cold milk or a scoop of vanilla ice cream, and both sound especially fitting for a dessert like this.
These bars are perfect for after-school snacks, shared desserts, or casual gatherings. Their texture and richness make them feel satisfying in a way that works equally well for kids and adults.
Store them in an airtight container at room temperature for up to 5 days. For longer storage, the source says they can be frozen for up to 3 months.
If freezing, place them in a single layer first, then transfer them to a freezer-safe container. Thaw at room temperature before serving.
Common Mistakes to Avoid
One common mistake is not softening the butter. The source stresses that room-temperature butter is important, and that makes a real difference in both the batter and the frosting.
Another issue is overmixing the batter. Since the bars are meant to stay chewy, mixing only until combined is the best approach.
Baking too long is another easy mistake. The bars should be golden brown and set, but not overly dry.
Finally, do not frost them before they cool. The source clearly warns about this, and it is one of the easiest ways to protect the final texture and appearance.
Helpful Notes
The source suggests adding a pinch of cinnamon to the batter for richer flavor. This would give the bars a little extra warmth without changing their core identity.
If nuts are a concern, sunflower seed butter is a very good alternative. That keeps the same rich texture while making the dessert nut-free.
Mini chocolate chips or dried fruit can also be folded into the batter for more texture and sweetness. These little additions help you tailor the bars without complicating the recipe.
For a lower sugar version, the source suggests using a sugar substitute that measures like sugar. That makes the recipe easier to adapt to different needs.
Frequently Asked Questions
Can the recipe be frozen?
Yes, these bars can be frozen. The source says to cool them completely, then wrap them tightly and store them in a freezer-safe container.
They can be frozen for up to 3 months. Thaw them before serving for the best texture.
Can ingredients be substituted?
Absolutely. Peanut butter can be replaced with almond or sunflower seed butter, and granulated sugar can be replaced with honey or maple syrup, with quantity adjustments as needed.
These changes make the recipe more flexible without changing its comforting, chewy character too much.
How should leftovers be stored?
Store leftovers in an airtight container at room temperature for up to 5 days. The source notes that they can also be refrigerated if you prefer them colder.
If refrigerated, it helps to let them come closer to room temperature before serving so the texture softens again.
Can the recipe be made ahead?
Yes, these bars are excellent for making ahead. The source says they stay fresh for several days and are perfect for preparing in advance for gatherings or snacks.
That make-ahead quality is one of their biggest strengths. They are the kind of dessert that can quietly wait on the counter, ready whenever someone wants a sweet bite.
Why These Bars Feel So Special
Some desserts are memorable because they are elaborate. Others are unforgettable because they feel simple, generous, and tied to good memories.
These bars belong in that second group. They are rich, chewy, and familiar in a way that feels instantly comforting.
Part of that comes from the peanut butter. It brings a grounded, warm richness that feels deeply nostalgic.
Part of it comes from the oats. They give the bars texture and make them feel hearty and homemade rather than overly polished.
Then there is the chocolate frosting, which completes everything with softness and sweetness. It turns a simple bar into something people look forward to.
That combination is what gives the dessert its staying power. It is easy to make, easy to share, and easy to remember.
Final Thoughts on Lunch Lady Peanut Butter Bars
Lunch Lady Peanut Butter Bars are the kind of dessert that remind you how powerful simple baking can be. With a chewy oat and peanut butter base, a rich chocolate frosting, and the kind of familiar sweetness that feels tied to warm memories, they offer comfort in one very shareable form.
That is part of what makes them so easy to love. They are simple enough for an ordinary day, but satisfying enough to feel special when served to others.
The ingredients are familiar, the method is approachable, and the final result feels generous, nostalgic, and deeply comforting. That is exactly the kind of recipe worth keeping.
Whether you serve them after school, at a family gathering, or on a quiet evening when something sweet would make the day feel softer, they carry that same cozy spirit. They are rich, chewy, chocolatey, and full of warmth.
And in the end, that may be what makes them so memorable. They do not just taste sweet.
They feel like home.
Lunch Lady Peanut Butter Bars
Lunch Lady Peanut Butter Bars are a rich, satisfying dessert that is perfect when you are craving something sweet and comforting. With a soft peanut butter base and a smooth chocolate frosting, these bars make a classic treat for sharing.
Prep Time: 20 minutes
Cook Time: 30 minutes
Total Time: 50 minutes
Course: Dessert
Cuisine: American
Servings: 12 bars
Calories: 250 kcal
Equipment
Mixing bowl
Baking pan
Ingredients
For the Frosting
- Salted butter, ½ cup, softened
- Powdered sugar, 3 cups
- Cocoa powder, 4 Tablespoons
- Milk, ¼ cup
- Vanilla extract, 2 teaspoons
For the Bars
- Salted butter, 1 cup, softened
- Granulated sugar, 1 cup
- Packed light brown sugar, 1 cup
- Creamy peanut butter, 2 ½ cups, divided
- Eggs, 2 large
- Vanilla extract, 2 teaspoons
- All-purpose flour, 2 cups, scooped & leveled
- Old-fashioned oats, 2 cups
- Baking soda, 1 teaspoon
- Salt, 1 teaspoon
Instructions
Preheat the oven to 350°F (175°C) and grease a baking pan.
In a large mixing bowl, cream together the softened butter, granulated sugar, and brown sugar until smooth. Add the peanut butter, eggs, and vanilla extract, then mix until everything is fully combined.
Gradually stir in the flour, oats, baking soda, and salt, mixing just until incorporated.
Spread the batter evenly into the prepared baking pan and bake for 30 minutes, or until the top is golden brown.
While the bars cool, make the frosting by beating the softened butter, powdered sugar, cocoa powder, milk, and vanilla extract until smooth.
After the bars have cooled completely, spread the frosting over the top and slice into squares.
Notes
Store the bars in an airtight container for several days. You can also mix in chocolate chips for extra flavor.

Fernando is the creator and writer behind the food blog Eating with your Hands. Living and working in cities like Paris, Barcelona, and Berlin, and being married to a Canadian foodie, has given Fernando a passion and interest in food and inspired him to run EWYH.