

Some desserts feel like they were made for slow afternoons, family tables, and the kind of sweet memories that come back with one spoonful. Magnolia Bakery Banana Pudding is one of those desserts.
It is creamy, soft, nostalgic, and layered with simple ingredients that somehow become something unforgettable together. The pudding is smooth and rich, the bananas bring fresh sweetness, the mini Nilla wafers soften into the layers, and the whipped cream turns the top into something light and cloud-like.
This is the kind of dessert that feels easy enough for an ordinary evening but special enough for a celebration. It has that homemade comfort people love, with a texture that gets even better after it chills.
Every spoonful has a little bit of everything: creamy pudding, tender banana slices, soft vanilla cookies, and fluffy whipped cream. It is simple, classic, and full of the kind of sweetness that brings people back for another serving.
Table of Contents
- What Is Magnolia Bakery Banana Pudding?
- Why This Dessert Feels So Comforting
- Recipe Overview
- Why You’ll Love Magnolia Bakery Banana Pudding
- Ingredients You’ll Need
- Ingredient Notes
- Directions
- Step 1: Prepare Your Ingredients
- Step 2: Start the Pudding Mixture
- Step 3: Add the Eggs
- Step 4: Add the Whole Milk
- Step 5: Add the Vanilla Extract
- Step 6: Cook the Pudding
- Step 7: Watch for the Right Texture
- Step 8: Remove the Pudding From the Heat
- Step 9: Cover the Pudding Properly
- Step 10: Prepare the Cold Heavy Cream
- Step 11: Add Sugar and Sweetened Condensed Milk
- Step 12: Whip the Cream
- Step 13: Avoid Overwhipping
- Step 14: Slice the Bananas
- Step 15: Prepare the Serving Dish
- Step 16: Add the First Wafer Layer
- Step 17: Add the First Banana Layer
- Step 18: Add the Pudding Layer
- Step 19: Repeat the Layers
- Step 20: Add the Whipped Cream
- Step 21: Add Optional Crushed Wafers
- Step 22: Cover and Chill
- Step 23: Serve Chilled
- Pro Tips for the Best Banana Pudding
- Variations
- Serving Suggestions
- Storage Tips
- Make-Ahead Instructions
- Common Mistakes to Avoid
- Helpful Notes
- Frequently Asked Questions
- Final Thoughts
- Magnolia Bakery Banana Pudding
What Is Magnolia Bakery Banana Pudding?
Magnolia Bakery Banana Pudding is a layered dessert made with homemade vanilla pudding, mini Nilla wafers, sliced ripe bananas, and a whipped cream topping. It is chilled before serving so the flavors can blend and the layers can set.
The pudding is made with cornstarch, sugar, salt, eggs, whole milk, and vanilla extract. It cooks on the stovetop until thick and creamy.
The dessert is then layered with mini Nilla wafers and fresh banana slices. As it chills, the wafers soften slightly and become part of the creamy texture.
The topping is made with cold heavy cream, granulated sugar, and sweetened condensed milk. Once whipped into stiff peaks, it becomes a fluffy finish for the pudding.
Why This Dessert Feels So Comforting
Banana pudding has a way of feeling familiar even before the first bite. The smell of ripe bananas, vanilla, cream, and soft cookies brings a sweet warmth that feels like home.
This dessert is comforting because it is soft, creamy, and layered. It does not need fancy decoration or complicated flavors to feel special.
The mini Nilla wafers bring a gentle crunch at first, then soften as the dessert chills. The bananas add freshness, while the pudding and whipped cream create a rich, smooth base.
It is also a dessert made for sharing. Whether served in a large dish or individual cups, it feels generous, cozy, and perfect for gatherings.
Recipe Overview
Prep Time: 20 minutes
Cook Time: 10 minutes
Total Time: 30 minutes
Servings: 8 people
This recipe takes about 30 minutes of active time, plus at least 2 hours of chilling. The chilling step is important because it allows the layers to settle and the flavors to blend.
The recipe serves 8 people, making it a wonderful dessert for family dinners, parties, holidays, or cozy evenings at home.
Why You’ll Love Magnolia Bakery Banana Pudding
You will love this dessert because it is rich, creamy, and easy to make. The ingredients are simple, but the final result feels special.
It is quick to prepare, with only 30 minutes of total active time. That makes it helpful when you need a dessert without spending hours baking.
The recipe is beginner-friendly. The pudding is cooked on the stovetop, the cream is whipped, and the dessert is assembled in layers.
It is perfect for gatherings because banana pudding is a crowd-pleaser. The flavor is sweet, familiar, and loved by both kids and adults.
It is also make-ahead friendly. In fact, chilling helps the dessert taste better because the layers have time to meld.
Ingredients You’ll Need
For the Pudding
2 tablespoons cornstarch
8 tablespoons granulated sugar, divided
1 pinch salt
2 large eggs
2 cups whole milk
1 tablespoon vanilla extract
For the Topping
2 cups heavy cream, cold
1 tablespoon sweetened condensed milk
For Assembly
4 cups mini Nilla wafers
4 large ripe bananas, sliced
Ingredient Notes
Cornstarch helps thicken the pudding. It gives the dessert its smooth, spoonable texture.
Granulated sugar sweetens both the pudding and the whipped cream topping. The recipe uses 8 tablespoons divided, so part goes into the pudding and the rest into the cream.
A pinch of salt balances the sweetness. It makes the vanilla and banana flavors taste fuller.
Eggs help create a richer pudding. They add body and give the pudding a custard-like feeling.
Whole milk makes the pudding creamy. It gives the stovetop mixture the right richness without becoming too heavy.
Vanilla extract is a key flavor in the pudding. Using high-quality vanilla extract makes a noticeable difference.
Cold heavy cream is used for the whipped topping. It whips best when chilled and creates a light, fluffy texture.
Sweetened condensed milk adds a creamy sweetness to the whipped cream. It makes the topping feel richer and more special.
Mini Nilla wafers add texture and classic banana pudding flavor. They soften as the dessert chills, blending into the pudding layers.
Ripe bananas bring natural sweetness. Choose bananas that are ripe and just speckled for the best flavor and texture.
Directions
Step 1: Prepare Your Ingredients
Before you begin, gather all of the ingredients for the pudding, topping, and assembly. You will need cornstarch, sugar, salt, eggs, whole milk, vanilla extract, cold heavy cream, sweetened condensed milk, mini Nilla wafers, and ripe bananas.
Having everything ready makes the recipe much smoother. The pudding needs steady whisking once it goes on the stove, so it helps to measure first.
Choose bananas that are ripe but still firm. Very mushy bananas can affect the texture of the dessert.
Step 2: Start the Pudding Mixture
In a medium saucepan, add 2 tablespoons cornstarch, 4 tablespoons granulated sugar, and a pinch of salt. Whisk these dry ingredients together until evenly combined.
This step helps distribute the cornstarch before the liquid ingredients are added. It also prevents clumps from forming later.
A smooth pudding begins with properly mixed dry ingredients. Take a moment to whisk well before moving on.
Step 3: Add the Eggs
Crack 2 large eggs into the saucepan. Whisk them into the cornstarch and sugar mixture.
The eggs help make the pudding rich and creamy. They also help the mixture set as it cooks.
Whisk until the eggs are broken up and blended. The mixture should look smooth before adding the milk.
Step 4: Add the Whole Milk
Pour 2 cups of whole milk into the saucepan. Add it gradually if needed while whisking.
The milk turns the egg and cornstarch mixture into a pudding base. Whole milk gives the pudding a creamy texture.
Keep whisking until the mixture looks smooth and evenly combined. There should be no visible lumps of cornstarch.
Step 5: Add the Vanilla Extract
Add 1 tablespoon vanilla extract to the saucepan. Whisk it into the pudding mixture.
Vanilla is one of the main flavors in this dessert. It gives the pudding warmth and sweetness without overpowering the bananas.
Make sure the vanilla is fully blended. The pudding base should now smell lightly sweet and fragrant.
Step 6: Cook the Pudding
Place the saucepan over medium heat. Stir continuously as the mixture begins to warm.
Constant whisking is important because the pudding can form lumps if left still. Keep the whisk moving across the bottom and sides of the pan.
Cook for about 5 to 7 minutes. The pudding should gradually thicken and begin to bubble.
Step 7: Watch for the Right Texture
The pudding is ready when it coats the back of a spoon. It should look smooth, thick, and creamy.
If the pudding is still thin, keep cooking and whisking. It needs enough time for the cornstarch and eggs to thicken the mixture properly.
Do not walk away while it cooks. Staying close helps prevent lumps and keeps the texture silky.
Step 8: Remove the Pudding From the Heat
Once thickened, remove the saucepan from the heat. Let the pudding cool for a few minutes.
The pudding will be very hot at first. A short cooling time makes it easier to transfer.
Do not let it sit uncovered too long. Pudding can form a skin on the surface if exposed to air.
Step 9: Cover the Pudding Properly
Transfer the pudding to a bowl. Press plastic wrap directly onto the surface of the pudding.
This prevents a skin from forming as it cools. The plastic wrap should touch the pudding, not just cover the top of the bowl.
Set the pudding aside while you prepare the whipped cream topping. It should cool slightly before layering.
Step 10: Prepare the Cold Heavy Cream
Pour 2 cups of cold heavy cream into a separate mixing bowl. Cold cream whips better and holds its shape more easily.
Use a clean bowl for whipping. Any extra moisture or grease can affect the texture.
The cream will become the fluffy topping that finishes the dessert. Keeping it cold helps create stiff peaks.
Step 11: Add Sugar and Sweetened Condensed Milk
Add the remaining 4 tablespoons granulated sugar and 1 tablespoon sweetened condensed milk to the heavy cream. These ingredients sweeten and enrich the topping.
The sugar gives the cream sweetness, while the condensed milk adds a creamy depth. Together, they make the topping taste more luxurious.
Do not add extra liquid beyond what is listed. The topping needs to stay thick and fluffy.
Step 12: Whip the Cream
Using a hand mixer or stand mixer, whip the cream on medium speed. Continue whipping until stiff peaks form.
This usually takes about 3 to 5 minutes. Watch carefully so you do not overwhip.
Stiff peaks mean the cream holds its shape when the beaters are lifted. Stop once you reach that point.
Step 13: Avoid Overwhipping
Be careful not to whip the cream too long. Overwhipped cream can become grainy and eventually turn toward butter.
The whipped cream should be smooth, fluffy, and firm. It should look soft but structured.
Once ready, set it aside in the refrigerator if you are not assembling immediately. Keeping it chilled helps maintain the texture.
Step 14: Slice the Bananas
Slice 4 large ripe bananas into even pieces. Try to keep the slices similar in thickness.
Even slices make layering easier and give the dessert a better texture. Each spoonful should have a balanced amount of banana.
Use bananas that are ripe but firm. Bananas that are too soft can become mushy in the dessert.
Step 15: Prepare the Serving Dish
Choose a large serving dish or individual cups. Both options work beautifully.
A large dish feels classic and generous for family-style serving. Individual cups feel neat and elegant for parties.
Make sure the dish is deep enough for several layers. The layers are part of what makes this dessert so satisfying.
Step 16: Add the First Wafer Layer
Add 1 cup of mini Nilla wafers to the bottom of the serving dish. Spread them evenly.
The wafers create the first layer of texture. They will soften as the pudding chills.
Try to cover the bottom as evenly as possible. This helps every serving include wafers.
Step 17: Add the First Banana Layer
Place a layer of sliced bananas over the wafers. Spread them evenly so they cover the cookie layer.
The bananas add fresh sweetness and softness. They also bring the classic banana pudding flavor.
Do not pile all the bananas in one place. Even layering makes the dessert more balanced.
Step 18: Add the Pudding Layer
Spoon a generous layer of pudding over the bananas. Use a spatula to smooth it out gently.
The pudding should cover the bananas and wafers. It helps bind the layers together.
Spread carefully so you do not disturb the bananas too much. A smooth pudding layer makes the dessert look clean and inviting.
Step 19: Repeat the Layers
Continue layering mini Nilla wafers, sliced bananas, and pudding until all ingredients are used. Try to keep the layers even.
Repeating the layers gives the dessert its signature texture. Every spoonful should include cookies, bananas, and pudding.
Finish with a layer of pudding on top. This creates a smooth surface for the whipped cream.
Step 20: Add the Whipped Cream
Spread the whipped cream over the final pudding layer. Use a spatula to create a soft, fluffy topping.
The whipped cream makes the dessert look inviting and gives it a light finish. It also balances the richness of the pudding.
Spread it gently from edge to edge. The top should look smooth, creamy, and generous.
Step 21: Add Optional Crushed Wafers
For an extra indulgent touch, sprinkle crushed Nilla wafers over the whipped cream before serving. This adds a little crunch and makes the top look finished.
This step is optional, but it adds texture and visual appeal. It also hints at the cookie layers inside.
You can add the crushed wafers right before serving if you want them to stay crisp. If added earlier, they may soften during chilling.
Step 22: Cover and Chill
Cover the dish with plastic wrap and refrigerate for at least 2 hours. This chilling time is important.
As the dessert rests, the flavors meld and the layers settle. The wafers soften slightly, and the pudding becomes more cohesive.
Do not skip this step. Without enough chilling time, the dessert may be too loose and the flavor less developed.
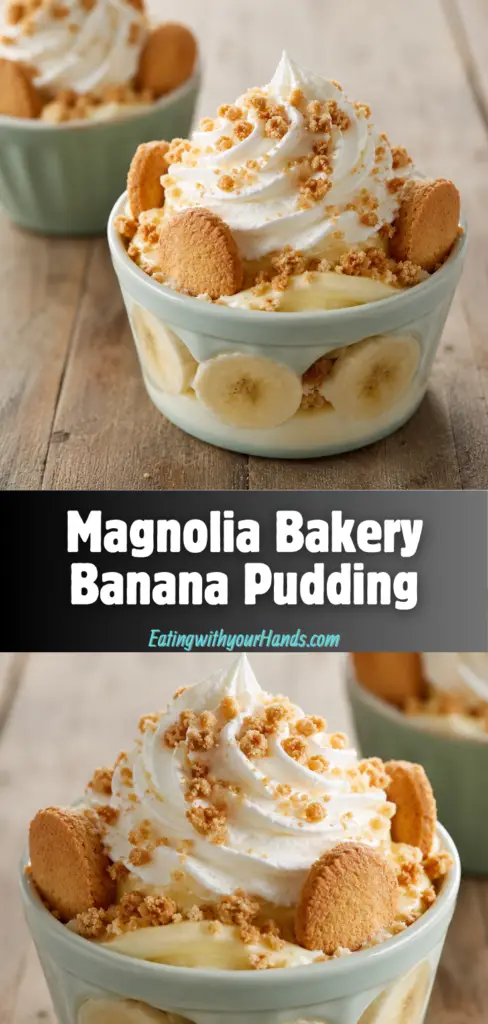
Step 23: Serve Chilled
Serve Magnolia Bakery Banana Pudding chilled. It can be served in individual cups or scooped from a large dish.
The texture should be creamy and layered, with soft wafers, sweet bananas, and fluffy whipped cream. Each spoonful should feel rich but comforting.
Garnish with crushed Nilla wafers or a slice of fresh banana if desired. This gives the dessert an elegant finishing touch.

Pro Tips for the Best Banana Pudding
Whisk the pudding constantly while cooking. This helps prevent lumps and gives the pudding a smooth texture.
Use ripe but firm bananas. Bananas that are too mushy can make the dessert overly soft.
Do not skip the chilling time. At least 2 hours in the refrigerator helps the layers set properly.
Stop whipping the cream once stiff peaks form. Overwhipping can ruin the texture.
Use high-quality vanilla extract for the best flavor. Since vanilla is a key part of the pudding, it makes a difference.
Variations
For a chocolate twist, add cocoa powder to the pudding. This creates a rich chocolate banana pudding.
Incorporate seasonal berries, such as strawberries or raspberries, for a fruity layer. They add color and freshness.
Try coconut cream instead of heavy cream for a tropical flavor. This gives the dessert a different creamy note.
Make it dairy-free by using almond or coconut milk and a dairy-free whipped topping. This adjusts the recipe for dairy-free needs.
Add a sprinkle of cinnamon or nutmeg for a warm spice flavor. This gives the pudding a cozy twist.
You can also add chopped nuts like pecans or walnuts for extra crunch. Make sure to skip nuts if you need a nut-free version.
Serving Suggestions
Serve Magnolia Bakery Banana Pudding chilled for the best texture. The cold pudding, soft wafers, and fresh bananas create the perfect spoonful.
You can serve it in a large dish for family-style gatherings. This feels classic and comforting.
Individual cups are also a lovely option. They make the dessert easy to portion and beautiful for parties.
Garnish with crushed Nilla wafers or a slice of fresh banana. These small touches make the dessert look polished.
It pairs wonderfully with a cup of coffee. It can also be served with a scoop of vanilla ice cream for extra indulgence.
Storage Tips
Store leftovers in an airtight container in the refrigerator for up to 3 days. Keep the pudding chilled until ready to serve again.
The texture is best within a short period because bananas can soften over time. The wafers will also continue to absorb moisture.
For longer storage, freeze the pudding without the whipped cream for up to a month. Thaw it in the refrigerator before serving.
If freezing, use an airtight container. This helps protect the pudding from freezer burn.
Make-Ahead Instructions
This recipe is perfect for making ahead. Prepare and layer the pudding, then refrigerate it for at least 2 hours or overnight.
The resting time allows the flavors to blend beautifully. It also helps the wafers soften into the creamy layers.
If making ahead for a gathering, add any crisp garnish close to serving time. This keeps crushed wafers from becoming too soft.
Common Mistakes to Avoid
Not whisking constantly can lead to lumpy pudding. Keep stirring while the pudding cooks.
Using overripe bananas can spoil the texture. Choose bananas that are ripe but still firm.
Skipping the chilling time can make the pudding runny. Let it chill for at least 2 hours.
Overwhipping the cream can turn it grainy. Stop once stiff peaks form.
Helpful Notes
For a richer flavor, try using homemade vanilla extract. Vanilla is central to the pudding’s flavor.
If you are short on time, store-bought pudding can be used, but it will not have the same depth of flavor. Homemade pudding gives the dessert its best taste.
For a gluten-free version, substitute the Nilla wafers with gluten-free vanilla cookies. This keeps the layered dessert style while adjusting for gluten-free needs.
Consider adding chopped nuts like pecans or walnuts for extra crunch. For a nut-free version, check that all ingredients are labeled nut-free.
High-quality vanilla extract and ripe bananas make a noticeable difference. Simple desserts depend on good ingredients.
Frequently Asked Questions
Can Magnolia Bakery Banana Pudding Be Frozen?
Yes, this dessert can be frozen, but it is best to freeze it without the whipped cream. The pudding itself can be stored in an airtight container for up to a month.
Thaw it in the refrigerator before serving. Add fresh whipped topping after thawing for the best texture.
Can Ingredients Be Substituted?
Yes, ingredients can be substituted. Nilla wafers can be replaced with gluten-free vanilla cookies if needed.
For a dairy-free option, use almond or coconut milk and a dairy-free whipped topping. Coconut cream can also be used instead of heavy cream for a tropical twist.
How Should I Store Leftovers?
Store leftovers in an airtight container in the refrigerator for up to 3 days. Keep the dessert chilled.
It is best enjoyed cold and within a few days. The bananas and wafers will continue softening over time.
Can This Recipe Be Made Ahead?
Yes, this recipe is excellent for making ahead. Prepare the pudding, layer the dessert, and refrigerate it for at least 2 hours or overnight.
The chilling time allows the flavors to meld beautifully. This makes it perfect for gatherings or special occasions.
Why Is My Pudding Lumpy?
Lumps can form if the pudding is not whisked constantly while cooking. Keep the whisk moving until the pudding thickens.
Make sure the cornstarch is combined well with the sugar and salt before adding liquids. This also helps prevent clumps.
What Bananas Work Best?
Use ripe bananas that are just speckled. They offer the sweetest flavor while still holding their shape.
Avoid very mushy bananas. They can make the dessert too soft and affect the texture.
Can I Use Store-Bought Pudding?
Yes, store-bought pudding can be used if you are short on time. However, the flavor will not have the same depth as homemade pudding.
The homemade version gives the dessert a richer and more comforting taste.
Final Thoughts
Magnolia Bakery Banana Pudding is the kind of dessert that feels sweet, creamy, nostalgic, and deeply comforting. It brings together homemade vanilla pudding, mini Nilla wafers, ripe bananas, and fluffy whipped cream in layers that soften and blend as they chill.
It is simple enough for beginner cooks, quick enough for last-minute dessert cravings, and special enough for gatherings. Whether served in individual cups or a large dish, it always feels generous and welcoming.
What makes this banana pudding memorable is not only the flavor, but the feeling it brings. The soft cookies, creamy pudding, fresh bananas, and whipped topping create a dessert that tastes like family, celebration, and comfort.
Make it ahead, let it chill, garnish it if you like, and serve it cold with the people you love. Every spoonful is creamy, sweet, and full of the kind of homemade joy that makes dessert feel like a memory.
Magnolia Bakery Banana Pudding

This Magnolia Bakery Banana Pudding is a rich, creamy dessert made with smooth homemade pudding, ripe bananas, mini Nilla wafers, and a fluffy whipped topping. The layers soften as they chill, creating a classic banana pudding texture that is sweet, comforting, and perfect for sharing.
Recipe Information
- Prep Time: 20 minutes
- Cook Time: 10 minutes
- Total Time: 30 minutes
- Course: Dessert
- Cuisine: American
- Servings: 8 people
- Calories: 350 kcal
Ingredients
For the Pudding
- 2 cups whole milk
Creates the creamy base for the pudding. - 1 pinch salt
Balances the sweetness and helps enhance the vanilla flavor. - 2 large eggs
Help thicken the pudding and give it a smooth, custard-like texture. - 1 tablespoon vanilla extract
Adds warm, classic flavor to the pudding. - 2 tablespoons cornstarch
Helps the pudding thicken properly as it cooks. - 8 tablespoons granulated sugar, divided
Sweetens both the pudding and the whipped topping.
For the Topping
- 1 tablespoon sweetened condensed milk
Adds extra sweetness and richness to the whipped cream. - 2 cups heavy cream, cold
Whips into a light, fluffy topping for the dessert.
For Assembly
- 4 large ripe bananas
Add fresh banana flavor and soft texture between the layers. - 4 cups mini Nilla wafers
Create the cookie layers that soften into the pudding as it chills.
Instructions
- In a saucepan, whisk together the cornstarch, 4 tablespoons of granulated sugar, and salt.
- Add the eggs, whole milk, and vanilla extract to the saucepan.
- Cook the mixture over medium heat, stirring constantly, until it thickens into a smooth pudding.
- Remove the pudding from the heat and let it cool.
- In a separate bowl, whip the cold heavy cream with the remaining granulated sugar and sweetened condensed milk until stiff peaks form.
- Slice the ripe bananas.
- In a serving dish, layer the mini Nilla wafers, sliced bananas, and cooled pudding.
- Repeat the layers as desired, then spread the whipped cream topping over the top.
- Refrigerate for at least 2 hours before serving so the layers can set and the wafers can soften.
Notes
- Use ripe bananas for the best flavor and natural sweetness.
- Add extra layers of wafers, bananas, and pudding if you want a fuller dessert.
- Keep the banana pudding refrigerated until ready to serve.

Fernando is the creator and writer behind the food blog Eating with your Hands. Living and working in cities like Paris, Barcelona, and Berlin, and being married to a Canadian foodie, has given Fernando a passion and interest in food and inspired him to run EWYH.