


There are some meals that feel bigger than the plate they arrive on. Nashville Hot Chicken Sandwiches have that kind of presence, because they come with heat, crunch, comfort, and the sort of bold flavor that makes everyone stop talking for a second after the first bite.
This is the kind of sandwich that feels made for lively tables and happy noise. It belongs at family lunches, weekend dinners, casual gatherings, and those warm-weather meals where good food seems to make everything feel more memorable.
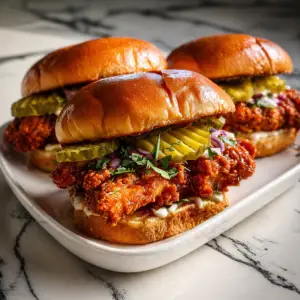
What makes this recipe so special is the contrast built into every layer. The chicken is crispy and juicy, the spice mix is bold and warming, the brioche bun is soft and slightly sweet, and the dill pickle chips add that sharp, refreshing crunch that keeps the whole sandwich balanced.
That contrast is exactly why this dish feels so satisfying. It is fiery and comforting at the same time, rich but not flat, crisp but still tender in the center, and full of the kind of flavor that lingers in the best way.
There is also something deeply nostalgic about fried chicken sandwiches done well. The smell of seasoned flour, hot oil, and freshly fried chicken filling the kitchen has a way of making the whole house feel alive.
This recipe captures that feeling beautifully. Even before the sandwiches are assembled, the aroma alone makes the meal feel like an event.
I think that is part of why dishes like this become favorites. They are not just about hunger, but about mood, memory, and that familiar excitement of gathering around food that feels generous and homemade.
These Nashville Hot Chicken Sandwiches also have a very approachable side. Even though they sound dramatic and restaurant-worthy, they are built from a simple list of ingredients and a method that is clear and manageable.
That makes them especially appealing for home cooks. You can make something bold and crowd-pleasing without needing a complicated process or a kitchen full of specialty tools.
And once they are stacked on those soft brioche buns with crunchy pickles tucked in, they become the kind of meal people remember. They are spicy, crisp, juicy, and just messy enough to feel fun.
Table of Contents
- What Are Nashville Hot Chicken Sandwiches?
- Why You’ll Love Nashville Hot Chicken Sandwiches
- Ingredients You’ll Need
- Chicken
- Buttermilk
- All-Purpose Flour
- Frying Oil
- Cayenne Pepper
- Light Brown Sugar
- Smoked Paprika
- Brioche Buns
- Dill Pickle Chips
- Step-by-Step Directions for Nashville Hot Chicken Sandwiches
- Preparing the Chicken
- Preparing the Breading Mixture
- Breading the Chicken
- Frying the Chicken
- Assembling the Sandwiches
- Variations to Try
- Spicy Honey Variation
- Buffalo Variation
- Vegetarian Variation
- Fresh Topping Variation
- Serving and Storage Tips
- Common Mistakes to Avoid
- Helpful Notes
- Frequently Asked Questions
- Why These Sandwiches Feel So Special
- Final Thoughts on Nashville Hot Chicken Sandwiches
- Nashville Hot Chicken Sandwiches
- Equipment
- Ingredients
- Instructions
- Notes
What Are Nashville Hot Chicken Sandwiches?
Nashville Hot Chicken Sandwiches are fried chicken sandwiches made with marinated chicken, a seasoned flour coating, and a spicy flavor profile built around cayenne pepper, brown sugar, and smoked paprika. They are served on brioche buns and topped with dill pickle chips for contrast and crunch.
The chicken is first soaked in buttermilk, which helps tenderize it and adds flavor. Then it is dredged in a seasoned flour mixture and fried until golden brown and crispy.
That already sounds delicious, but the real personality of the sandwich comes from the heat. The cayenne pepper brings the signature spicy character, while the brown sugar softens it slightly and the smoked paprika adds depth.
The brioche bun matters too. Its soft, buttery texture helps balance the crispness and spice of the chicken, while the pickles bring the bright, tangy finish that makes the whole sandwich feel complete.
This is a dish built on contrast, and that is exactly what makes it so lovable. Every bite gives you warmth, crunch, tenderness, and just enough sweetness to keep the heat feeling exciting rather than overwhelming.
Prep time is 15 minutes. Cook time is 20 minutes, making the total time 35 minutes.
The recipe serves 4 sandwiches. That makes it a great option for a family meal, a relaxed dinner with friends, or a small gathering where you want something memorable on the table.
Why You’ll Love Nashville Hot Chicken Sandwiches
One of the easiest things to love about this recipe is how quickly it comes together. In just 35 minutes, you can make a sandwich that feels bold, comforting, and special enough to serve proudly.
Another reason is the ingredient list. The recipe uses a relatively small number of staples, which means you get a lot of flavor without an overwhelming amount of prep.
It is also beginner-friendly. The source recipe keeps the process straightforward, making it easier for even less experienced cooks to get a crisp and flavorful result.
That matters because fried chicken can sound intimidating. Here, the steps stay simple enough that the dish feels exciting without feeling out of reach.
These sandwiches are also perfect for gatherings. Their bold flavor and satisfying texture make them the kind of meal people get excited about immediately.
The make-ahead option is another major benefit. The chicken can be marinated in advance, which makes the cooking process much easier when it is time to serve.
Most of all, these sandwiches feel fun. They are a little messy, deeply flavorful, and exactly the sort of meal that turns an ordinary lunch or dinner into something people talk about afterward.
Ingredients You’ll Need
This recipe uses a handful of practical ingredients, but each one contributes something important. Together, they create a sandwich that feels rich, spicy, juicy, and beautifully balanced.
Chicken
You will need 4 boneless, skinless chicken thighs or breasts. The source notes that thighs give more flavor and moisture, but breasts also work.
Chicken thighs are especially nice here because they stay juicy and flavorful. That richness works beautifully with the bold spice blend and crisp coating.
Buttermilk
You will need 1 cup of buttermilk for marinating. If buttermilk is unavailable, the source suggests mixing regular milk with a tablespoon of vinegar as a substitute.
The buttermilk is important because it tenderizes the chicken and helps season it gently before breading. It also helps the flour coating stick better later.
All-Purpose Flour
You will need 2 cups of all-purpose flour. This forms the crispy coating around the chicken.
Fresh flour is recommended for the best texture. Since the flour carries the spice mixture, it becomes much more than just a coating.
Frying Oil
You will need 3 cups of vegetable or peanut oil for frying. The source notes that peanut oil can add a mild nutty flavor.
The oil is what allows the breaded chicken to fry into that golden, crisp shell. A clean, hot oil helps create the best crunch.
Cayenne Pepper
You will need ½ cup of cayenne pepper. The source notes that this amount can be adjusted depending on your spice preference.
This is the ingredient that gives the sandwiches their signature heat. It is the fiery core of the recipe and part of what gives it that unmistakable Nashville-style energy.
Light Brown Sugar
You will need ¼ cup of light brown sugar. This balances the heat and brings a softer sweetness into the spice mix.
That sweetness matters. It keeps the spice from feeling harsh and gives the sandwich a better overall balance.
Smoked Paprika
You will need 2 tablespoons of smoked paprika. This adds warmth and a smoky depth to the seasoned coating.
Paprika helps round out the flavor so the heat feels layered instead of flat. It gives the sandwich more complexity without complicating the recipe.
Brioche Buns
You will need 4 brioche buns. Their soft, buttery texture makes them ideal for holding the crisp chicken and pickles.
The bun is not just a container here. It is part of the balance that keeps the sandwich from feeling too aggressive or too dry.
Dill Pickle Chips
You will need dill pickle chips to taste. These add the tangy, crunchy contrast that completes the sandwich.
Pickles are especially important in a sandwich this rich and spicy. They wake up the whole bite and add freshness in the middle of all that crispy heat.
Step-by-Step Directions for Nashville Hot Chicken Sandwiches
This recipe is very manageable, but each step matters. A little care with marinating, breading, and frying will give you the crisp, juicy, flavorful result that makes these sandwiches so satisfying.
Preparing the Chicken
Step 1: Pour the Buttermilk Into a Bowl
Start by pouring the buttermilk into a mixing bowl. This will be the marinade that helps tenderize the chicken and gently flavor it before frying.
A marinade like this makes a real difference. It helps the chicken stay juicy and gives the coating something to cling to later.
Step 2: Add the Chicken to the Buttermilk
Place the chicken thighs or breasts into the buttermilk. Make sure each piece is well coated.
This helps ensure the flavor and tenderness reach every piece evenly. A well-coated chicken piece will also be easier to bread later on.
Step 3: Cover and Marinate
Cover the bowl with plastic wrap and place it in the refrigerator for at least 30 minutes. The source also notes that overnight marination gives even deeper flavor if you have the time.
That extra time is helpful because it lets the buttermilk do its work. The longer rest can create even juicier, more flavorful chicken.
Preparing the Breading Mixture
Step 4: Mix the Flour and Spices
In a separate bowl, combine the flour, cayenne pepper, brown sugar, and smoked paprika. Stir until the mixture is even and the spices are fully distributed.
This is where the sandwich starts to take on its signature character. The flour becomes a spicy, smoky, slightly sweet coating that brings the whole dish to life.
Step 5: Heat the Oil
Pour the vegetable or peanut oil into a frying pan and heat it over medium-high heat. The source says it is ready when a pinch of flour sizzles when dropped in.
That detail is very useful because hot enough oil is essential for crispness. If the oil is too cool, the coating can absorb too much oil and lose its texture.
Breading the Chicken
Step 6: Remove the Chicken From the Marinade
Take the marinated chicken out of the refrigerator and lift each piece from the buttermilk. Let the excess drip off lightly.
You do not want the chicken dripping heavily, but you also do not want it dry. A light coating of buttermilk helps the flour mixture adhere properly.
Step 7: Dredge in the Seasoned Flour
Press each piece of chicken into the seasoned flour mixture until fully coated. Make sure every side is covered.
This coating is what creates the crisp outer shell. The more even it is, the more satisfying the final sandwich will be.
Frying the Chicken
Step 8: Fry the Chicken in Batches
Carefully place the breaded chicken into the hot oil. Fry for about 5 to 7 minutes on each side until golden brown and crispy.
The source warns against overcrowding the pan, and that matters a lot. Frying in batches helps keep the oil temperature steady and gives the coating a better texture.
Step 9: Check for Color and Crispness
As the chicken cooks, watch for a rich golden-brown color and a crisp surface. That outer shell is one of the most important parts of the sandwich experience.
This is where the kitchen starts to smell especially irresistible. The scent of spice and frying chicken creates that warm, hungry anticipation that makes the meal feel exciting.
Step 10: Drain on Paper Towels
Once the chicken is cooked, transfer it to a plate lined with paper towels. This helps absorb excess oil and keeps the exterior from feeling greasy.
That small step helps preserve the crisp texture. It also makes the finished sandwich feel a little cleaner and more balanced.
Assembling the Sandwiches
Step 11: Prepare the Brioche Buns
Cut the brioche buns in half. If you like, lightly toast them for a little extra structure and texture.
The source notes this as optional, but it is a lovely touch. A lightly toasted bun can stand up to the juicy chicken more easily.
Step 12: Add the Chicken to the Bottom Bun
Place one piece of crispy fried chicken on the bottom half of each bun. This creates the warm, savory center of the sandwich.
At this point, the sandwich already looks satisfying. The contrast between the golden chicken and the soft bun is part of what makes it so appealing.
Step 13: Add the Dill Pickle Chips
Top the chicken with dill pickle chips. These bring the tangy crunch that cuts through the richness and heat.
This step matters more than it might seem. Pickles are what keep the sandwich lively and balanced instead of simply heavy and spicy.
Step 14: Close the Sandwich
Place the top half of the bun over the pickles and press gently. This helps hold the layers together without flattening the sandwich too much.
Now the sandwich is ready to serve. It should feel warm, crisp, and just slightly messy in the best possible way.
Step 15: Serve Immediately
Serve the sandwiches right away while the chicken is still hot and crisp. This is when the texture and flavor feel most satisfying.
Freshly fried chicken is at its best straight away. The heat, crunch, and softness of the bun all come together most beautifully in that first warm serving.
Variations to Try
One of the strengths of this recipe is how easy it is to customize while keeping the same spicy, comforting foundation. Small changes can shift the mood of the sandwich without taking away its appeal.
Spicy Honey Variation
Step 1: Mix Honey With Hot Sauce
The source suggests drizzling honey mixed with a little hot sauce over the fried chicken. This adds an extra sweet-and-spicy finish that makes the sandwich feel even more layered.
That touch of honey can soften the heat in a lovely way. It also adds shine and a little extra richness to the chicken.
Buffalo Variation
Step 2: Toss the Fried Chicken in Buffalo Sauce
For a buffalo-style twist, toss the fried chicken in buffalo sauce before assembling the sandwiches. This changes the flavor profile but keeps the same bold and satisfying spirit.
Buffalo sauce adds a tangier kind of heat. It makes the sandwich feel sharper and a little more zesty.
Vegetarian Variation
Step 3: Replace Chicken With Fried Cauliflower or Eggplant
The source suggests crispy fried cauliflower or eggplant for a meatless option. This keeps the structure of the sandwich while changing the center.
Both options can carry the seasoning and crisp texture well. That makes this recipe surprisingly adaptable for different eaters.
Fresh Topping Variation
Step 4: Add Cabbage and Carrot Slaw
A crunchy slaw made with cabbage and carrots adds freshness and texture. The source mentions this as a great seasonal topping.
Slaw works especially well because it cools the heat and gives the sandwich a little more brightness. It also adds another layer of crunch.

Serving and Storage Tips
Serve Nashville Hot Chicken Sandwiches warm. The source suggests pairing them with crispy fries or a refreshing coleslaw, which makes a lot of sense given the boldness of the sandwich.
You can also offer ranch or blue cheese dressing on the side. These cooling sauces help balance the heat and give people a little more control over the final flavor.
Store leftovers in an airtight container in the refrigerator for up to 3 days. For best texture, store the fried chicken separately from the buns and toppings if possible.
The source also notes that fried chicken can be frozen before assembling. Freeze it for up to 2 months, then thaw and reheat in the oven to help bring back its crispiness.
Common Mistakes to Avoid
One common mistake is not marinating the chicken long enough. The source stresses at least 30 minutes, and that time helps keep the chicken juicy and flavorful.
Another issue is overcrowding the pan. Frying too many pieces at once lowers the oil temperature and can lead to soggier chicken.
The source also warns about oil temperature. If the oil is not hot enough, the coating absorbs too much oil and loses the crisp finish that makes the sandwich so enjoyable.
Finally, do not skimp on the seasoning in the flour mixture. The bold flavor is part of what gives the sandwich its identity, so the spices really matter here.
Helpful Notes
The source includes a gluten-free option by using gluten-free flour. That can be a very useful adjustment while keeping the same overall style of sandwich.
It also suggests serving the sandwich with cooling sides like coleslaw or ranch if the chicken feels too spicy. That is a smart reminder, because the heat can easily be balanced with the right pairings.
You can also add extras like sliced avocado or tomato for a fresh variation. These small additions do not change the spirit of the sandwich, but they do add more texture and contrast.
For a low-carb or allergy-friendly option, the source notes that you can use different buns or omit them entirely. That flexibility makes the recipe easier to adapt to different needs.
Frequently Asked Questions
Can the recipe be frozen?
Yes, the fried chicken can be frozen before assembling the sandwiches. The source recommends storing it in an airtight container or freezer bag for up to 2 months.
When ready to serve, thaw it in the refrigerator and reheat it in the oven. That helps preserve the crisp texture much better than softer reheating methods.
Can ingredients be substituted?
Absolutely. If you do not have buttermilk, the source says you can mix regular milk with a tablespoon of vinegar.
You can also use gluten-free flour for breading or replace the chicken with cauliflower or eggplant for a vegetarian version. The recipe is bold enough to support those changes without losing its overall appeal.
How should leftovers be stored?
Store leftover sandwiches in an airtight container in the refrigerator for up to 3 days. The source also suggests storing the chicken and buns separately if possible.
That approach helps preserve freshness and keeps the bread from getting too soft. It also makes reheating easier.
Can the recipe be made ahead?
Yes, the chicken can be marinated in advance for up to 24 hours. The source recommends frying it just before serving so it stays as crisp and delicious as possible.
That makes the recipe very useful for gatherings or planned dinners. The prep can happen early, and the final cooking can happen right before everyone eats.
Why These Sandwiches Feel So Special
Some sandwiches are just convenient. Others feel like a full experience, and these definitely belong in that second category.
Part of that comes from the heat. Spice has a way of making food feel lively and memorable, especially when it is balanced by sweetness, softness, and crunch.
Part of it comes from the texture. Crispy fried chicken inside a soft brioche bun with cool pickles creates a bite that feels full and satisfying in every possible way.
There is also the emotional side of it. This kind of sandwich feels made for sharing, for picnic tables, for loud kitchens, and for those meals where people keep talking long after the plates are mostly empty.
That is what makes it more than just lunch or dinner. It becomes part of the energy of the gathering.
Final Thoughts on Nashville Hot Chicken Sandwiches
Nashville Hot Chicken Sandwiches are the kind of meal that feel bold, comforting, and unforgettable all at once. With juicy fried chicken, a spicy seasoned coating, soft brioche buns, and crisp dill pickle chips, they create the kind of sandwich that people remember long after the meal is over.
What makes them so easy to love is that they balance intensity with comfort. The heat is real, but it is matched by sweetness, crunch, juiciness, and softness in a way that keeps every bite exciting.
The ingredients are simple, the steps are approachable, and the final result feels far more impressive than the effort required. That is often the sign of a truly great recipe.
Whether you serve them for a casual family dinner, a picnic, or a lively gathering with friends, they bring energy to the table. They are spicy, crisp, juicy, and wonderfully satisfying.
And in the end, that may be why they are so special. They do not just feed people.
They make the whole meal feel alive.
Nashville Hot Chicken Sandwiches
Nashville Hot Chicken Sandwiches are crispy, spicy, and packed with sweet-smoky flavor. This bold sandwich is a great pick for lunch or dinner when you want something crunchy, juicy, and full of heat.
- Prep Time: 15 minutes
- Cook Time: 20 minutes
- Total Time: 35 minutes
- Course: Dinner, Lunch
- Cuisine: American
- Servings: 4 sandwiches
- Calories: 450 kcal
Equipment
Frying pan
Mixing bowl
Ingredients
For Serving
- Brioche buns, 4 pieces
- Dill pickle chips, to taste, for serving
Spice Mix
- Cayenne pepper, ½ cup
- Light brown sugar, ¼ cup
- Smoked paprika, 2 tablespoons
Oil
- Vegetable or peanut oil, 3 cups, for frying
Breading
- All-purpose flour, 2 cups
Marinade
- Buttermilk, 1 cup
Chicken
- Boneless, skinless chicken thighs (or breasts), 4 pieces
Instructions
Place the chicken in buttermilk and let it marinate for at least 30 minutes.
Set up a breading station with the seasoned flour. Coat the marinated chicken in the flour, then fry until golden brown and cooked through.
To assemble, place the fried chicken on the brioche buns and top with dill pickle chips.
Notes
You can make the sandwiches milder or hotter by adjusting the amount of cayenne pepper in the spice mix.

Fernando is the creator and writer behind the food blog Eating with your Hands. Living and working in cities like Paris, Barcelona, and Berlin, and being married to a Canadian foodie, has given Fernando a passion and interest in food and inspired him to run EWYH.