

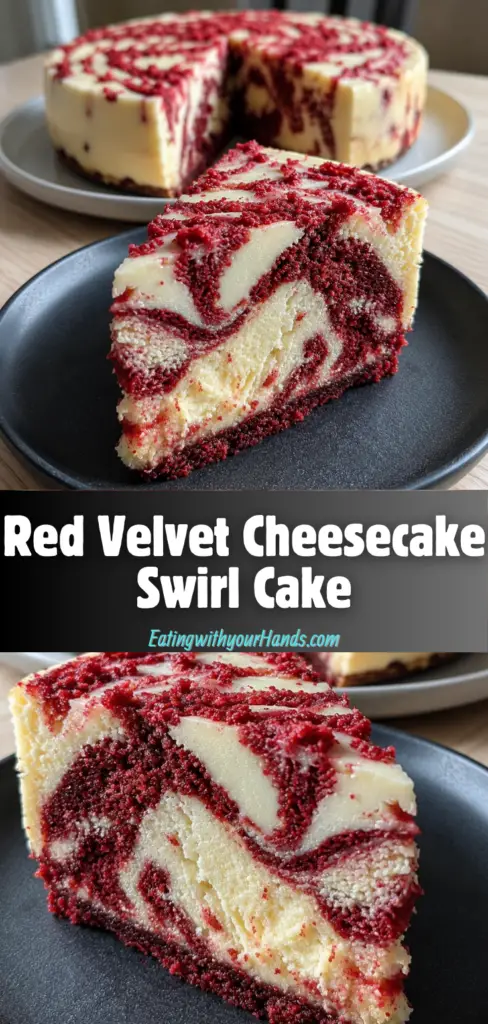
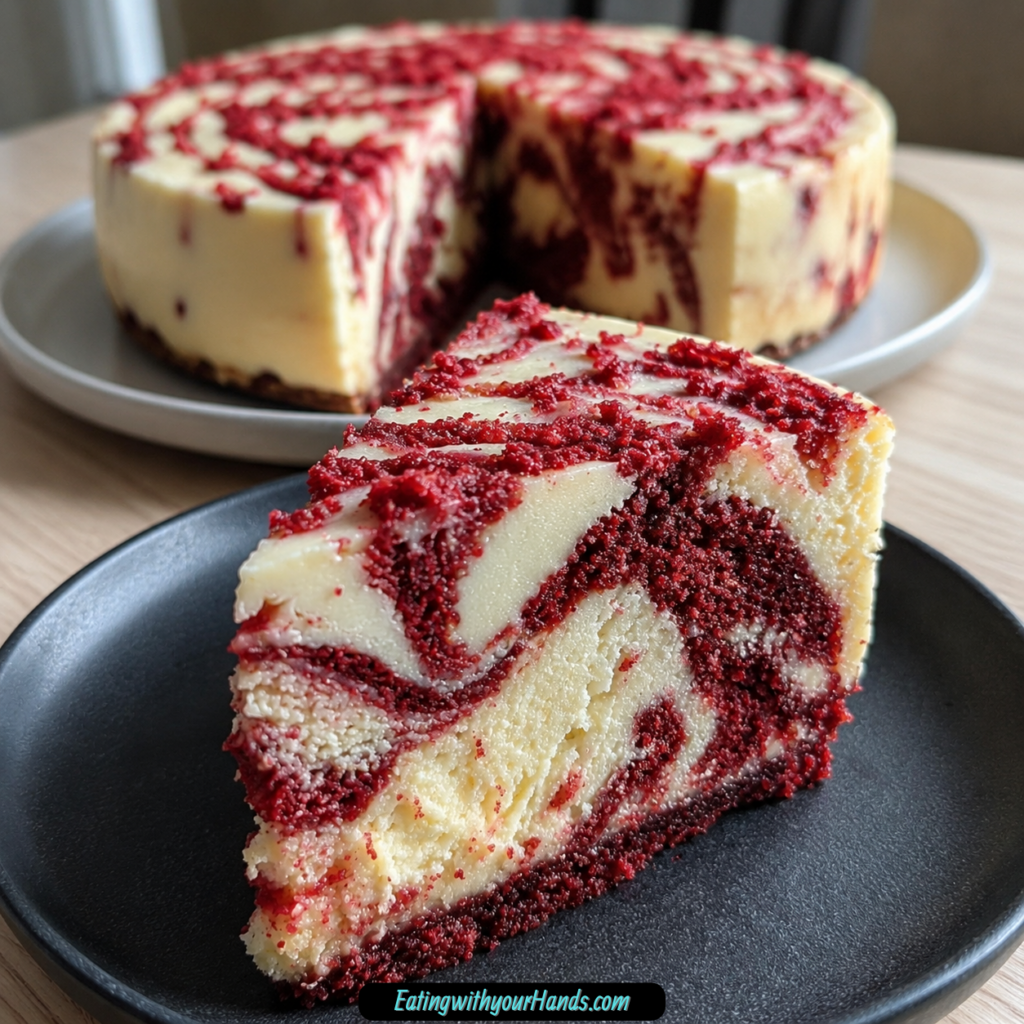
Some desserts have a way of stopping the whole room for a second. Red Velvet Cheesecake Swirl Cake is one of those cakes.
It is bold, beautiful, creamy, and rich, with a deep red velvet cake base and a smooth cheesecake swirl running through it. Every slice feels like two beloved desserts meeting in one showstopping cake.
I still think of this kind of cake as celebration food. It has that bright, dramatic color that makes a dessert table feel instantly more festive, but it also has the soft, tender texture that makes people come back for one more bite.
The red velvet cake brings gentle cocoa flavor, sweetness, moisture, and that signature red color. The cheesecake swirl adds creaminess, tang, and a soft contrast that makes the cake feel more special than a standard layer cake.
What I love most is that it looks impressive without being overly complicated. You mix the red velvet batter, mix the cheesecake filling, layer them together, swirl gently, bake, cool, and serve.
This Red Velvet Cheesecake Swirl Cake is perfect for birthdays, holidays, cozy family dinners, special gatherings, or any time you want a dessert that feels memorable. It is the kind of cake that turns an ordinary table into a celebration.
Table of Contents
- What Is Red Velvet Cheesecake Swirl Cake?
- Why You’ll Love This Red Velvet Cheesecake Swirl Cake
- Recipe Details
- Ingredients You’ll Need
- A Closer Look at the Ingredients
- The Beauty of the Cheesecake Swirl
- Directions
- Step 1: Preheat the Oven
- Step 2: Prepare the Cake Pan
- Step 3: Measure the Dry Ingredients
- Step 4: Mix the Dry Ingredients
- Step 5: Add the Buttermilk
- Step 6: Add the Vegetable Oil
- Step 7: Add the Eggs
- Step 8: Add the White Vinegar
- Step 9: Add the Red Food Coloring
- Step 10: Mix the Cake Batter
- Step 11: Check the Batter Texture
- Step 12: Soften the Cream Cheese
- Step 13: Beat the Cream Cheese
- Step 14: Add the Powdered Sugar
- Step 15: Add the Vanilla Extract
- Step 16: Pour the First Layer of Red Velvet Batter
- Step 17: Add the Cheesecake Mixture
- Step 18: Add the Remaining Red Velvet Batter
- Step 19: Create the Swirl
- Step 20: Smooth the Top Lightly
- Step 21: Bake the Cake
- Step 22: Cool the Cake in the Pan
- Step 23: Transfer to a Wire Rack
- Step 24: Serve at Room Temperature
- Helpful Tips for the Best Red Velvet Cheesecake Swirl Cake
- Variations
- Serving Suggestions
- Storage Tips
- Freezing Instructions
- Make-Ahead Notes
- Frequently Asked Questions
- Can I Freeze Red Velvet Cheesecake Swirl Cake?
- What Can I Use as a Substitute for Buttermilk?
- Can I Make This Cake Gluten-Free?
- Can I Make This Cake Dairy-Free?
- Can I Use Melted Butter Instead of Vegetable Oil?
- How Do I Get a Deeper Red Color?
- How Do I Keep the Cheesecake Swirl Smooth?
- How Do I Avoid Over-Swirling?
- Final Thoughts
- Red Velvet Cheesecake Swirl Cake
What Is Red Velvet Cheesecake Swirl Cake?
Red Velvet Cheesecake Swirl Cake is a moist red velvet cake with a creamy cheesecake mixture swirled through the batter before baking. The red velvet portion is made with flour, sugar, cocoa powder, baking soda, salt, buttermilk, oil, eggs, vinegar, and red food coloring.
The cheesecake swirl is made with cream cheese, powdered sugar, and vanilla extract. It is layered between portions of cake batter and gently swirled with a knife to create a marbled effect.
The result is a cake that is soft, colorful, creamy, and rich. It combines the familiar flavor of red velvet with the smooth texture of cheesecake.
This cake is also make-ahead friendly and freezer-friendly. That makes it especially convenient for celebrations, holidays, and special occasions.
Why You’ll Love This Red Velvet Cheesecake Swirl Cake
This cake is a true showstopper. The red velvet color and creamy cheesecake swirl make every slice look beautiful.
It combines two classic desserts in one treat. You get moist red velvet cake and smooth cheesecake in the same bite.
The prep time is only about 30 minutes. That makes it approachable enough for a weeknight treat but still special enough for a party.
The ingredients are simple and easy to work with. Flour, sugar, cocoa powder, baking soda, salt, buttermilk, oil, eggs, vinegar, red food coloring, cream cheese, powdered sugar, and vanilla come together without too much fuss.
The cake can be made ahead of time. It also freezes well, which is helpful when preparing for special occasions.
It is family-friendly and fun to make. The swirling step is especially enjoyable because it creates the marbled pattern that makes the cake unique.
Recipe Details
- Recipe name: Red Velvet Cheesecake Swirl Cake
- Prep time: About 30 minutes
- Oven temperature: 350°F (175°C)
- Bake time: About 45 minutes
- Main cake flavor: Red velvet with a subtle cocoa note
- Swirl: Cream cheese, powdered sugar, and vanilla extract
- Texture: Moist cake with creamy cheesecake ribbons
- Best served: At room temperature
- Storage: Airtight container in the refrigerator for up to 5 days
- Freezer-friendly: Yes, individual slices can be frozen for up to 3 months
- Gluten-free option: Use a good gluten-free 1:1 baking flour
- Dairy-free option: Use plant-based cream cheese and a dairy-free milk alternative
- Serving ideas: Whipped cream, vanilla ice cream, fresh berries, or chocolate sauce
Ingredients You’ll Need
For the Red Velvet Cake
- 2 cups all-purpose flour
- 1.5 cups granulated sugar
- 3 tablespoon unsweetened cocoa powder
- 1 teaspoon baking soda
- 1 teaspoon salt
- 1 cup buttermilk
- 1 cup vegetable oil
- 2 large eggs
- 1 teaspoon white vinegar
- 1 tablespoon red food coloring
For the Cheesecake Swirl
- 8 oz cream cheese
- 1 cup powdered sugar
- 1 teaspoon vanilla extract
A Closer Look at the Ingredients
All-purpose flour gives the cake its structure. A good gluten-free 1:1 substitute can be used if you need a gluten-free option.
Granulated sugar adds sweetness and helps keep the cake moist. It is essential to the texture and flavor of the red velvet batter.
Unsweetened cocoa powder gives the cake a subtle chocolate note. It does not turn the cake into a full chocolate cake, but it deepens the red velvet flavor.
Baking soda helps the cake rise. It works with the acidic ingredients to create a fluffy texture.
Salt enhances the flavor of the cake. It helps balance the sweetness and brings out the cocoa and vanilla notes.
Buttermilk adds moisture and acidity. If you do not have buttermilk, you can use yogurt or milk mixed with a splash of vinegar.
Vegetable oil keeps the cake soft and moist. Melted butter can be used as a flavorful alternative.
Eggs help bind the cake batter together. They also support the structure as the cake bakes.
White vinegar reacts with the baking soda and helps create a lighter texture. It is a classic part of the red velvet-style batter.
Red food coloring gives the cake its vibrant color. Gel food coloring can be used for a deeper, more dramatic red.
Cream cheese is the base of the cheesecake swirl. Full-fat block-style cream cheese at room temperature gives the best texture.
Powdered sugar sweetens the cheesecake mixture and helps it become smooth. It blends easily into the cream cheese.
Vanilla extract enhances the cheesecake flavor. It makes the swirl taste warm, sweet, and creamy.
The Beauty of the Cheesecake Swirl
The cheesecake swirl is what makes this cake feel extra special. It brings a creamy layer into the red velvet batter and creates a marbled look when sliced.
The swirl does not need to be perfect. In fact, the natural movement of the knife through the batter is what makes each cake unique.
The key is to swirl gently. Too much swirling can blend the cheesecake and red velvet together until the pattern disappears.
A few slow passes with a knife are enough. You want ribbons of cheesecake, not a completely mixed batter.
When the cake bakes, the cheesecake layer settles into the red velvet and creates a soft, creamy contrast. It makes every slice look beautiful and taste rich.
Directions
Step 1: Preheat the Oven
Preheat your oven to 350°F (175°C). This gives the oven time to heat evenly before the cake goes in.
A properly preheated oven helps the cake rise and bake at the right pace. If the oven is not hot enough, the texture may not set properly.
Let the oven heat while you prepare the pan, cake batter, and cheesecake mixture. This keeps the whole process moving smoothly.
Step 2: Prepare the Cake Pan
Grease your cake pan well so the cake does not stick after baking. Make sure to cover the bottom and sides.
This cake has a cheesecake swirl, so a well-prepared pan is important. It helps the cake release more cleanly after cooling.
Set the prepared pan aside while you mix the batters. You will need it ready once the red velvet cake batter is finished.
Step 3: Measure the Dry Ingredients
In a large mixing bowl, add 2 cups all-purpose flour, 1.5 cups granulated sugar, 3 tablespoon unsweetened cocoa powder, 1 teaspoon baking soda, and 1 teaspoon salt. These dry ingredients form the base of the red velvet cake.
Use a spoon or whisk to distribute everything evenly. This helps prevent pockets of baking soda, cocoa, or salt from ending up in one part of the cake.
The mixture should look evenly blended before the wet ingredients are added. Taking time here helps the batter come together more smoothly.
Step 4: Mix the Dry Ingredients
Stir the flour, sugar, cocoa powder, baking soda, and salt until well combined. Make sure the cocoa powder is not sitting in clumps.
Because cocoa powder can sometimes clump, break up any visible lumps with your whisk or spoon. This gives the cake a smoother texture.
Once mixed, the dry ingredients should look uniform. Now they are ready for the wet ingredients.
Step 5: Add the Buttermilk
Pour 1 cup buttermilk into the dry ingredients. Buttermilk adds moisture and helps create the classic red velvet texture.
If you do not have buttermilk, you can use yogurt or milk mixed with a splash of vinegar. Let the milk and vinegar mixture sit briefly before using if you make that substitute.
Add it slowly enough that it does not splash. It will begin loosening the dry ingredients right away.
Step 6: Add the Vegetable Oil
Add 1 cup vegetable oil to the mixing bowl. Oil helps keep the cake tender and moist.
Melted butter can be used instead if you want a richer flavor. The texture may be slightly different, but it is a flavorful option.
The batter will begin to look shiny as the oil mixes in. This is normal.
Step 7: Add the Eggs
Add 2 large eggs to the bowl. Eggs help bind the batter and give the cake structure.
Crack them in carefully to avoid shells. If preferred, crack them into a small bowl first, then add them to the batter.
Once added, they will help the dry and wet ingredients come together into a smoother mixture.
Step 8: Add the White Vinegar
Add 1 teaspoon white vinegar. This ingredient reacts with the baking soda and helps the cake bake with a fluffy texture.
The vinegar will not make the cake taste sour. It simply supports the red velvet structure.
Stir it into the batter along with the other wet ingredients. It should be evenly distributed.
Step 9: Add the Red Food Coloring
Add 1 tablespoon red food coloring. This gives the cake its signature red velvet color.
Gel food coloring can be used if you want a deeper, more vibrant red. Use the amount based on the result you want.
Stir carefully at first so the color does not splatter. The batter will begin turning red as it mixes.
Step 10: Mix the Cake Batter
Use a whisk or electric mixer to mix everything together until the batter is smooth and well combined. Do not worry if the batter looks a little runny.
Red velvet batter can be thinner than some other cake batters because of the oil and buttermilk. That is normal.
Mix only until the ingredients are fully combined. Avoid overmixing once the batter looks smooth.
Step 11: Check the Batter Texture
Look at the batter before moving on. It should be smooth, red, and pourable.
If you see flour streaks along the sides of the bowl, scrape them down and mix briefly. The batter should be even in color and texture.
Once the cake batter is ready, set it aside while you prepare the cheesecake swirl. Do not let it sit too long before assembling.
Step 12: Soften the Cream Cheese
Make sure the 8 oz cream cheese is at room temperature. Soft cream cheese blends much more smoothly.
Cold cream cheese can leave lumps in the cheesecake swirl. A smooth swirl gives the cake a better texture.
Use full-fat block-style cream cheese for the best result. It holds its structure well and creates a creamy layer.
Step 13: Beat the Cream Cheese
Place the cream cheese in another mixing bowl. Beat it until creamy and smooth.
There should be no lumps. Take a little time with this step because the cream cheese is the base of the swirl.
A smooth cream cheese mixture will spread and swirl more easily. It also bakes into a softer cheesecake ribbon.
Step 14: Add the Powdered Sugar
Add 1 cup powdered sugar to the cream cheese. Mix until combined.
Powdered sugar sweetens the cheesecake layer and blends easily. It helps create a smooth texture without graininess.
Start mixing slowly so the sugar does not puff out of the bowl. Increase speed once it begins blending.
Step 15: Add the Vanilla Extract
Add 1 teaspoon vanilla extract to the cheesecake mixture. Mix again until everything is combined and fluffy.
Vanilla makes the cheesecake layer taste warmer and more complete. It pairs beautifully with the red velvet cake.
The mixture should look creamy, sweet, and spreadable. It is now ready for assembly.
Step 16: Pour the First Layer of Red Velvet Batter
Pour half of the red velvet cake batter into the prepared pan. Spread it evenly across the bottom.
This bottom layer gives the cheesecake mixture a base to sit on. Try to cover the pan evenly so each slice has a good cake layer.
Use a spatula if needed to guide the batter into the corners or edges. The layer does not need to be perfect, but it should be even.
Step 17: Add the Cheesecake Mixture
Dollop the cheesecake mixture over the red velvet batter. Use spoonfuls and distribute them across the surface.
Once dolloped, gently spread the cheesecake mixture so it covers the cake batter. Be careful not to press too hard into the red velvet layer.
The cheesecake does not need to form a perfectly smooth sheet. It just needs to be distributed well enough to swirl later.
Step 18: Add the Remaining Red Velvet Batter
Pour the remaining red velvet cake batter over the cheesecake layer. Try to cover the cheesecake mixture as evenly as possible.
Use a spatula to spread the batter gently. Some cheesecake may still peek through, and that is fine.
This top layer helps create the marbled effect once you swirl with a knife. Work gently so the layers do not fully blend before swirling.
Step 19: Create the Swirl
Take a knife and gently drag it through the batter to create a marbled effect. Use slow, gentle motions.
Do not overdo this step. Too much swirling can blend the red velvet and cheesecake together and make the pattern less distinct.
A few passes through the batter are enough. You want visible ribbons of cheesecake running through the red velvet.
Step 20: Smooth the Top Lightly
After swirling, smooth the top very lightly if needed. Do not disturb the pattern too much.
The surface does not need to be perfectly flat. A little movement and texture make the cake look homemade and beautiful.
Once the swirl looks marbled, the cake is ready for the oven. Place it carefully on the center rack.
Step 21: Bake the Cake
Bake the cake in the preheated oven for about 45 minutes. The cake is done when a toothpick inserted into the center comes out clean.
Because of the cheesecake swirl, check the center carefully. The toothpick should not come out with wet red velvet batter.
The cake should look set and smell rich and sweet. Avoid opening the oven too often while it bakes.
Step 22: Cool the Cake in the Pan
Once baked, remove the cake from the oven. Let it cool in the pan for about 10-15 minutes.
This resting time helps the cake firm up before moving. A hot cake is more delicate and can break easily.
Letting it cool slightly also helps the cheesecake swirl settle. Do not rush this step.
Step 23: Transfer to a Wire Rack
After 10-15 minutes, carefully transfer the cake to a wire rack. Let it cool completely before serving.
Cooling fully improves the texture. It also makes slicing cleaner.
If the cake is still warm when cut, the cheesecake swirl may be softer. Waiting gives the best presentation.
Step 24: Serve at Room Temperature
Serve the Red Velvet Cheesecake Swirl Cake at room temperature for the best flavor and texture. This allows the cake to feel soft and the cheesecake swirl to taste creamy.
You can enjoy it plain or add toppings. It pairs well with whipped cream, vanilla ice cream, fresh berries, or chocolate sauce.
Slice carefully so the swirl shows in each piece. The marbled interior is part of what makes this cake so special.
Helpful Tips for the Best Red Velvet Cheesecake Swirl Cake
Use room-temperature cream cheese for the cheesecake swirl. This helps avoid lumps and creates a smoother filling.
Do not overmix the cake batter. Mix until smooth and combined, then stop.
Use gel food coloring if you want a deeper red color. It can create a more vibrant look.
Swirl gently with a knife. Too much swirling can make the cheesecake layer disappear into the red velvet batter.
Let the cake cool completely before serving. This helps the texture set and makes slicing easier.
For a richer flavor, use melted butter instead of vegetable oil. This is an optional swap from the helpful notes.
Variations
Add chocolate chips to the red velvet batter for a chocolate lover’s version. Mini chocolate chips can add extra texture.
Swirl in chocolate ganache for an even richer dessert. This creates a more intense chocolate flavor.
Add seasonal spices like cinnamon or nutmeg for a cozy twist. This is especially nice in fall.
Make a lighter version by using Greek yogurt instead of cream cheese in the swirl. The texture and flavor will change slightly.
For a dairy-free option, use plant-based cream cheese and a dairy-free milk alternative. This lets you adjust the cake for dairy-free needs.
Add lemon zest to the cheesecake layer for a refreshing citrus kick. The brightness works nicely with the creamy swirl.
Use melted butter instead of vegetable oil if you want more richness. This gives the cake a slightly different flavor.
Serving Suggestions
Serve Red Velvet Cheesecake Swirl Cake at room temperature. This gives the best balance of moist cake and creamy cheesecake texture.
Add a dollop of whipped cream for a simple finish. It makes the dessert feel extra soft and festive.
A scoop of vanilla ice cream pairs beautifully with the cake. The cool vanilla flavor works well with the red velvet and cheesecake.
Fresh berries make a pretty garnish. They add color and freshness to the plate.
A drizzle of chocolate sauce can make the cake feel more dramatic. This is perfect for celebrations.
Serve it for birthdays, holidays, family dinners, or special gatherings. It is the kind of dessert that looks impressive on any table.
Storage Tips
Store leftover cake in an airtight container in the refrigerator for up to 5 days. The cheesecake swirl means refrigeration is the best storage method.
Let the cake cool completely before storing. This helps prevent moisture from collecting inside the container.
For best flavor, let slices sit at room temperature briefly before serving. This softens the texture slightly.
Keep the cake covered so it does not dry out. Airtight storage helps preserve the moisture.
If storing individual slices, place parchment paper between them if needed. This helps keep them neat.
Freezing Instructions
Red Velvet Cheesecake Swirl Cake freezes well. Wrap individual slices tightly in plastic wrap once the cake is completely cooled.
Place the wrapped slices in an airtight container. Freeze for up to 3 months.
When ready to enjoy, thaw the slices in the refrigerator overnight. This helps the cheesecake swirl return to a good texture.
Serve after thawing. Let the slice sit briefly at room temperature if you prefer a softer bite.
Freezing individual slices makes it easy to enjoy the cake later without thawing the whole dessert.
Make-Ahead Notes
This cake can be made ahead for celebrations. Bake it, cool it completely, then refrigerate until ready to serve.
You can also freeze individual slices for future desserts. This is useful for holidays or special occasions when you want to prepare early.
If serving to guests, thaw frozen slices overnight in the refrigerator. Then bring them closer to room temperature before serving.
The cake is also easy to dress up right before serving. Add whipped cream, berries, ice cream, or chocolate sauce for a festive touch.
Frequently Asked Questions
Can I Freeze Red Velvet Cheesecake Swirl Cake?
Yes, you can freeze this cake. Once it is completely cooled, wrap individual slices tightly in plastic wrap and place them in an airtight container.
It will keep well in the freezer for up to 3 months. Thaw slices in the refrigerator overnight before serving.
What Can I Use as a Substitute for Buttermilk?
You can make a buttermilk substitute by mixing 1 cup regular milk with 1 tablespoon vinegar or lemon juice. Let it sit for about 5 minutes before using.
Yogurt can also be used as a substitute. The goal is to keep that needed acidity in the cake batter.
Can I Make This Cake Gluten-Free?
Yes, you can make this cake gluten-free by substituting the all-purpose flour with a good gluten-free 1:1 baking flour. This works well for maintaining the cake texture.
Make sure all other ingredients are also gluten-free if needed. Always check labels when baking for dietary restrictions.
Can I Make This Cake Dairy-Free?
Yes, use plant-based cream cheese and a dairy-free milk alternative. You can also use the appropriate substitute for buttermilk by combining dairy-free milk with vinegar.
The flavor and texture may change slightly, but the cake can still be delicious. Choose dairy-free products you already enjoy.
Can I Use Melted Butter Instead of Vegetable Oil?
Yes, melted butter can be used instead of vegetable oil. It gives the cake a richer flavor.
The texture may be slightly different, but it is a flavorful alternative. Use it if you prefer a buttery taste.
How Do I Get a Deeper Red Color?
Use gel food coloring for a deeper, more vibrant red. Gel coloring is often more concentrated.
Add it carefully and mix until the batter is evenly colored. The final color will also depend on the cocoa powder and batter mixture.
How Do I Keep the Cheesecake Swirl Smooth?
Use room-temperature full-fat block-style cream cheese. Beat it until completely smooth before adding the powdered sugar and vanilla.
Do not rush this step. Smooth cream cheese creates the best swirl texture.
How Do I Avoid Over-Swirling?
Use a knife and make only a few gentle passes through the batter. Stop while you can still see separate red velvet and cheesecake areas.
Over-swirling blends the layers too much. The goal is a marbled effect, not a fully mixed batter.
Final Thoughts
Red Velvet Cheesecake Swirl Cake is the kind of dessert that feels joyful before you even slice it. The color is bold, the swirl is creamy, and the flavor brings together red velvet cake and cheesecake in one beautiful treat.
It is perfect for celebrations, but it is also simple enough to make when you want something special at home. With about 30 minutes of prep and a straightforward baking process, it feels impressive without being overwhelming.
The cake is moist, rich, and full of contrast. The red velvet layer brings subtle cocoa flavor and softness, while the cheesecake swirl adds creamy sweetness.
Whether you serve it with whipped cream, vanilla ice cream, berries, or chocolate sauce, this cake is made for sharing. It is a celebration on a plate, filled with color, comfort, and the kind of sweetness that makes memories around the table.
Red Velvet Cheesecake Swirl Cake

This Red Velvet Cheesecake Swirl Cake is a rich, eye-catching dessert that combines soft red velvet cake with a smooth cream cheese swirl. The cake has a light cocoa flavor, a tender buttermilk crumb, and a beautiful red color, while the cheesecake layer adds creamy sweetness in every slice. It is a lovely dessert for birthdays, holidays, celebrations, or anytime you want a red velvet cake that feels a little more special than the classic version.
Recipe Details
- Prep Time: 30 minutes
- Cook Time: 45 minutes
- Total Time: 1 hour 15 minutes
- Course: Dessert
- Cuisine: American
- Servings: 8 people
- Calories: 350 kcal
Equipment
- Mixing bowl
- Cake Pan
Ingredients
For the Cheesecake Swirl
- 1 teaspoon Vanilla Extract Enhances flavor.
- 1 cup Powdered Sugar Essential for sweetness in the frosting.
- 8 oz Cream Cheese Use full-fat block-style at room temperature.
For the Cake
- 1 cup Vegetable Oil Melted butter is a flavorful alternative.
- 1 teaspoon White Vinegar Reacts with baking soda for a fluffy texture.
- 1 tablespoon Red Food Coloring Opt for gel food coloring for deeper color.
- 1 cup Buttermilk Can substitute with yogurt or milk mixed with vinegar.
- 1 teaspoon Salt Enhances flavor.
- 2 cup All-Purpose Flour A good gluten-free 1:1 substitute works well.
- 2 large Eggs The binding agent.
- 3 tablespoon Unsweetened Cocoa Powder Offers a subtle chocolate note.
- 1.5 cup Granulated Sugar Essential for sweetness and moisture.
- 1 teaspoon Baking Soda Acts as a leavening agent.
Instructions
Step 1: Prepare the Oven and Pan
Preheat your oven to 350°F (175°C).
Grease your cake pan and set it aside.
Step 2: Make the Red Velvet Batter
In a mixing bowl, combine all the cake ingredients.
Mix until the batter is smooth and evenly blended.
Step 3: Prepare the Cheesecake Swirl
In another bowl, beat the cream cheese until smooth.
Add the powdered sugar and vanilla extract, then mix until creamy and fully combined.
Step 4: Layer the Batter
Pour half of the red velvet cake batter into the prepared cake pan.
Dollop the cheesecake mixture over the batter.
Pour the remaining cake batter over the top.
Step 5: Create the Swirl
Use a knife to gently swirl the cheesecake mixture into the cake batter.
Avoid over-swirling so the cheesecake ribbons stay visible after baking.
Step 6: Bake the Cake
Bake for 45 minutes, or until a toothpick inserted into the cake comes out clean.
Step 7: Cool and Serve
Allow the cake to cool before slicing.
Serve once the texture has set and the cheesecake swirl is firm enough to cut cleanly.
Notes
You can add chocolate chips to the batter for extra texture.
Serving Suggestions
This red velvet cheesecake swirl cake pairs well with:
- Hot coffee
- Iced coffee
- Black tea
- Fresh strawberries
- Whipped cream
- Vanilla ice cream
- A light dusting of powdered sugar
Storage
How to Store
Store leftover cake in an airtight container in the refrigerator.
How to Serve Later
Let chilled slices sit at room temperature for a few minutes before serving so the cake softens slightly and the cheesecake swirl tastes creamier.

Fernando is the creator and writer behind the food blog Eating with your Hands. Living and working in cities like Paris, Barcelona, and Berlin, and being married to a Canadian foodie, has given Fernando a passion and interest in food and inspired him to run EWYH.