
Some desserts do more than satisfy a sweet craving. They bring back the feeling of a full kitchen, a busy table, and the kind of laughter that seems to gather naturally whenever chocolate and caramel are involved.
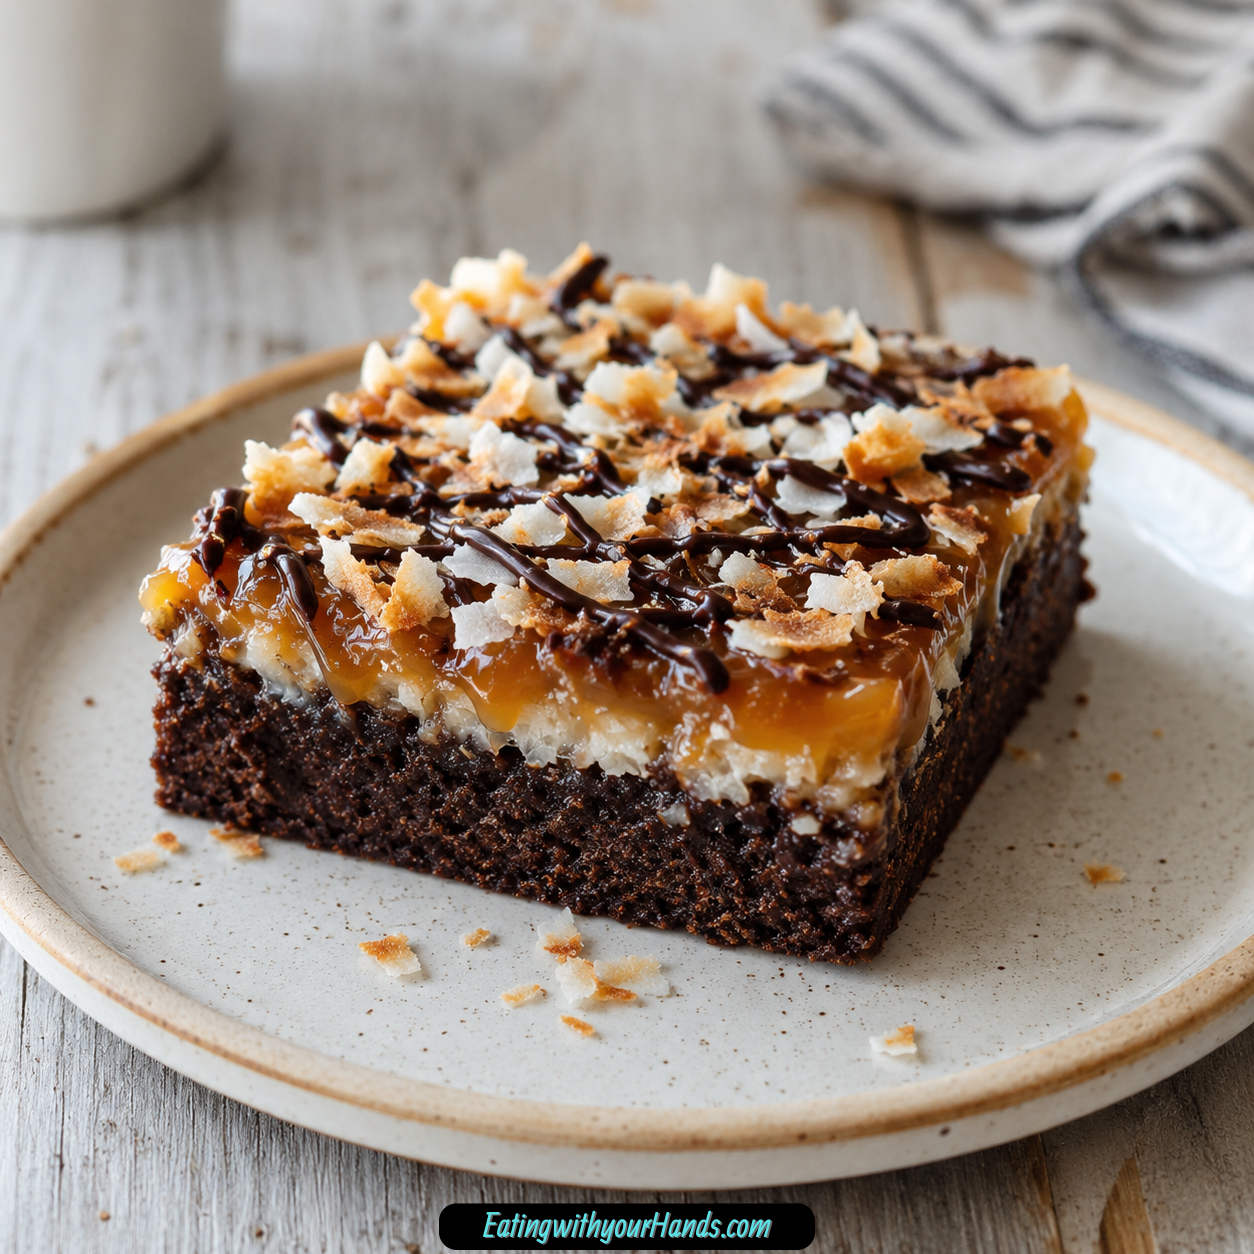
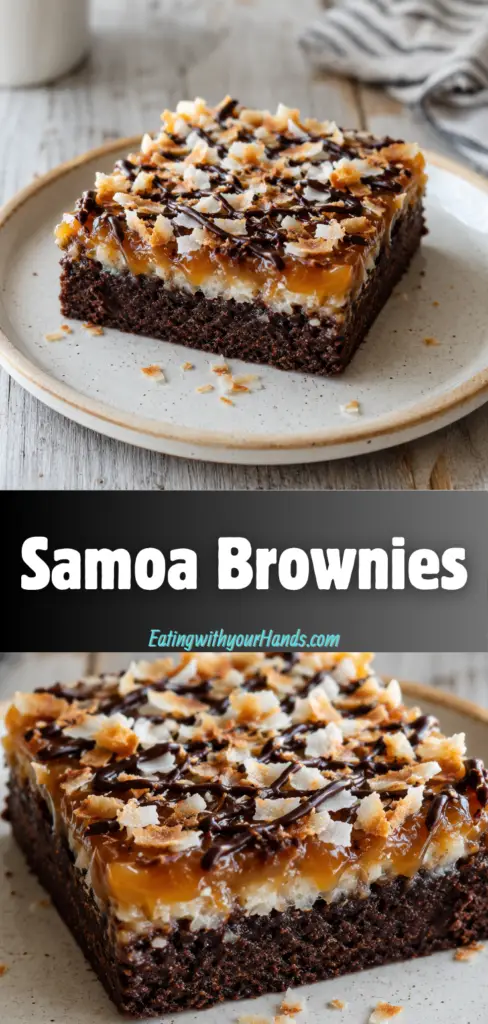
Samoa Brownies are exactly that kind of dessert. They begin with a soft, fudgy brownie base, then get dressed up with gooey caramel, toasted shredded coconut, and a smooth drizzle of melted semi-sweet chocolate.
Every bite has a little bit of everything. The brownie is rich and tender, the caramel is sticky and sweet, the coconut adds chew and warmth, and the chocolate drizzle ties everything together in a way that feels both nostalgic and indulgent.
This recipe is simple enough for a casual evening but special enough for parties, potlucks, birthdays, holidays, or any gathering where you want a dessert that disappears quickly. It uses an easy brownie mix base, which keeps the process approachable while still delivering a beautiful, bakery-style finish.
Table of Contents
- What Are Samoa Brownies?
- Why This Recipe Feels So Special
- Recipe Overview
- Why You’ll Love Samoa Brownies
- Ingredients You’ll Need
- Ingredient Notes
- Directions
- Step 1: Gather Your Ingredients
- Step 2: Preheat the Oven
- Step 3: Line the Baking Pan
- Step 4: Prepare the Brownie Batter
- Step 5: Add Optional Nuts
- Step 6: Pour the Batter Into the Pan
- Step 7: Bake the Brownies
- Step 8: Avoid Overbaking
- Step 9: Cool the Brownies in the Pan
- Step 10: Toast the Coconut
- Step 11: Spread the Caramel Topping
- Step 12: Add the Toasted Coconut
- Step 13: Melt the Chocolate Chips
- Step 14: Drizzle the Chocolate
- Step 15: Let the Brownies Set
- Step 16: Lift the Brownies From the Pan
- Step 17: Slice Into Squares
- Step 18: Serve and Enjoy
- Pro Tips for the Best Samoa Brownies
- Variations
- Serving Suggestions
- Storage Tips
- Freezing Instructions
- Make-Ahead Instructions
- Common Mistakes to Avoid
- Helpful Notes
- Frequently Asked Questions
- Final Thoughts
- Samoa Brownies
What Are Samoa Brownies?
Samoa Brownies are fudgy brownies topped with caramel, toasted coconut, and melted chocolate. They are inspired by the beloved Samoa cookie flavor combination of chocolate, caramel, and coconut.
This dessert takes that familiar flavor and turns it into a soft, rich brownie bar. Instead of a cookie base, you get a chocolatey brownie layer that feels dense, tender, and satisfying.
The topping is what makes these brownies stand out. A generous layer of caramel ice cream topping spreads over the cooled brownies, then toasted shredded coconut is pressed gently into the caramel.
Finally, melted semi-sweet chocolate chips are drizzled over the top. Once the brownies set, every square has layers of chocolate, caramel, and coconut in each bite.
Why This Recipe Feels So Special
There is something magical about the smell of brownies baking. It fills the kitchen with warmth before the dessert is even finished.
Then comes the toasted coconut. Its aroma is sweet, nutty, and cozy, and it makes the whole recipe feel more homemade.
The caramel gives the brownies a gooey richness that turns a simple brownie mix into something memorable. It creates that sticky, sweet layer that makes everyone pause after the first bite.
The chocolate drizzle adds the final touch. It makes the brownies look beautiful and gives them another layer of chocolate flavor.
Recipe Overview
Prep Time: 10 minutes
Cook Time: 30 minutes
Total Time: 40 minutes
Servings: 12 brownies
This recipe comes together quickly, with only 10 minutes of prep time. The brownies bake for about 25 to 30 minutes, then the toppings are added after cooling.
The recipe makes 12 brownies, which makes it perfect for sharing. You can cut them into generous squares for dessert plates or smaller pieces for a party tray.
Why You’ll Love Samoa Brownies
You will love this recipe because it is easy but still feels impressive. Starting with brownie mix keeps the process simple, while the caramel, coconut, and chocolate make the final dessert feel special.
The preparation is quick. With just 10 minutes of hands-on time before baking, this recipe fits easily into a busy schedule.
The ingredients are simple and easy to find. Brownie mix, shredded coconut, caramel ice cream topping, and chocolate chips come together in a way that tastes rich and indulgent.
This recipe is beginner-friendly. Even if you do not bake often, the steps are straightforward and forgiving.
It is also perfect for gatherings. The rich chocolate, gooey caramel, and toasted coconut make these brownies a crowd-pleasing dessert for casual nights and celebrations alike.
Ingredients You’ll Need
1 box brownie mix, prepared according to package directions
2 cups shredded coconut, toasted for added flavor
16 ounces caramel ice cream topping, for a rich, gooey finish
½ cup semi-sweet chocolate chips, melted for drizzling on top
Ingredient Notes
Brownie mix forms the base of the recipe. Prepare it according to the package directions so the texture turns out as intended.
Shredded coconut brings the Samoa-inspired flavor. Toasting it adds warmth, depth, and a slightly nutty aroma.
Caramel ice cream topping creates the sweet, gooey layer. It spreads easily and helps the coconut adhere to the brownies.
Semi-sweet chocolate chips are melted and drizzled over the top. High-quality chocolate chips can make the final flavor even better.
You can also add chopped pecans or walnuts to the brownie batter before baking if you want a nutty twist. This is optional, but it adds texture and richness.
For a gluten-free option, use a gluten-free brownie mix and make sure the toppings are also gluten-free. This keeps the flavor while adjusting the recipe for dietary needs.
Directions
Step 1: Gather Your Ingredients
Start by gathering the brownie mix, shredded coconut, caramel ice cream topping, and semi-sweet chocolate chips. If you plan to add nuts, set those out as well.
Having everything ready makes the baking process smoother. This is especially helpful because the recipe moves quickly once the brownies are baked and cooled.
You will also need an 8×8 inch baking pan, parchment paper, a mixing bowl, a spatula, and a microwave-safe bowl for melting the chocolate. These simple tools make the process easier from start to finish.
Step 2: Preheat the Oven
Preheat your oven to 350°F. This gives the oven time to reach the proper baking temperature before the brownie batter goes in.
A fully preheated oven helps the brownies bake evenly. If the oven is not hot enough, the center may take longer to set and the edges may bake unevenly.
While the oven heats, you can prepare the pan and mix the brownie batter. This keeps the timing easy and efficient.
Step 3: Line the Baking Pan
Line an 8×8 inch baking pan with parchment paper. Leave a little overhang on the sides so the brownies can be lifted out after cooling.
The parchment paper makes removal much easier. It also helps prevent the caramel topping from sticking to the pan.
Smooth the parchment into the corners as best you can. A neatly lined pan makes the brownies easier to slice later.
Step 4: Prepare the Brownie Batter
In a mixing bowl, prepare the brownie mix according to the package directions. Whisk or stir until the batter is smooth.
Follow the instructions on your specific box because different mixes may call for slightly different additions. The goal is to create the brownie base exactly as intended.
The batter should look thick, glossy, and chocolatey. Stir only until combined so the texture stays fudgy.
Step 5: Add Optional Nuts
If you want extra flavor and crunch, fold ½ cup chopped nuts into the brownie batter. Pecans or walnuts both work well.
This step is optional. The brownies are delicious without nuts, but nuts add a rich, slightly crunchy contrast to the caramel and coconut topping.
Fold gently so the nuts are evenly distributed. Avoid overmixing the batter.
Step 6: Pour the Batter Into the Pan
Pour the brownie batter into the prepared 8×8 inch baking pan. Use a spatula to spread it evenly from corner to corner.
An even layer helps the brownies bake consistently. Try to smooth the top without pressing too hard.
Make sure the batter reaches all edges of the pan. This helps create evenly sized brownies once they are cut.
Step 7: Bake the Brownies
Place the pan in the preheated oven. Bake the brownies for about 25 to 30 minutes, or according to the package directions.
The brownies are ready when a toothpick inserted into the center comes out with a few moist crumbs. You do not want it completely wet, but you also do not want the brownies overbaked.
Keep an eye on them near the end of the baking time. Fudgy brownies are best when they stay soft and moist.
Step 8: Avoid Overbaking
Check the brownies carefully as they bake. Overbaking can make them dry and less fudgy.
A few moist crumbs on the toothpick are a good sign. That means the center is set but still soft.
If the toothpick comes out with wet batter, bake a little longer. If it comes out completely dry, the brownies may be firmer than ideal.
Step 9: Cool the Brownies in the Pan
Once baked, remove the brownies from the oven and let them cool in the pan for about 10 minutes. This gives the base time to settle.
Cooling helps the brownies hold together before adding the toppings. If the caramel is added while they are too hot, it may melt too much and slide around.
Letting the brownies rest also makes the texture better. They become easier to handle as they cool.
Step 10: Toast the Coconut
Toast 2 cups shredded coconut until fragrant and lightly golden. Keep a close eye on it because coconut can brown quickly.
Toasting brings out the coconut’s flavor and adds a warm, nutty aroma. This step makes the topping taste much better than plain coconut.
Let the toasted coconut cool slightly before adding it to the caramel layer. Warm coconut is fine, but it should not be scorching hot.
Step 11: Spread the Caramel Topping
Once the brownies have cooled, drizzle or spread 16 ounces of caramel ice cream topping over the surface. Use a spatula to help spread it evenly.
The caramel should cover the brownies in a generous layer. This creates the gooey center between the brownie and coconut.
Try to spread it all the way to the edges. That way, every brownie square gets caramel in each bite.
Step 12: Add the Toasted Coconut
Sprinkle the toasted shredded coconut evenly over the caramel layer. Cover the surface as evenly as possible.
The caramel helps the coconut stick to the brownies. Press the coconut gently so it adheres without crushing the brownie layer.
This topping gives the brownies their Samoa-inspired flavor. The toasted coconut adds chew, sweetness, and depth.
Step 13: Melt the Chocolate Chips
Place ½ cup semi-sweet chocolate chips in a microwave-safe bowl. Melt them in 30-second intervals, stirring after each interval.
Continue until the chocolate is smooth. Stirring between intervals helps prevent the chocolate from scorching.
The melted chocolate should be glossy and pourable. If needed, stir a little longer to smooth out any remaining small pieces.
Step 14: Drizzle the Chocolate
Drizzle the melted chocolate over the coconut topping. You can use a spoon to create thin lines across the surface.
This final drizzle adds flavor and makes the brownies look beautiful. It also ties the chocolate brownie base to the caramel-coconut topping.
Drizzle lightly or generously depending on your preference. Either way, the chocolate gives the brownies a finished look.
Step 15: Let the Brownies Set
Allow the brownies to set for at least 30 minutes before cutting. This gives the caramel and chocolate time to firm slightly.
If you cut too soon, the topping may slide and the squares may look messy. Waiting helps create cleaner slices.
Let them sit at room temperature until the topping feels stable. You can also chill them briefly if you want firmer cuts.
Step 16: Lift the Brownies From the Pan
Use the parchment paper overhang to lift the brownies out of the pan. Place them on a cutting board.
This is one of the reasons parchment paper is so helpful. It makes removing the brownies much easier and helps protect the topping.
Be gentle as you lift. The caramel and coconut topping can be sticky, so move slowly.
Step 17: Slice Into Squares
Use a sharp knife to cut the brownies into 12 squares. Wipe the knife between cuts if the caramel sticks.
Clean cuts help the layers look beautiful. The brownie, caramel, coconut, and chocolate should all be visible.
Cut them larger for a rich dessert or smaller for a party platter. Either way, they will be sweet, fudgy, and indulgent.
Step 18: Serve and Enjoy
Arrange the Samoa Brownies on a platter and serve. They are delicious at room temperature.
For an extra indulgent dessert, serve them with vanilla ice cream or whipped cream. The creamy side pairs beautifully with the fudgy brownies and caramel topping.
A sprinkle of extra toasted coconut on top can make the presentation even prettier. It also adds a little more texture.

Pro Tips for the Best Samoa Brownies
Do not overbake the brownie base. A fudgy texture makes the caramel and coconut topping even better.
Use parchment paper. It makes lifting and slicing the brownies much easier.
Toast the coconut for better flavor. Toasted coconut tastes warmer, richer, and more aromatic.
Let the brownies cool before adding toppings. This helps the caramel stay in place.
Allow the topped brownies to set before slicing. This gives you cleaner squares and a better texture.
Variations
For a minty twist, add 1 teaspoon peppermint extract to the brownie batter. This gives the dessert a cool flavor note.
For a seasonal fall version, add pumpkin spice to the brownie mix. This creates a warm spice flavor with the chocolate.
Try a peanut butter drizzle instead of chocolate for a nutty flavor. It changes the topping while keeping the brownies rich.
For a gluten-free version, use a gluten-free brownie mix and make sure all toppings are gluten-free. This keeps the dessert accessible.
Add crushed nuts like pecans or almonds for extra crunch and flavor. They can go into the batter or on top.
You can also add a pinch of sea salt on top to enhance the chocolate flavor. The salt balances the sweetness of the caramel.
Serving Suggestions
Serve Samoa Brownies at room temperature for the best texture. The caramel will be soft, the brownie will be fudgy, and the coconut topping will be chewy.
Cut them into generous squares for dessert plates. For parties, cut them smaller so guests can enjoy them as a bite-sized treat.
They pair wonderfully with vanilla ice cream. The cold ice cream contrasts with the rich chocolate and caramel.
A dollop of whipped cream also works well. It lightens the richness and makes the dessert feel extra special.
For a prettier presentation, sprinkle a little toasted coconut over the platter. It gives the brownies a warm, finished look.
Storage Tips
Store leftover Samoa Brownies in an airtight container at room temperature for up to 3 days. Keep them covered so the brownies stay soft.
For longer storage, place them in the refrigerator for up to a week. Let them come to room temperature before serving for the best taste.
The caramel topping can become firmer when chilled. Bringing the brownies back to room temperature helps restore a softer texture.
If stacking the brownies, separate layers with parchment paper. This helps prevent the caramel topping from sticking.
Freezing Instructions
Samoa Brownies can be frozen for up to 3 months. Let them cool completely before freezing.
Cut them into squares and place them in an airtight container or freezer bag. If stacking, use parchment paper between layers.
Thaw the brownies in the refrigerator before serving. This helps them soften gradually and keeps the texture better.
For the best flavor, let them come to room temperature after thawing. The brownie and caramel layers will taste richer when not too cold.
Make-Ahead Instructions
This recipe is perfect for making ahead. You can prepare the brownies a day in advance and add the toppings before serving.
You can also fully assemble the brownies ahead of time. Let them set, cover them well, and store them until ready to serve.
Making them ahead allows the caramel and coconut flavors to settle together beautifully. It also saves time on the day of your gathering.
If you want the chocolate drizzle to look fresh, add it after the caramel and coconut have set slightly. This gives the top a clean finish.
Common Mistakes to Avoid
Overbaking the brownies can make them dry. Check for moist crumbs with a toothpick.
Skipping the cooling time can make the toppings messy. Let the brownie base cool before adding caramel and coconut.
Not using parchment paper can make removal difficult. The caramel layer is sticky, so parchment helps a lot.
Using low-quality chocolate can affect flavor. High-quality chocolate chips give a better drizzle and richer taste.
Cutting too soon can make the layers slide. Let the brownies set before slicing.
Helpful Notes
For a dairy-free option, use dairy-free chocolate chips and caramel sauce. Make sure the brownie mix and any required package ingredients also fit your needs.
You can substitute the boxed brownie mix with homemade brownie batter for a richer flavor. The topping method remains the same.
Add a pinch of sea salt on top to enhance the chocolate flavor. This balances the caramel sweetness beautifully.
For a fun twist, mix in crushed pretzels for a salty crunch. The salty texture works well with caramel and chocolate.
Fresh shredded coconut and high-quality chocolate chips can improve the final flavor. Simple recipes often taste best when the ingredients are good.
Frequently Asked Questions
Can Samoa Brownies Be Frozen?
Yes, Samoa Brownies can be frozen. Let them cool completely, then cut them into squares.
Place the squares in an airtight container or freezer bag. They can be frozen for up to 3 months.
Thaw them in the refrigerator before serving. For the best taste, let them come to room temperature before eating.
Can Ingredients Be Substituted?
Yes, this recipe is flexible. You can use any brand of brownie mix you like.
For a gluten-free option, use a gluten-free brownie mix and make sure the toppings are gluten-free. You can also swap semi-sweet chocolate chips for dark chocolate or milk chocolate.
How Should I Store Leftovers?
Store leftover Samoa Brownies in an airtight container at room temperature for up to 3 days. This keeps them soft and easy to enjoy.
If you want them to last longer, refrigerate them for up to a week. Let them come to room temperature before serving for the best flavor.
Can This Recipe Be Made Ahead?
Yes, this recipe is great for making ahead. You can prepare the brownies a day in advance and add the toppings just before serving.
You can also fully assemble them ahead of time. Letting the toppings set makes slicing easier.
Why Are My Brownies Dry?
The brownies may have been overbaked. Check them near the end of baking and look for a toothpick with a few moist crumbs.
A completely dry toothpick can mean the brownies have baked too long. Fudgy brownies should stay soft in the center.
Why Is My Topping Sliding Off?
The brownies may have been too warm when the caramel was added. Let the brownie base cool before topping.
The brownies may also need more setting time before slicing. Let them rest at least 30 minutes so the caramel and chocolate can firm up.
What Can I Serve With Samoa Brownies?
Serve them with vanilla ice cream, whipped cream, or an extra sprinkle of toasted coconut. These additions make the dessert feel even more indulgent.
They are also delicious on their own. The caramel, coconut, chocolate, and fudgy brownie base already create a complete dessert.
Final Thoughts
Samoa Brownies are the kind of dessert that brings together everything people love about chocolate, caramel, and coconut. The brownie base is soft and fudgy, the caramel topping is rich and gooey, the toasted coconut adds warmth and chew, and the chocolate drizzle makes each square feel finished.
They are easy enough for a casual baking day and special enough for gatherings. With just 10 minutes of prep and a few simple toppings, you can turn a boxed brownie mix into a dessert that looks beautiful and tastes deeply satisfying.
What makes these brownies memorable is the way the layers work together. Each bite has sweetness, richness, texture, and a little nostalgia.
Bake them, let the kitchen fill with that chocolate-caramel aroma, and share them with the people you love. Samoa Brownies are more than a quick dessert; they are a sweet, cozy reminder that the best treats are often the ones enjoyed together.
Samoa Brownies
These Samoa Brownies are a rich, easy dessert inspired by the classic combination of chocolate, caramel, and coconut. A fudgy brownie base is finished with a sweet caramel layer, shredded coconut, and a drizzle of melted semi-sweet chocolate.
Recipe Information
- Prep Time: 10 minutes
- Cook Time: 30 minutes
- Total Time: 40 minutes
- Course: Dessert
- Cuisine: American
- Servings: 12 brownies
- Calories: 250 kcal
Equipment
- Oven
- Mixing bowl
Ingredients
For the Brownies
- 1 box brownie mix, prepared according to the package directions
Creates the chocolate brownie base for the dessert.
For the Topping
- ½ cup semi-sweet chocolate chips, melted
Adds a rich chocolate drizzle over the finished brownies. - 2 cups shredded coconut
Gives the brownies their signature coconut texture and flavor. - 16 ounce caramel ice cream topping
Creates a sweet, gooey caramel layer over the brownies.
Instructions
- Prepare the brownie mix according to the package directions.
- Bake the brownies as directed on the package.
- Let the brownies cool completely before adding the topping.
- Spread the caramel ice cream topping evenly over the cooled brownies.
- Sprinkle the shredded coconut over the caramel layer.
- Drizzle the melted semi-sweet chocolate chips over the top.
- Let the brownies set before slicing into squares.
Notes
- Allow the brownies to set fully before cutting so the topping stays in place.
- For extra coconut flavor, lightly toast the shredded coconut before adding it.
- Store leftovers in an airtight container.

Fernando is the creator and writer behind the food blog Eating with your Hands. Living and working in cities like Paris, Barcelona, and Berlin, and being married to a Canadian foodie, has given Fernando a passion and interest in food and inspired him to run EWYH.