
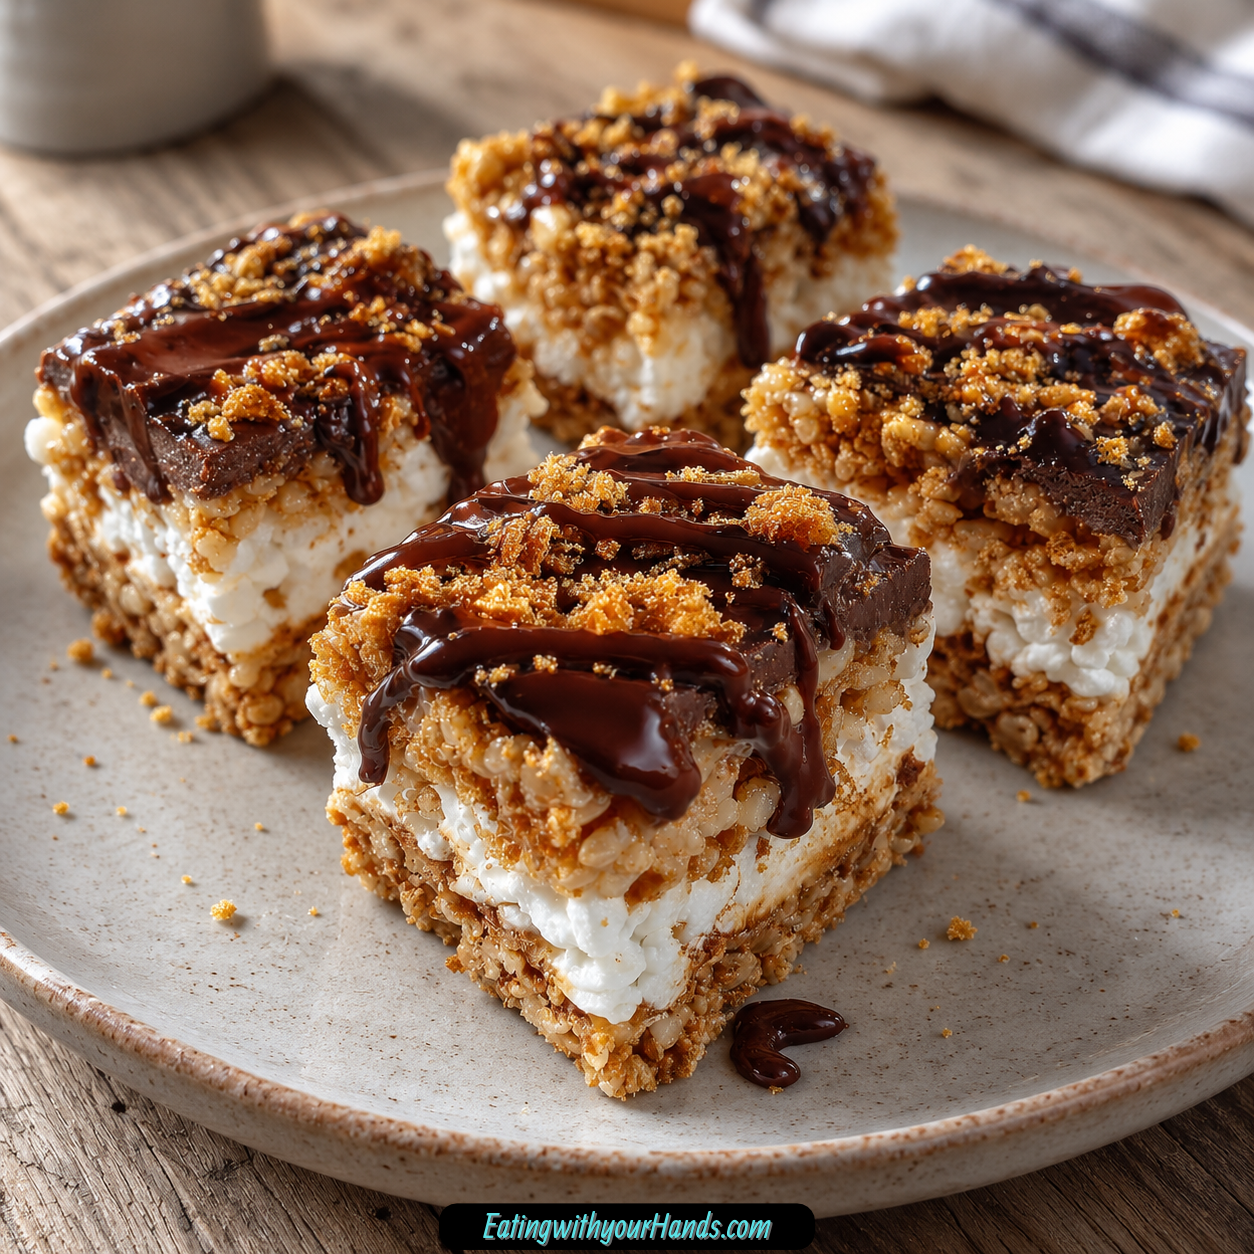

The first time I made S’mores Sushi, I was trying to come up with something playful enough to impress a room full of kids without committing to a complicated baking project. What happened instead was one of those happy dessert surprises where a simple idea became the first thing everyone reached for.
The inspiration came from classic s’mores, but I wanted something easier to serve at a birthday party and much less messy than building individual toasted sandwiches. Turning those familiar flavors into neat little sushi-style rectangles made the whole dessert feel instantly more fun.
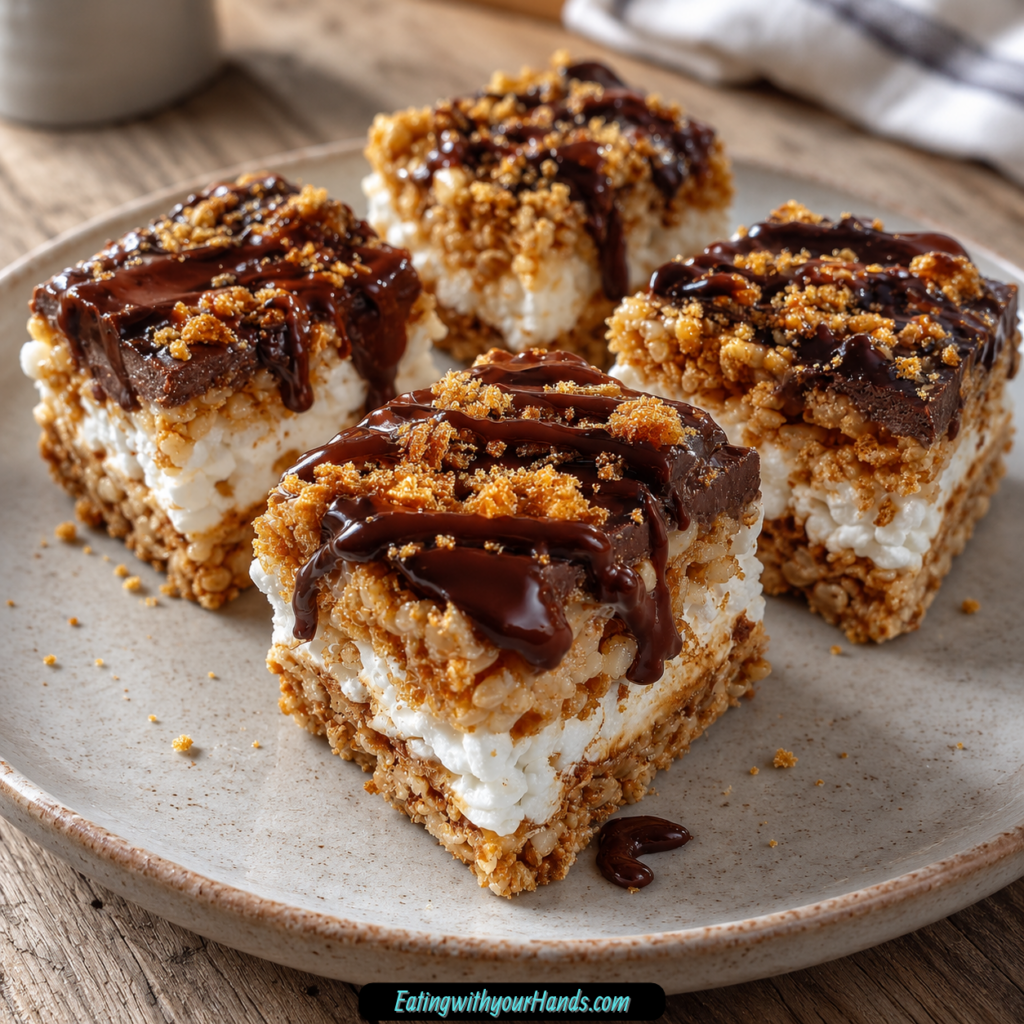
The base brings that unmistakable crispy cereal crunch, while the marshmallow layer keeps everything soft and gooey. Graham crackers add the campfire flavor people expect, and melted chocolate ties the entire thing together.
What I love most is the contrast. Every bite has crisp, fluffy, chewy, crunchy, and melty elements all stacked into a small piece that disappears in a couple of bites.
The name makes people smile before they even taste one. There is no actual sushi involved, of course, but the compact shape makes the dessert feel playful and unexpected.
It is also wonderfully low-stress. There is no oven, no dough, no frosting, and no complicated decorating technique standing between you and a full platter.
This is exactly the kind of dessert I make when the weather is too warm to bake or when I need something fast for a party. The whole recipe is built around melt, mix, layer, set, and slice.
And once the extra melted chocolate comes out for dipping, the platter rarely lasts long. Kids love the shape, adults love the nostalgia, and somehow everyone ends up reaching for another piece.
Table of Contents
- Why You’ll Love This S’mores Sushi
- Ingredients for S’mores Sushi
- Why the Rice Krispies Base Matters
- Why Mini Marshmallows Are So Useful
- Marshmallow Fluff Creates the Gooey Layer
- Graham Crackers Add the Campfire Flavor
- Why Semisweet Chocolate Works So Well
- Equipment You’ll Need
- How to Make S’mores Sushi
- Step 1: Prepare the Baking Dish
- Step 2: Melt the Butter
- Step 3: Melt the Mini Marshmallows
- Step 4: Add the Rice Krispies
- Step 5: Press the Base Into the Pan
- Step 6: Let the Base Cool
- Step 7: Spread the Marshmallow Fluff
- Step 8: Add the Graham Crackers
- Step 9: Melt the Chocolate
- Step 10: Drizzle or Spread the Chocolate
- Step 11: Let Everything Set
- Step 12: Prepare the Knife
- Step 13: Cut Into Sushi-Sized Pieces
- Step 14: Serve With Extra Chocolate
- Tips for the Best S’mores Sushi
- Why You Shouldn’t Over-Press the Base
- Peanut Butter Variation
- White Chocolate Variation
- Caramel Variation
- How to Use Regular Marshmallows
- What to Do Without Marshmallow Fluff
- Serving S’mores Sushi at Parties
- Serving for Summer Gatherings
- Why Fresh Is Best
- Storage
- Humid Weather Storage
- Freezing S’mores Sushi
- Frequently Asked Questions
- Nutritional Information
- The Dessert That Stole the Birthday Table
- S’mores Sushi Recipe
Why You’ll Love This S’mores Sushi
The biggest advantage is that this is a no-bake dessert. You only need the stovetop long enough to melt the butter and marshmallows, and the rest is simple assembly.
It is also especially kid-friendly. The small pieces are easy to hold, and the sushi-inspired shape turns an ordinary crispy treat into something that feels like a party activity.
The flavors are instantly recognizable. Marshmallow, graham cracker, crispy rice cereal, butter, and chocolate bring all the familiar s’mores notes without needing a campfire.
The recipe also works beautifully for gatherings. The finished pieces can be arranged on a platter, served with melted chocolate, and passed around without plates or forks.
Another reason I love it is how flexible the topping can be. Peanut butter, white chocolate, sprinkles, or caramel can all change the mood without changing the basic structure.
Most importantly, it feels fun from beginning to end. Even the layering process has that playful quality that makes the dessert as enjoyable to assemble as it is to eat.
Ingredients for S’mores Sushi
The ingredient list is short, but each part creates a distinct layer of texture and flavor. Together, they build the crisp, gooey, chocolatey bite that makes this dessert so hard to resist.
- ¼ cup butter
- 10 oz mini marshmallows
- 5 cups Rice Krispies cereal
- 2 cups marshmallow Fluff
- 1 cup crushed graham crackers
- 1 cup semisweet chocolate chips, melted
- Extra melted chocolate, for serving
Salted or unsalted butter can both work. Use whichever one you already have on hand.
Mini marshmallows are especially convenient because they melt quickly and evenly. Regular marshmallows can be used too, but cutting them into smaller pieces makes the melting process easier.
Why the Rice Krispies Base Matters
The crispy cereal layer gives the dessert its structure. Without it, the marshmallow and chocolate would be too soft to cut neatly into sushi-style pieces.
Five cups of cereal create enough volume for the base while keeping the texture light. The goal is to coat the cereal evenly without crushing it.
The marshmallow-butter mixture acts as the binder. Once pressed into the pan and cooled, it holds the cereal together firmly enough for the later layers.
Work quickly once the cereal goes into the saucepan. The mixture begins setting as it cools, so fast mixing gives you the best chance of even coating.
Why Mini Marshmallows Are So Useful
Mini marshmallows melt faster than larger ones. That makes it easier to create a smooth, glossy mixture without stubborn unmelted pieces.
The recipe uses 10 oz, which creates enough marshmallow to bind the cereal without making the base overwhelmingly sticky. Constant stirring over low heat keeps the mixture from scorching.
If you only have regular marshmallows, cut them into smaller pieces first. Smaller chunks melt more evenly and reduce the chance of ending up with rubbery pockets.
The heat should stay low throughout the process. Marshmallow can burn quickly once it begins softening.
Marshmallow Fluff Creates the Gooey Layer
Two cups of marshmallow Fluff sit directly over the cooled cereal base. This gives the dessert a softer, creamier marshmallow layer than the cereal mixture alone can provide.
The Fluff is spread after the base has cooled for about 10 minutes. That brief wait keeps the layers from blending together too aggressively.
Do not worry about making the surface perfectly smooth. A slightly rustic layer still tastes exactly the same once the graham crackers and chocolate go on.
This middle layer is what gives the finished pieces that unmistakable s’mores chew. It also helps the graham cracker crumbs stick in place.
Graham Crackers Add the Campfire Flavor
One cup crushed graham crackers brings the flavor that makes the dessert feel truly like s’mores. Without them, the recipe would taste more like a chocolate-covered cereal treat.
Crush the crackers fairly fine but leave a few small chunks for texture. Those slightly larger pieces create little pockets of crunch in the finished bar.
Sprinkle the crumbs over the marshmallow Fluff while it is still tacky. Then press them gently so they adhere without sinking completely into the marshmallow.
The graham cracker layer also helps separate the Fluff from the melted chocolate. That makes each bite feel more layered and distinct.
Why Semisweet Chocolate Works So Well
Semisweet chocolate provides enough sweetness to feel indulgent without overpowering the already-sweet marshmallow layers. One cup melted chocolate chips is enough to cover the top in drizzles or a thin spread.
You can drizzle the chocolate in zigzags for a more decorative look. Spreading it smoothly creates a cleaner, more uniform top.
Extra melted chocolate is especially fun for dipping. It turns each piece into something that feels a little more like dessert fondue.
Let the chocolate sit long enough to set before slicing. That helps the edges look cleaner and keeps the top from smearing across the knife.
Equipment You’ll Need
A 9×13-inch baking dish gives the cereal mixture enough room to spread into an even layer. It also becomes the surface that shapes the dessert before slicing.
A large saucepan is needed for melting the butter and marshmallows. Choose one with enough room to stir in all 5 cups of cereal comfortably.
A spatula is helpful for pressing and spreading. A sharp knife becomes especially important at the end when you want neat sushi-sized rectangles.
Running the knife under hot water can make slicing easier. Dry it before cutting so extra water does not affect the chocolate or marshmallow.
How to Make S’mores Sushi
The key to this recipe is moving quickly while the marshmallow mixture is warm and then being patient while the layered dessert sets. Once the base is firm, the remaining steps are easy and forgiving.
Step 1: Prepare the Baking Dish
Grease a 9×13-inch baking dish thoroughly with butter or baking spray. Pay special attention to the corners and edges where marshmallow mixtures tend to cling.
Set the dish close to the stove before you begin melting anything. Once the cereal mixture is ready, you will want to transfer it immediately.
A well-greased pan makes both pressing and slicing much easier. It also helps the finished pieces release without tearing.
Step 2: Melt the Butter
Place ¼ cup butter in a large saucepan over low heat. Let it melt gently without browning.
Once the butter is fully liquid, keep the heat low. High heat is unnecessary and makes the marshmallow stage harder to control.
Swirl the butter through the bottom of the pan so it coats the surface. This helps reduce sticking when the marshmallows are added.
Step 3: Melt the Mini Marshmallows
Add 10 oz mini marshmallows to the melted butter. Stir constantly over low heat until the mixture becomes smooth and glossy.
This usually takes about 3–4 minutes. Keep scraping the bottom and sides of the saucepan so nothing sits in one place long enough to burn.
Do not walk away during this step. Marshmallows can change from soft to scorched surprisingly quickly.
Step 4: Add the Rice Krispies
Remove the saucepan from the heat as soon as the marshmallow mixture is smooth. Immediately add the 5 cups Rice Krispies cereal.
Stir quickly until every piece looks coated. Use a folding motion so the cereal stays crisp instead of being crushed.
The mixture will begin firming as it cools. Work efficiently so you can transfer it before it becomes difficult to shape.
Step 5: Press the Base Into the Pan
Transfer the cereal mixture into the greased 9×13-inch dish. Spread it from corner to corner.
Use a spatula or lightly greased hands to press it into an even layer. Keep the pressure firm enough to create structure but not so aggressive that the cereal becomes compact and hard.
If using your hands, a light coating of cooking spray can help prevent sticking. Smooth the surface as evenly as possible.
Step 6: Let the Base Cool
Allow the cereal layer to cool for about 10 minutes. You want it to stop steaming and become more stable before the next layer goes on.
Do not wait until it becomes rock-hard. The surface should still have enough softness to hold the toppings.
This short cooling stage creates separation between the cereal base and marshmallow Fluff. It also keeps the Fluff from melting into the lower layer.
Step 7: Spread the Marshmallow Fluff
Spoon the 2 cups marshmallow Fluff over the cooled cereal base. Spread it gently from edge to edge.
A spatula works best, though the Fluff can be sticky. Move slowly and avoid pulling too hard on the cereal layer underneath.
Do not worry about perfect smoothness. Small swirls and unevenness will disappear visually once the graham crackers and chocolate are added.
Step 8: Add the Graham Crackers
Sprinkle the 1 cup crushed graham crackers evenly over the marshmallow Fluff. Cover as much of the surface as possible.
Press the crumbs very gently with the back of a spoon or your fingertips. The goal is simply to help them stick.
Leave a few slightly larger graham pieces if you enjoy extra crunch. The mix of fine crumbs and small chunks gives the layer more character.
Step 9: Melt the Chocolate
Melt the 1 cup semisweet chocolate chips until smooth. Stir until there are no unmelted pieces remaining.
Keep the texture fluid enough to drizzle. If you prefer a smooth top, prepare enough working time to spread the chocolate before it begins setting.
The chocolate should be warm and pourable rather than scorching hot. Excess heat is unnecessary and can disturb the marshmallow layer.
Step 10: Drizzle or Spread the Chocolate
Drizzle the melted chocolate over the graham cracker layer using a spoon. Zigzags create a playful look that fits the sushi presentation.
If you prefer a more polished finish, spread the chocolate into a thin, even layer. Either approach works equally well for flavor.
Try to reach all parts of the pan. The chocolate is the final layer that ties the s’mores flavor together.
Step 11: Let Everything Set
Allow the layered dessert to rest for at least 30 minutes. This gives the chocolate time to firm and the entire slab time to become easier to cut.
Do not rush this stage. Cutting too early can drag the chocolate through the marshmallow and create messy edges.
Room temperature works well. Once the surface feels set, you can move on to slicing.
Step 12: Prepare the Knife
Run a sharp knife under hot water. Dry it thoroughly before making the first cut.
The warm blade moves more cleanly through sticky marshmallow and chocolate. Repeat the process between cuts if the knife becomes coated.
A clean blade produces much neater rectangles. This small trick makes the finished pieces look much more polished.
Step 13: Cut Into Sushi-Sized Pieces
Slice the dessert into small rectangular pieces. Keep the size compact enough to feel like playful dessert sushi rather than full-size cereal bars.
Work slowly so the layers stay aligned. Use straight downward cuts instead of sawing aggressively.
If the edges become sticky, clean and warm the knife again. Patience creates cleaner pieces.
Step 14: Serve With Extra Chocolate
Arrange the pieces on a platter. Place extra melted chocolate alongside for dipping.
Serve within a few hours when possible. The marshmallow is still soft and the graham crackers retain the most crunch during that window.
The dessert is ready as soon as the pieces are arranged. No additional chilling or cooking is required.
Tips for the Best S’mores Sushi
Grease the pan generously. Sticky marshmallow mixtures are much easier to manage when every corner has a thin coating of butter or spray.
Keep the saucepan heat low. Gentle heat melts marshmallows smoothly and gives you more control.
Work quickly once the cereal goes in. The mixture becomes firmer as it cools, so fast transfer and pressing create a more even base.
Let the base cool before adding Fluff. That protects the layered look and prevents the marshmallow from melting into the cereal.
Use a warm knife for slicing. Clean edges make the sushi shape much more obvious.
And serve relatively fresh when possible. The contrast between crisp cereal, soft marshmallow, crunchy graham, and chocolate is strongest early on.
Why You Shouldn’t Over-Press the Base
Pressing is necessary, but too much pressure can make the cereal layer hard and dense. You want it stable enough to slice while still keeping that light crispy texture.
Use just enough pressure to create an even surface. Think firm and controlled rather than compacted.
A slightly softer base also makes the final dessert easier to bite. It should bend just a little rather than shatter or become tough.
The marshmallow binder will continue holding everything together as it cools. You do not need to force the cereal into a brick.
Peanut Butter Variation
Peanut butter works beautifully with chocolate and marshmallow. You can swirl some into the marshmallow Fluff layer for a richer center.
Another option is drizzling melted peanut butter over the chocolate. This gives the top a striped, dessert-shop look.
Keep the peanut butter as an accent rather than completely replacing the marshmallow. The crispy, fluffy, chocolatey balance should remain.
This variation makes the dessert feel especially indulgent. The salty nuttiness is a strong contrast to the sweet layers.
White Chocolate Variation
White chocolate can replace the semisweet chocolate chips. The result becomes sweeter and more vanilla-forward.
Melt and drizzle it exactly as you would the semisweet version. Let it set fully before slicing.
Sprinkles can be scattered over the white chocolate while it is still wet. This is especially fun for birthday parties.
The pale chocolate also makes the dessert look completely different. It is an easy way to create another version without changing the base.
Caramel Variation
Salted caramel sauce can be drizzled over the top layer. It adds a buttery, sweet-salty flavor that works naturally with graham crackers and chocolate.
Use it as a finishing drizzle rather than completely replacing the chocolate. The semisweet layer still gives the dessert its classic s’mores identity.
Caramel can also be served on the side for dipping. That gives people a choice between chocolate and caramel.
This version feels especially rich. Small pieces work best because every bite has plenty of sweetness.
How to Use Regular Marshmallows
Regular marshmallows can replace minis. Cut them into smaller pieces before adding them to the saucepan.
Smaller pieces melt faster and more evenly. Large whole marshmallows can leave stubborn lumps if the outside melts before the center.
Keep stirring over low heat until the mixture is smooth. Patience is more important than increasing the temperature.
Once fully melted, continue exactly as written. The cereal does not need any other adjustment.
What to Do Without Marshmallow Fluff
Extra marshmallow mixture can replace the Fluff when necessary. Prepare more of the butter-and-marshmallow style mixture and spread it over the cereal base.
Work quickly because homemade melted marshmallow sets faster than Fluff. That means the graham crackers should be ready before you start spreading.
The texture will not be identical. Fluff gives the smoothest, softest layer.
Still, the overall flavor remains very close to classic s’mores. Chocolate and graham cracker continue to provide the familiar finish.
Serving S’mores Sushi at Parties
Arrange the pieces in neat rows on a large platter. The sushi-style shape is easiest to appreciate when the rectangles are displayed individually.
Place a small bowl of melted chocolate nearby. Guests can dip each piece or drizzle extra chocolate over the top.
The dessert is especially good for birthday parties because the shape feels interactive. Kids can pick up a piece easily without needing forks.
Adults tend to enjoy it just as much. The nostalgic s’mores flavor usually wins people over before they have time to question the name.
Serving for Summer Gatherings
Because there is no oven, this dessert is especially useful on hot days. Only a few minutes of low stovetop heat are needed.
Make the base earlier, let it set, and slice shortly before serving. The kitchen stays much cooler than it would with a baked dessert.
The marshmallow-and-chocolate combination still feels festive enough for a summer party. You get all the campfire nostalgia without standing beside an actual fire.
Serve with cold drinks and keep the platter out only as long as needed. Warm weather can soften the chocolate more quickly.
Why Fresh Is Best
The cereal has its best crispness shortly after the dessert is assembled. Over time, moisture from the marshmallow layers gradually softens the texture.
The graham crackers also begin losing some of their crunch during storage. That is completely normal.
Serving within a few hours gives you the strongest contrast between every layer. This is when the dessert feels most dynamic.
That does not mean leftovers are bad. They simply become softer and chewier.
Storage
Store leftover S’mores Sushi in an airtight container at room temperature. The texture stays best for about 2 days.
The pieces can still be enjoyable into a third day if kept properly sealed. Expect the graham cracker layer to soften somewhat over time.
Keep the container tightly closed. Exposure to air can make some parts dry while other parts become sticky.
Avoid stacking without separation if the chocolate is still soft. Let it set completely first.
Humid Weather Storage
Very humid weather can soften the dessert more quickly. In that situation, the refrigerator can help stabilize the layers.
Chilling may firm the chocolate and marshmallow more than room-temperature storage. Let the pieces sit briefly before eating if they feel too firm.
Fresh serving is still the preferred option. Refrigeration is mainly useful when humidity becomes a problem.
Keep the container sealed even in the refrigerator. This protects the dessert from absorbing other odors.
Freezing S’mores Sushi
Freezing is not the preferred storage method. Marshmallow layers can become unusually chewy after thawing.
If you absolutely need to freeze the pieces, let them set first so the chocolate is firm. Freeze uncovered briefly before wrapping tightly.
Thaw at room temperature for about 30 minutes before serving. Expect the texture to differ from a fresh batch.
Use freezing only when necessary. Room-temperature storage produces a much better result.
Frequently Asked Questions
Can I Use Regular Marshmallows Instead of Mini Marshmallows?
Yes. Cut regular marshmallows into smaller pieces before melting.
The smaller pieces melt faster and more evenly. Stir constantly over low heat until completely smooth.
How Long Does S’mores Sushi Keep?
It is best during the first 2 days when stored in an airtight container at room temperature. It can remain enjoyable for up to about 3 days, though the graham crackers become softer.
Keep the container tightly closed. Fresh texture is always the strongest.
Can I Freeze S’mores Sushi?
Freezing is not recommended because the marshmallow texture can become chewy after thawing. Fresh or short-term room-temperature storage is better.
If freezing is unavoidable, set the chocolate first, wrap tightly, and thaw at room temperature for about 30 minutes. Expect a softer texture.
What Can I Use Instead of Marshmallow Fluff?
Extra melted marshmallow mixture can be used. Spread it over the cereal base while it is still workable.
Move quickly because it firms faster than Fluff. Add the graham crackers soon after spreading.
Why Is My Cereal Base Too Hard?
It may have been pressed too firmly. Compacting the cereal too aggressively can make the finished layer dense.
Use enough pressure to create an even base but stop before crushing the cereal. The marshmallow will hold it together as it cools.
Why Is Everything Sticking to My Knife?
The marshmallow layers are naturally sticky. A warm knife cuts through them more cleanly.
Run the blade under hot water and dry it between cuts. Repeat whenever the knife becomes coated.
Can I Use White Chocolate?
Yes. White chocolate can replace the semisweet chips.
Melt it until smooth and drizzle or spread it over the graham cracker layer. Sprinkles can be added before it sets.
Can I Add Peanut Butter?
Yes. Swirl peanut butter into the Fluff or drizzle melted peanut butter over the top.
Keep the amount balanced so the marshmallow and chocolate still remain noticeable. The nutty flavor works especially well with semisweet chocolate.
Nutritional Information
The nutritional profile of S’mores Sushi depends on the specific butter, marshmallows, cereal, Fluff, graham crackers, chocolate, and any extra toppings used. Additional chocolate for dipping will naturally make each serving richer.
Peanut butter, white chocolate, caramel, sprinkles, or other variations also change the final values. Portion size matters too because the dessert can be cut into many different-sized rectangles.
This is best enjoyed as a sweet treat rather than something built around nutritional goals. The recipe is designed around marshmallow, cereal, chocolate, and graham cracker indulgence.
Smaller pieces make it easy to enjoy a little at a time. That bite-sized format is one of the reasons the dessert works so well at parties.
The Dessert That Stole the Birthday Table
I still remember the first platter disappearing faster than I expected. I had made the pieces because I thought the sushi shape would amuse the kids, but the adults seemed just as curious.
Within minutes, people were asking what was inside. The answer sounded almost too simple: cereal, marshmallow, graham crackers, and chocolate.
That simplicity was exactly what made the reaction so funny. Nothing about the ingredients was unfamiliar, but presenting them in a new shape made the whole dessert feel different.
The kids loved being able to pick up individual pieces. The grown-ups seemed to love the fact that every bite tasted like a campfire dessert without the smoke, fire, or sticky marshmallow strings.
After that party, S’mores Sushi became one of those recipes I kept returning to whenever I needed something cheerful. It always feels a little playful before anyone even takes a bite.
Sometimes I keep it completely classic. Other times I add peanut butter, swap in white chocolate, or let sprinkles turn the platter into something even more colorful.
Still, I rarely change the core layers. Crispy cereal, soft marshmallow, graham cracker crunch, and chocolate already give the dessert exactly the combination I want.
The waiting is still the hardest part. Thirty minutes is not very long, but it feels longer when a pan of chocolate-covered marshmallow treats is sitting on the counter.
Once the knife finally comes out, though, the whole thing becomes part dessert and part activity. Warm blade, neat rectangles, a platter, and a little bowl of melted chocolate are all it takes.
That is why S’mores Sushi has stayed one of my favorite no-bake party treats. It is nostalgic without being ordinary, playful without being complicated, and simple enough to make whenever a little dessert magic sounds like a good idea.
S’mores Sushi Recipe

Playful, sweet, and packed with classic s’mores flavor, this S’mores Sushi layers chewy Rice Krispies, marshmallow Fluff, crunchy graham crackers, and melted semisweet chocolate into fun bite-sized pieces. It is an easy American dessert with a whimsical presentation that makes each piece especially fun to serve and share.
Recipe Details
- Prep Time: 15 minutes
- Cook Time: 10 minutes
- Total Time: 25 minutes
- Course: Dessert
- Cuisine: American
- Servings: 12 servings
- Calories: 220 kcal
Ingredients
For the Rice Krispies Base
- 5 cups Rice Krispies cereal
- 10 oz. mini marshmallows
- ¼ cup butter
For the S’mores Layers
- 1 cup semisweet chocolate chips melted, plus more for serving
- 1 cup crushed graham crackers
- 2 cups marshmallow Fluff
Instructions
Step 1: Melt the Butter and Marshmallows
Add the butter and mini marshmallows to a large saucepan over low heat.
Stir as they melt until the mixture is smooth and evenly combined.
Step 2: Add the Cereal
Stir the Rice Krispies cereal into the melted marshmallow mixture.
Continue mixing until the cereal is thoroughly coated.
Step 3: Form the Base
Transfer the mixture to a greased 9×13-inch baking dish.
Press it evenly into the pan, then let the layer cool.
Step 4: Add the Marshmallow Fluff
Spread the marshmallow Fluff evenly over the cooled Rice Krispies layer.
Cover the surface from edge to edge for an even filling.
Step 5: Add the Graham Crackers
Sprinkle the crushed graham crackers over the marshmallow Fluff.
Distribute them evenly across the entire layer.
Step 6: Finish with Chocolate
Pour the melted semisweet chocolate chips over the graham cracker layer.
Spread the chocolate across the top so the dessert has a rich chocolate finish.
Step 7: Slice into Sushi Pieces
Cut the layered dessert into sushi-sized rectangles.
Use a sharp knife for cleaner slices.
Step 8: Serve
Arrange the pieces for serving.
Serve with extra melted chocolate on the side for dipping.
Notes
- Use a sharp knife to cut clean slices.
- Store leftovers in an airtight container.
- For best results, serve fresh.
Serving Suggestions
Serve S’mores Sushi fresh after cutting it into small sushi-sized rectangles. The chewy Rice Krispies base, fluffy marshmallow layer, crisp graham crackers, and melted chocolate create the familiar flavors of s’mores in a playful new shape.
This recipe makes 12 servings and is especially fun to serve with extra melted semisweet chocolate for dipping. Cutting with a sharp knife helps keep the individual pieces neat and easy to handle.
For the best overall texture, serve the pieces fresh after assembling.
Storage
Store leftovers in an airtight container.
For the best texture, enjoy the S’mores Sushi while fresh.
Marshmallow Tip
Use 10 oz. mini marshmallows with ¼ cup butter for the Rice Krispies base.
Melt them together over low heat before adding the cereal.
Cereal Tip
Use 5 cups Rice Krispies cereal and stir until every piece is well coated in the melted marshmallow mixture.
Fluff Tip
Spread 2 cups marshmallow Fluff evenly over the cooled cereal layer.
Graham Cracker Tip
Use 1 cup crushed graham crackers and sprinkle them over the marshmallow Fluff.
Chocolate Tip
Use 1 cup melted semisweet chocolate chips for the top layer.
Prepare additional melted chocolate for serving if desired.
Cutting Tip
Use a sharp knife to cut the dessert into clean sushi-sized rectangles.
Serving Tip
Serve fresh with extra melted chocolate for dipping.

Fernando is the creator and writer behind the food blog Eating with your Hands. Living and working in cities like Paris, Barcelona, and Berlin, and being married to a Canadian foodie, has given Fernando a passion and interest in food and inspired him to run EWYH.